– 6 –
EN
Setup
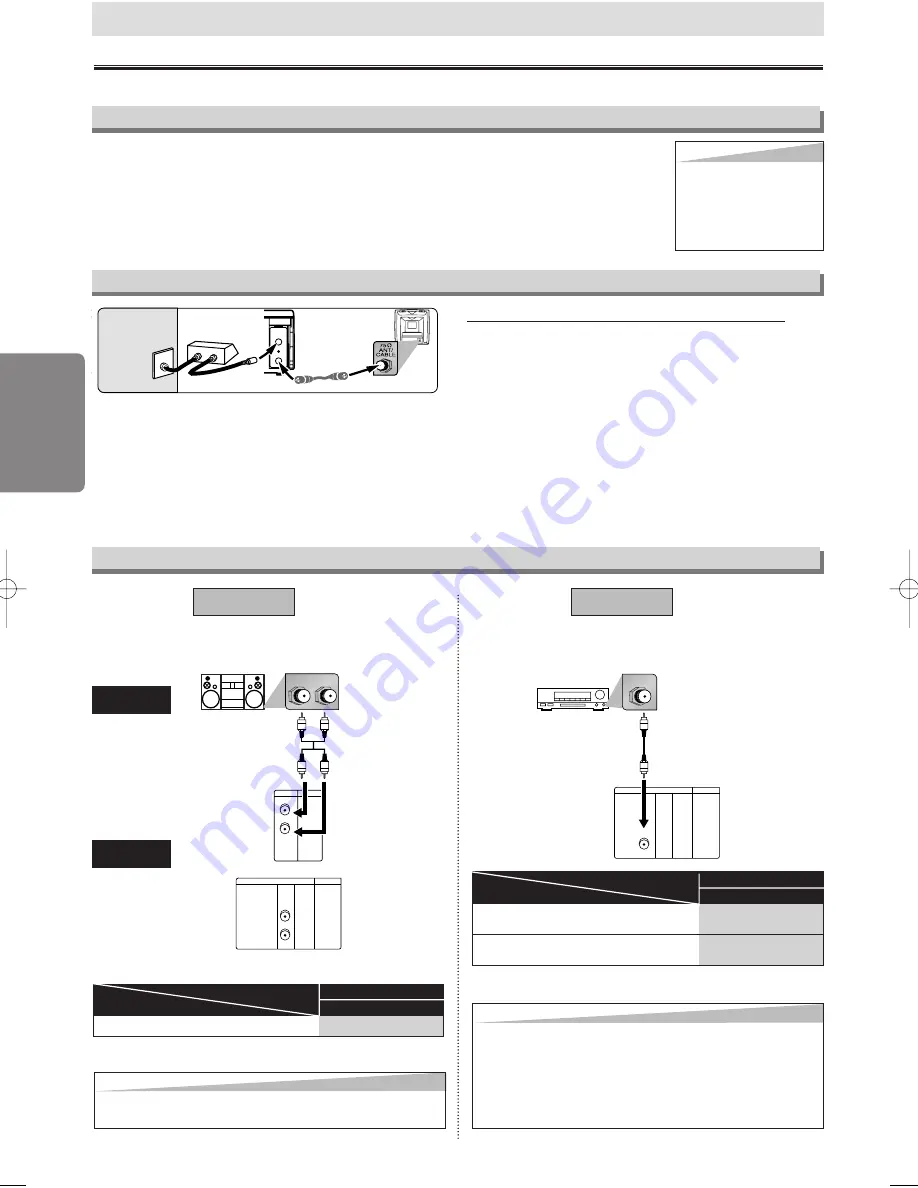
Hint for Cable Box or Satellite Box
L
R
VCR
DVD/VCR
AUDIO OUT
L
R
DIGITAL
AUDIO OUT
or
AUDIO
OUT
DVD
S-VIDEO
OUT
AUDIO OUT
L
R
DVD/VCR
Stereo system
DIGITAL
AUDIO OUT
COAXIAL
AUDIO
OUT
DVD
S-VIDEO
OUT
COAXIAL
AUDIO OUT
DVD/VCR
AUDIO
DVD/VCR
Method 1
Analog audio
input jacks
Digital audio
input jack
AUDIO OUT
(Analog)
DIGITAL
AUDIO OUT
Method 2
Connection to an Audio System
Audio cable
(supplied)
Audio Coaxial
Digital cable
(commercially
available)
Dolby Digital decoder,
MD deck or DAT deck
BITSTREAM
PCM
SETUP > QUICK >
DOLBY DIGITAL
PCM
SETUP > QUICK >
DOLBY DIGITAL
Connecting to a Dolby Digital decoder
for Dolby Digital audio output.
Connecting to the other equipment (an MD deck
or DAT deck etc.) without Dolby Digital decoder.
* To complete these settings, refer to pages 20-21.
Hint
Hint
• The audio source on a disc in a Dolby Digital 5.1 channel surround
format cannot be recorded as digital sound by an MD or DAT deck.
• By hooking this unit up to a Multi-channel Dolby Digital
decoder, you can enjoy high-quality Dolby Digital 5.1
channel surround sound as heard in the movie theaters.
• Playing a DVD using incorrect settings may generate
noise distortion and may also damage the speakers.
Connecting to Stereo System.
Setting
Connection
* To complete these settings, refer to pages 20-21.
Connection
Setting
(DVD mode only)
If channel 3 is already occupied for broadcasting,
1) Set your TV to channel 4.
2) Insert a pre-recorded tape into this unit.
3) Press
[SOURCE]
on the unit so that the
VCR OUTPUT light is lit.
• If noise appears on the TV screen, press
[VCR/TV]
on the remote control.
4) Press
[PLAY
B
]
once.
5)
After a few seconds, hold [PLAY
B
] on
the unit for 3 seconds.
• The RF output channel will change to channel 4
from channel 3 and you will see a playback pic-
ture.
• When a picture does not appear on the TV
screen, repeat step 4).
6) Press
[STOP
C
]
to stop playback.
RF Output Channel
Connections
Please refer to “Basic TV Connection” on the front page before you use this unit.
Hint
Hint
• The RF output channel may
not change when you adjust
tracking during playback. In this
case, stop the playback, and
start the playback again. After
that, hold
[PLAY
B
B
]
on the
unit for 3 seconds again.
Setup
Select this connection when you want to view or record a
scrambled channel. With this connection, channels cannot be
changed on the unit. You can view or record ONLY the chan-
nels you have selected on the cable box or the satellite box.
• While you are recording, only the recorded channel can be
viewed.
To select channels of the cable box or satellite box
1) Turn on the unit by pressing
[STANDBY-ON]
, then press
[VCR/TV]
.The “POWER” light on the front panel will
appear, then press
[SKIP/CH.
G
G
/
K
K H
H
/
L
L
]
to select chan-
nel 3 or 4 (the same channel as the output channel of the
cable box or satellite box).
• If you use the channel 4, you need to change the unit’s
RF output to channel 4. Refer to “RF Output Channel”.
2) At the TV, select channel 3 or 4 (the same channel as you
have selected at step 1).
3) On the cable box or satellite box, select the channel you
want to view or record.
ANT-OUT
ANT-IN
RF cable
(supplied)
(Back of DVD/VCR)
IN
OUT
(Back of TV)
Satellite or
Cable TV
signal
(Cable box or
Satellite box)
Hint
Hint
• Playing a DVD using incorrect settings may generate
noise distortion and may also damage the speakers.
H98K3CD_EN.qx3 05.11.19 6:05 PM Page 6
Содержание CMWD2205
Страница 26: ... 26 EN MEMO ...
Страница 54: ... 26 FR MÉMO ...


