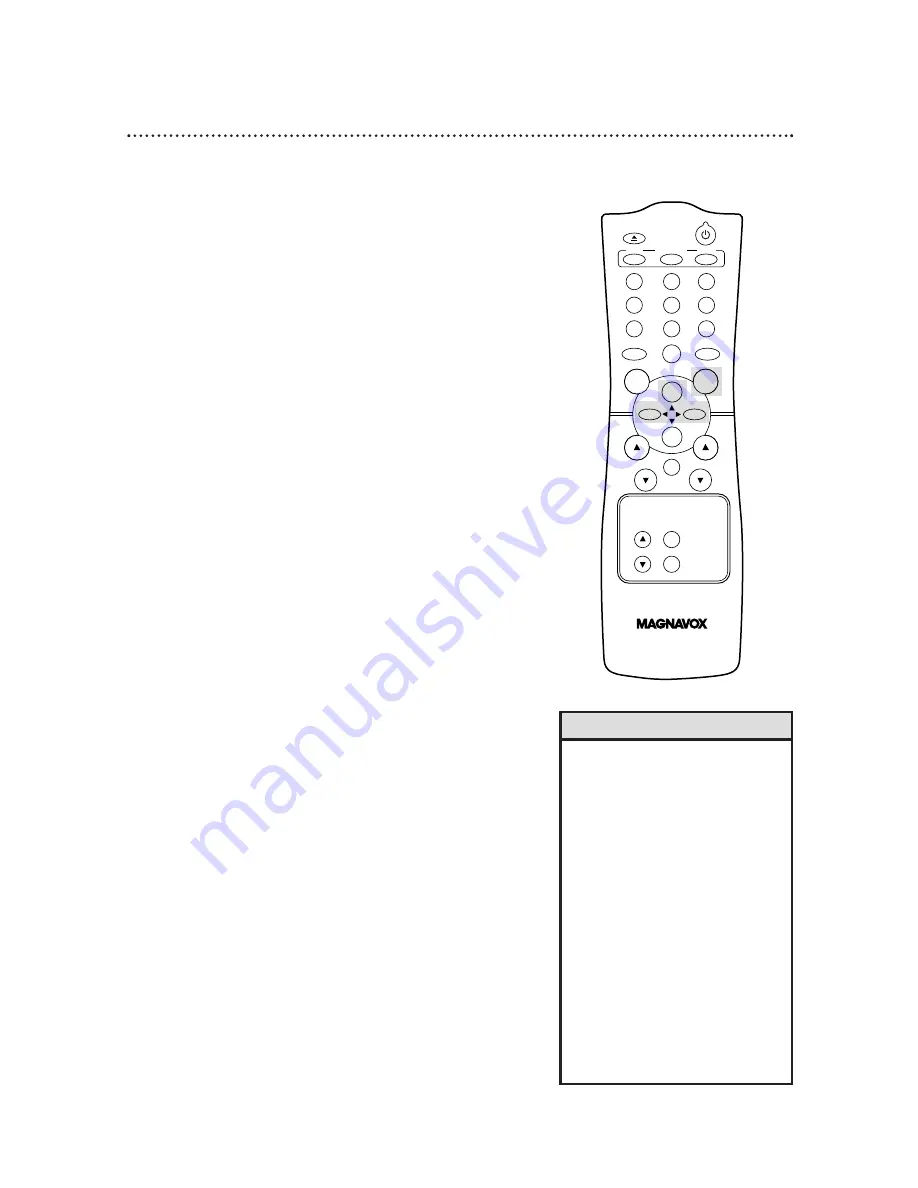
Magnavox CC19C1MG - 19

POWER

EJECT

SPEED

MEMORY

1

2

3

4

5

6

7

8

9

0

CH.

VOL.

SLEEP/

WAKE UP

ALT.CH

REW

PLAY

F.FWD

REC

/OTR

PAUSE

/STILL

STOP

MUTE

TRACKING

MENU

STATUS/EXIT

CLEAR

Playback Options  41

Forward and Reverse Searching (SP/LP/SLP)

1

During tape playback, press and release the F.FWD/

B

button or

the REW(ind)/

{

button. A fast forward or reverse picture search

will begin.

2

To return to normal playback, press the PLAY/

button.

Super High Speed Searching (LP/SLP)

1

During tape playback, press the F.FWD/

B

button or the

REW(ind)/

{

button, then press again. The TV/VCR will now

search in super high speed. 
Press the F.FWD/

B

button or the REW(ind)/

{

button repeatedly

to switch between regular and super high speed searching.

2

To return to normal playback, press the PLAY/

button.

Viewing a Still Picture

1

During tape playback, press the PAUSE/STILL button. A still pic-
ture will appear on the screen. The noise lines will move each
time you press the PAUSE/STILL button.

2

To release the still picture and return to normal playback, press
the PLAY/

button.

•  Still mode will automatically switch to

Stop mode after five minutes to pro-
tect the TV/VCR and the tape from
damage.

•  SP/LP/SLP means this feature will

work with tapes recorded in Standard
Play, Long Play, or Super Long Play.
For details about tape speed, see
page 29.

•  LP/SLP means this feature will work

with tapes recorded in Long Play and
Super Long Play.  For details on tape
speed, see page 29.

•  During forward and reverse search-

ing, horizontal noise bars will appear
on the TV/VCR screen.

•  Tapes recorded in SLP speed will

have the clearest picture during for-
ward and reverse searching and Still
mode.

Helpful Hints

Содержание CC19C1MG - 19" Combination Tv/vcr

Страница 1: ...TVCR CC13C1MG CC19C1MG Color TV with built in VCR Color TV with built in VCR Owner s Manual Owner s Manual...

Страница 2: ...easy access to accessories from our convenient home shopping network And most importantly you can count on our uncompromising com mitment to your total satisfaction All of this is our way of saying w...

Страница 3: ...ween the equipment and receiver 3 Connect the equipment into an outlet on a circuit different from that to which the receiver is connected 4 Consult the dealer or an experienced radio TV technician fo...

Страница 4: ...s 24 25 On Screen Status Displays 26 Reminder 27 Basic Operations Playing 28 Recording 29 Recording Options One Touch Recording 30 Rerecording Tape Duplication 31 Timer Recording 32 35 Defeat Recordin...

Страница 5: ...leakage that may result in bodily injury or damage to the unit Install ALL batteries correctly with the and markings on the battery aligned as indicated on the unit Do not mix batteries for example o...

Страница 6: ...channel 03 or 04 Then select channels at the Cable Box 1 Hook up your TV VCR using one of the connections shown A B ANT ANT Rod Antenna not supplied Hooking Up Your TV VCR With an Indoor Antenna To i...

Страница 7: ...bles are not supplied Helpful Hints Crooked Pin Straight Pin Bent pin Plug Cable Hooking Up Your TV VCR to Another Video Source VCR or Camcorder You may need this connection if you want to copy tapes...

Страница 8: ...enna or cable to the ANT enna jack on the TV VCR then press the F FWD B button again You may need to follow the steps on page 10 instead CONNECTANTENNAORCABLE TO TVCR THEN PRESS B TO END PRESS EXIT SE...

Страница 9: ...s the MENU button 2 Press the PLAY button or the STOP button to select PRIM SETUP Then press the F FWD B button PRIMARY SETUP SELECT LANGUAGE AUTO PROGRAMMING CH MEMORY REVIEW VOLUME BAR ON SET CLOCK...

Страница 10: ...to select AUTO PROGRAMMING then press the F FWD B button AUTO CH PROGRAMMING will appear on the screen The TV VCR distinguishes between TV channels and cable channels auto matically and the TV VCR wi...

Страница 11: ...ear on the screen 4 If all the programmed channels don t fit on the screen press the F FWD B button If you do not press the F FWD B button within 10 seconds the remaining channels will appear on the s...

Страница 12: ...lock according to your Time Zone Cable Box users must set the clock manually To set the clock manually follow the steps on pages 12 13 To set the clock using Automatic PBS Channel Selection follow the...

Страница 13: ...CK TIME 09 30 PM MONTH TO CORRECT PRESS CLEAR TO END PRESS EXIT 6 Press two Number buttons for the month two Number buttons for the day and two Number buttons for the year For example for July 1 2001...

Страница 14: ...1 Press the MENU button 2 Press the PLAY button or the STOP button to select PRIM SETUP Then press the F FWD B button PRIMARY SETUP SELECT LANGUAGE AUTO PROGRAMMING CH MEMORY REVIEW VOLUME BAR ON SET...

Страница 15: ...f for several minutes When you turn on the TV VCR again the clock will be set To display the time on the TV VCR screen press the STATUS EXIT but ton Details are on page 26 You cannot use the AUTO CLOC...

Страница 16: ...Press the MENU button 2 Press the PLAY button or the STOP button to select PRIM SETUP Then press the F FWD B button PRIMARY SETUP SELECT LANGUAGE AUTO PROGRAMMING CH MEMORY REVIEW VOLUME BAR ON SET CL...

Страница 17: ...omati cally If the TV VCR finds the PBS channel the time will appear on the screen If the TV VCR does not find the PBS channel you will be prompted to turn off the TV VCR Leave it off for several min...

Страница 18: ...button PRIMARY SETUP SELECT LANGUAGE AUTO PROGRAMMING CH MEMORY REVIEW VOLUME BAR ON SET CLOCK SELECT KL CHOOSE B TO END PRESS EXIT 3 Press the PLAY button or the STOP button to select SET CLOCK Then...

Страница 19: ...s the STATUS EXIT button 1 Press the MENU button 2 Press the PLAY button or the STOP button to select PRIM SETUP Then press the F FWD B button PRIMARY SETUP SELECT LANGUAGE AUTO PROGRAMMING CH MEMORY...

Страница 20: ...GHTNESS or to return to a previous menu F FWD Fast Forward Button When tape playback is stopped press to fast forward the tape at high speed During play back press to fast forward the tape while the p...

Страница 21: ...ack Connect your antenna or cable here Details are on page six Antenna Hole Connect the stem of an indoor antenna here Details are on page six AC Power Cord Connect to a standard AC outlet to supply p...

Страница 22: ...turn to the previous volume level 22 Remote Control Buttons VOL ume o p Buttons Press to adjust the sound level If you press the VOL ume o p buttons when the sound is muted the sound will be restored...

Страница 23: ...he status display Details are on page 26 Press to remove the menu STOP Button Press to stop the tape Press to select an item in the menu PAUSE STILL Button During recording press to temporarily stop t...

Страница 24: ...Press the REW ind button or the F FWD B button to adjust the picture control Refer to the chart on page 25 4 When you finish press the STATUS EXIT button The menus on page 25 will disap pear if you do...

Страница 25: ...n to increase a picture control AUDIO VIDEO STOP EJECT REW PLAY F FWD REC OTR CHANNEL VOLUME POWER EARPHONE TO ADJUST PRESS B TO ADJUST PRESS B TO ADJUST PRESS B Press the STOP button Press the PLAY b...

Страница 26: ...isplay will appear for five seconds After five seconds only the counter will remain on the screen Portions of the status display also may appear when you press other function buttons If you select STA...

Страница 27: ...OFF by following the steps below 1 Press the MENU button 2 Press the PLAY button or the STOP button to select REMINDER 3 Press the REW ind button or the F FWD B button to select ON or OFF Each press...

Страница 28: ...ture Helpful Hints Follow the steps below to play a tape 1 Insert a tape in the TV VCR The power will come on If the tape s record tab is missing playback should start automatically 2 If playback does...

Страница 29: ...nnel o p buttons or the Number buttons to select the channel you want to record You can not change channels during recording 4 Press the REC ord OTR button once to start recording The Record light wil...

Страница 30: ...ANCEL PRESS CLEAR 4 To stop an OTR before recording is finished press the STOP EJECT button on the TV VCR Or press the REC ord OTR button then press the CLEAR button then press the STOP button on the...

Страница 31: ...t will play your tape Insert a prerecorded tape in the source unit If playback begins press the STOP button on the unit 3 The TV VCR will record your tape Insert a blank tape in the TV VCR Make sure t...

Страница 32: ...R will record a TV program on any day you choose up to 12 months away DAILY The TV VCR will record every day from Monday to Friday starting at the same time and recording the same channel for the same...

Страница 33: ...ll appear on the screen for a few seconds Then information about the program in that position will appear on the screen If this happens press the STATUS EXIT but ton Then use the Number buttons to sel...

Страница 34: ...TIME OFF 11 00 PM REC SPEED SLP START DATE 07 10 2001 TUESDAY TO CORRECT PRESS CLEAR TO END PRESS EXIT 10 Press the STATUS EXIT button PROGRAM WAS COM PLETED PLEASE TURN OFF FOR TIMER RECORDING will a...

Страница 35: ...recording If you do not press a button within 10 sec onds information about the next timer recording will appear auto matically This will continue until all positions have been displayed Then the menu...

Страница 36: ...l not occur You can not program a timer recording if DEFEAT RECORDING is ON To set DEFEAT RECORDING to OFF repeat steps 1 2 above At step 3 press the PLAY o button or the STOP p button to select DEFEA...

Страница 37: ...while the tape is rewinding The TV VCR will stay in Repeat Play mode until you set ONE TIME PLAY to ON even if you turn off the TV VCR To set ONE TIME PLAY to ON follow steps 1 2 above Then press the...

Страница 38: ...and B on a tape over and over again 1 Insert a tape in the TV VCR 3 Press the PLAY button or the STOP button to select VCR SETUP then press the F FWD B button 5 Press the F FWD B button repeatedly so...

Страница 39: ...he tape then press the MEMORY button to set the end position B The length of time between the start position A and the end position B must be at least three minutes 9 The TV VCR will immediately rewin...

Страница 40: ...ins on the screen press the MEM ORY button so that M appears on the screen To erase a real time counter memory press the MEMORY button so that the M disappears from the screen 01 08 PM STOP CH10 SLP 1...

Страница 41: ...back press the PLAY button Viewing a Still Picture 1 During tape playback press the PAUSE STILL button A still pic ture will appear on the screen The noise lines will move each time you press the PAUS...

Страница 42: ...ntal Guidelines You will complete steps 1 7 twice choosing Movie Ratings at step 5 the first time then choosing Parental Guidelines at step 5 the second time You can not view tape playback if the rati...

Страница 43: ...additional sub ratings will appear If you select the rating category such as TV PG and turn it on or off the specific sub ratings such as V for Violence will turn on or off automatically You can alwa...

Страница 44: ...the Confirm Code space Your new access code should be recorded You will return to the SMARTLOCK menu 6 Press the STATUS EXIT button 1 6 2 4 5 3 To protect the privacy of the access code an X will app...

Страница 45: ...VCR PROGRAM VCR SETUP CAPTION PRESS B 1 3 2 BLOCKED RATINGS Movie Ratings G PG 13 NC 17 Parental Guidelines TV Y7 TV G D L S V TV PG x x TV 14 x x x x TV MA x x x RATING EXPLANATIONS For Movie Ratings...

Страница 46: ...programming To set BLUE BACKGROUND to ON or OFF follow the steps below 1 Press the MENU button PRIM SETUP VCR PROGRAM VCR SETUP CAPTION REMINDER BRIGHTNESS PRESS B VCR SETUP ONE TIME PLAY ON REPEAT PL...

Страница 47: ...he STATUS EXIT but ton If you start a recording after you set the Sleep Timer the Sleep Timer will be cancelled Helpful Hints 2 Press the PLAY o o button or the STOP p p button to select SLEEP Then pr...

Страница 48: ...o come on 1 Press the SLEEP WAKE UP button To cancel the Wake Up Timer press the SLEEP WAKE UP button Press the PLAY o button or the STOP p button to select WAKE UP Then press the REW ind s s button o...

Страница 49: ...the VOL ume o p buttons or the MUTE button Volume Bar 49 3 Press the PLAY button or the STOP button to select VOLUME BAR then press the F FWD B button Each press of the F FWD B button will turn the VO...

Страница 50: ...er to your area s TV program listings for shows with closed captions 1 Press the MENU button 2 Press the PLAY button or the STOP button to select CAPTION 3 Press the REW ind button or the F FWD B butt...

Страница 51: ...osed captions follow steps 1 2 on page 50 At step 3 press the REW ind button or the F FWD B button to select OFF Press the STATUS EXIT button When you change channels the closed captions may be delaye...

Страница 52: ...POWER OFF will appear on the screen The TV VCR will turn itself off when the tape has finished rewinding If a real time counter memory is set the TV VCR may only rewind the tape to the point at which...

Страница 53: ...Input The channel to which you set your TV VCR during dubbing The line input channel is always channel 00 A V IN Mode a TV VCR operation OTR One Touch Recording a timed recording that starts immediat...

Страница 54: ...he recording start and stop times correctly Details are on pages 32 35 Midnight is 12 a m Noon is 12 p m Make sure the TV VCR power is off Set the clock Details are on pages 12 17 Put a tape in the TV...

Страница 55: ...ontrol directly at the TV VCR s remote sensor Details are on pages five and 20 Remove all obstacles between the remote control and the TV VCR Inspect and replace the batteries in the remote control De...

Страница 56: ...Dimensions 15 3 4 H x 15 3 16 W x 14 13 16 D CC13C1MG 400mm x 386mm x 377mm 19 11 16 H x 19 7 16 W x 18 5 16 D CC19C1MG 500mm x 494mm x 465mm Weight 24 3 lbs 11 0 kg CC13C1MG Weight 44 1 lbs 20 0 kg C...

Страница 57: ...nsumer Electronics In countries where Philips Consumer Electronics does not distribute the prod uct the local Philips service organization will attempt to provide service although there may be a delay...

Страница 58: ...2 number buttons 22 one touch recording 30 pause still button 23 41 picture adjusting 24 25 play button 20 22 playback options 41 playing 28 power button 20 22 cord 7 21 real time counter memory 40 re...

Страница 59: ......

Страница 60: ...Johnson Highway P O Box 555 Jefferson City TN 37760 1 800 851 8885 VHS Cassette Rewinder M61117 Three Cassette Storage Cases plastic Fits VHS and Beta cassettes M61104 Six High grade VHS T 120 Cassett...

Отзывы: