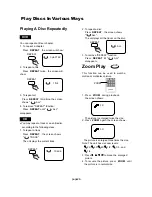


Zoom
We provide both ZOOM in/out and Zoom pan function for the pictures. The "ZOOM" key is used to turn on
or off this function. When this mode is on, any picture will be displayed at the last ratio selected by the user.
A message on the screen will indicate the current Zoom ratio.
If zoom mode is on, "FF" and "FR" keys are used to control the ratio of zoom in/out. With ZOOM mode off, a
picture is scaled to fit the TV screen.
Notes
: During ZOOM function, slideshow transition and image rotation are disabled. TO cancel the ZOOM
function, press the ZOOM key again and resume the slideshow.
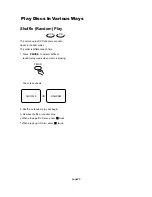
Digest
The "MENU" or "STOP" key is used to display thumbnail size pictures. After it is enabled, up to 12 scaled-
down thumbnail pictures will be displayed on the screen. The "NEXT" and "PREV" keys can be used to
display the next/prev nine pictures in the the Kodak Picture CD.
You can select any of the nine displayed thumbnails by using the Arrow Keys and pressing the "PLAY" key.
The thumbnail will be enlarged to fit the TV screen and the slide show will statr. If you desire to display an
image indefinitely, press the PAUSE key. To view the Next or Previous picture press NEXT or PREVIOUS
keys. To resume the slideshow press the PLAY key.
IMPORTANT NOTE:
Quality of pictures displayed on the screen is highly dependent on the viewing device.
A Kodak Picture CD has the size and shape of a regular CD. You can order a KODAK Picture CD simply by
checking the box on the photofinishing envelope when you drop off a roll of film (35 mm or Advanced Photo
System (APS) color print film) at the time of processing in photo processing outlet displaying "Kodak Picture
CD"sign. When your order is returned, you receive your prints, negatives, and your full roll of pictures safely
stored on your KODAK Picture CD. Each KODAK Picture CD brings you the tools to enhance, share and
manage your pictures on your computer.
Now, you can playback Kodak Picture CDs on XXX DVD players and view your pictures on your TV in the
comfort of your living room.
Playing back your Kodak Picture CD
The new feature enables the decoding of JPEG files from a Kodak Picture CD disk.
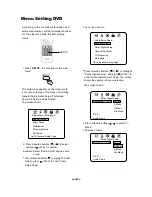
Playback modes
Normal
When a Kodak Picture CD is inserted on a player an automatic slide show is launched. Each picture in the
Kodak Picture CD will be displayed consecutively in a slide-show fashion and will be scaled to fit in the TV
screen. Twelve slideshow transition modes are provided, use "PLAY MODE" key to select.Select transition
mode prior to start of slideshow if one mode is desired for the entire show.
Customer can set transition effects for each picture in a slideshow by using the "PLAY MODE" functions
while viewing a slideshow.The last transition mode selected will be used in any future slideshows.
To display an image indefinitely, press the PAUSE key. To view the Next or Previous picture press NEXT or
PREVIOUS keys. To resume the slideshow press the PLAY key.
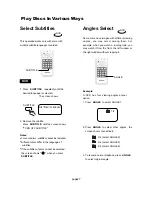
Image Rotation
There are four modes to rotate a picture:"Invert", "Mirror", "Left", and "Right". These operations are allowed
only when a picture is being displayed normally and will be cancelled automatically when a new picture is
displayed.The arrow key is used to select the diferent rotation modes:
Up
Down
Left
Right
-Invert/Normal
-Mirror/Normal
-Turn left
-Turn right
Mode 0: no special transition effect (by default)
Mode 1: wipe from top to bottom
Mode 2: wipe from bottom to top
Mode 3: wipe from left to right
Mode 4: wipe from right to left
Mode 5: wipe from left top to right bottom
Mode 6: wipe from right top to left bottom
Mode 7: wipe from left bottom to right top
Mode 8: wipe from right bottom to left top
Mode 9: wipe from center to top/bottom
Mode 10: wipe from center to left/right
Mode 11: wipe from top/bottom to center
Mode 12: wipe from left/right to center
Mode 13: horizontal blinds
Mode 14: vertical blind
Mode 15: wipe from edge to center
Mode 16: random
page36
Kodak Picture CD Playback
Содержание 17MD255V
Страница 42: ...17MD255V 17 LCD TV WITH BUILT IN DVD PLAYER...