background image

EN-19

○ ○ ○ ○ ○ ○ ○ ○ ○ ○ ○

. English .

User’s Manual

Projector

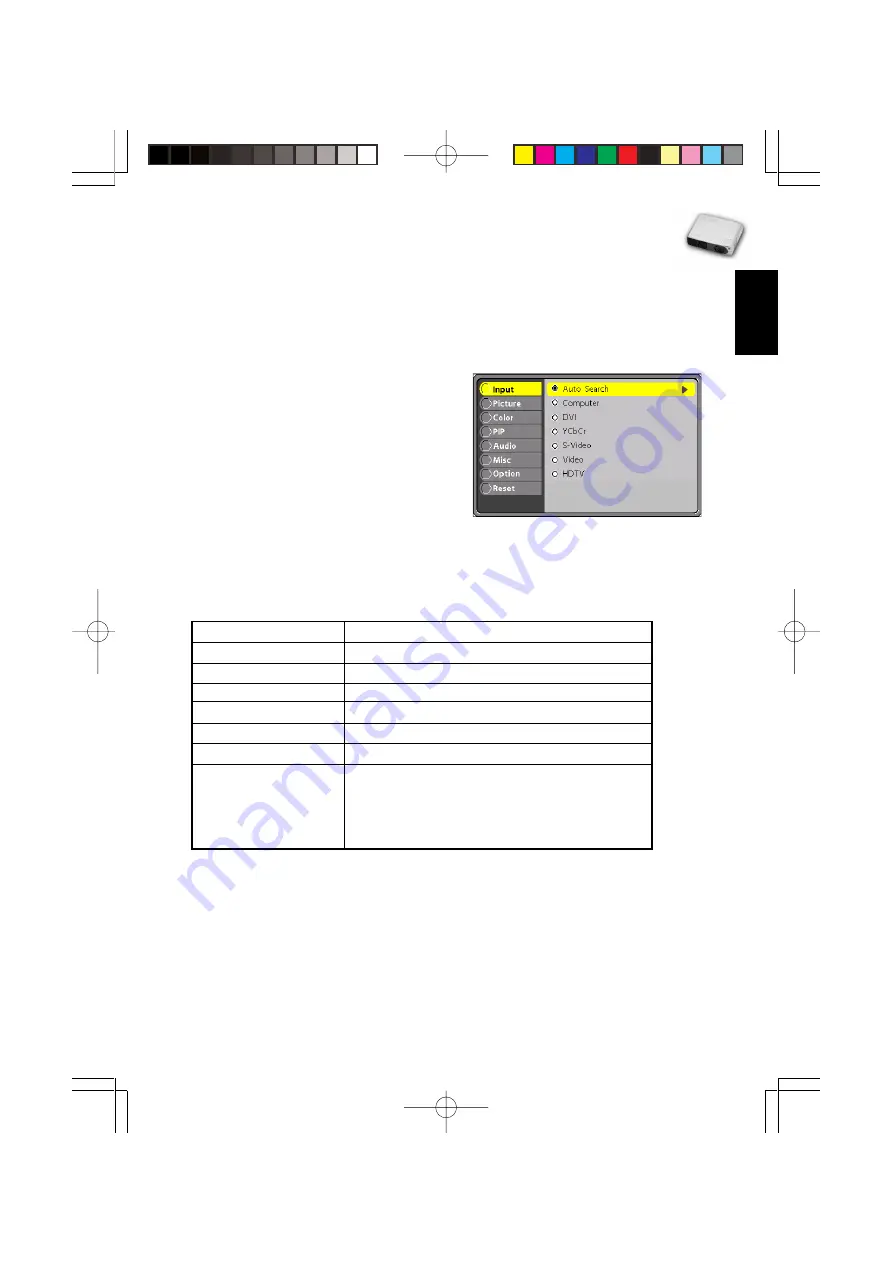
Input Menu

This menu allows to specify the signal source that you wish to project. This is particularly
useful if you have several sources (video and/or computer) connected to your projector.
Changing settings procedure (using either the Projector Control Panel or the Remote
Controller):
1.Press the MENU button to display OSD
   menu.
2.Press the   or    button to select
   INPUT menu.
3.To enter the sub-menu setting, press
   the MENU button once again.
4.Press the   or    button to select the
   desired input source.
5.Press the   button to confirm the input selection.
6.To exit from the current menu, toggle the MENU button.

The following table provides detail of the available sub-menu choices:

Option

Description

Auto Search

Automatically scans the input source.

Computer

Signal from computer. (desktop or notebook)

DVI

Signal from DVI(Digital Visual Interface) device.

YCbCr

Component video signal.

S-Video

S-video signal.

 Video

Composite video signal.

HDTV

Signal from HDTV.
(High Definition TV - a high-resolution TV
standard, which is part of the group of digital
TV standards introduced in USA in late 1998).

Picture Menu

This menu provides precise control of the projected image including:
Brightness, contrast, horizontal position, vertical position, sharpness(just for computer
signal),tracking, sync and auto tracking.

Содержание 1100S

Страница 1: ...ar installation If this equipment does cause harmful interference to radio or television reception detectable by turning the equipment in question off and on the user is encouraged to try to correct t...

Страница 2: ...ht light can damage your eyes Never let children look into the lens when it is on 8 Do not place your hand or objects near the ventilation holes The air coming out is hot 9 Never open any covers on th...

Страница 3: ...b with your bare hands The invisible residue left by the oil on your hands may be shorten the bulb life Use lint free gloves or finger cots are recommended Preventing Internal Heat Build Up After you...

Страница 4: ...Projector Setting Up the Projector Connecting to a Computer Connecting to a Video Source Using the Projector Turning the Audio Visual A V Equipment On and Off Turning the Projector On and Off Focusing...

Страница 5: ...Menus Video Input Signal Picture Menu Other OSD Menus No Input Signal Maintenance Cleaning the Lens Cleaning the Projector Housing Cleaning the Air Filter Replacing the Lamp Technical Specifications A...

Страница 6: ...sensor 9 Speakers 10 Control Panel including Power button 11 AC power socket 12 Rear IR remote controller sensor 13 Security lock receptacle 14 Control port PS2 USB 15 Computer IN DVI I connector 16...

Страница 7: ...uency and phase MENU Displays or hides the on screen control menus VOLUME Increases the volume of the projector s speakers VOLUME Decreases the volume of the projector s speakers Cursor Controller It...

Страница 8: ...as right mouse only functions when your projector is equipped with an optional mouse link cable LASER Fires laser pointer press and hold VOLUME Adjusts the volume of the projector s speakers KEYSTONE...

Страница 9: ...troller buttons can also be used for advanced functions and to access the projector s menu system The remote controller can even be used as a remote mouse for your computer and also includes a laser p...

Страница 10: ...ce such as a stereo Unpacking the Projector When you unpack the projector make sure you have all these components Projector Projector carrying case Remote Controller IR 2 AAA batteries for the Control...

Страница 11: ...Meters 2 5 Meters 4 Meters 5 Meters 8 Meters 10 Meters WIDE 34 3 68 8 83 8 137 2 167 6 274 4 331 4 TELE 25 9 51 8 63 5 103 6 125 6 207 2 251 2 3 When replacing batteries on the Remote Controller take...

Страница 12: ...pable of displaying VGA 640 x 480 SVGA 800 x 600 XGA 1024 x 768 or SXGA 1280 x 1024 resolutions The projector will resize VGA XGA and SXGA inputs for SVGA projection The types of computers supported b...

Страница 13: ...small pins You can connect the projector simultaneously to composite component and S Video sources You can select which video source to project using the control panel or remote controller If the Aut...

Страница 14: ...jector 2 Computer 3 Video source 4 Audio source Turning the Projector On and Off 1 Connect the power cord to the projector 2 Insert the power plug into a wall outlet 3 Remove the projector lens cap 4...

Страница 15: ...is in focus and whether it fits properly on the screen To adjust the focus of the image rotate the focus ring which is the right one on the projector s lens To adjust the size of the image rotate the...

Страница 16: ...mp time counter Lamp LED Amber Flashing The projector is shutting down The fan motor is cooling the lamp for shutdown Do not unplug the power cable or turn the power switch off before the Lamp LED tur...

Страница 17: ...button Note To increase value press the button To decrease value press the button To confirm the selection on the INPUT PICTURE Auto Tracking and RESET Menus press the button 4 During the on screen d...

Страница 18: ...display OSD menus Each OSD menu interface you will see on the screen is depending on the type of input signal Input Signal Type Menu Interface Computer DVI HDTV Input Picture Color PIP Audio Misc Opt...

Страница 19: ...m the input selection 6 To exit from the current menu toggle the MENU button The following table provides detail of the available sub menu choices Option Description Auto Search Automatically scans th...

Страница 20: ...the current menu toggle the MENU button The following table provides detail of the available sub menu choices Sub Menu Description Brightness The higher the setting the brighter the image The lower th...

Страница 21: ...ing 6 After you have done with the adjustment of a sub menu item a To resume changing another sub menu item press the or button b To exit from the current menu toggle the MENU button The following tab...

Страница 22: ...ontroller 1 Press the MENU button to display OSD menu 2 Press the or button to select PIP menu 3 To enter the sub menu setting press the MENU button once again 4 Press the or button to select the sub...

Страница 23: ...ow horizontal position PosiV Adjusts the additional image window vertical position Brightness The higher the setting the brighter the picture The lower the setting the darker the picture Contrast The...

Страница 24: ...utton to select the sub menu item 5 Press the or button to adjust the value of desired sub menu item On the Mute sub menu press the or button to select the desired setting 6 After you have done with t...

Страница 25: ...ct the desired setting 6 After you have done with the adjustment of a sub menu item a To resume changing another sub menu item press the or button b To exit from the current menu toggle the MENU butto...

Страница 26: ...to select OPTION menu 3 To enter the sub menu setting press the MENU button once again 4 Press the or button to select the sub menu item 5 Press the or button to adjust the value of desired sub menu...

Страница 27: ...ically Yes Ceiling projection is active No Ceiling projection is inactive Auto Off Automatically turns off the lamp if the projector does not detect an input signal for specified time period 30 minute...

Страница 28: ...PICTURE menu interface Picture Menu This menu provides precise control of the projected image including brightness contrast saturation tint sharpness and aspect ratio Changing settings procedure usin...

Страница 29: ...higher the setting the stronger color strength The lower the setting the weaker color strength Tint Adjusts the projection between red and green color Sharpness The higher the setting the sharper the...

Страница 30: ...ttached with your projector if you press the MENU button on either the Projector Control Panel or the Remote Controller one of the following on screen display menus will appear on the screen Input Men...

Страница 31: ...covers on the projector except the lamp and air filter covers Dangerous electrical voltages inside the projector can cause severe injury Except as specifically indicated in this Instruction Manual do...

Страница 32: ...om the wall socket 2 Place a protective sheet cloth beneath the projector Turn the projector over so you can see its underside 3 Remove the air filter by pulling the filter tab 4 Clean the air filter...

Страница 33: ...g the lamp 1 Turn off the projector and unplug the power cable 2 Turn the projector over so you can access the lamp cover 3 Remove the access panel screws and open the panel 4 Remove the screws on the...

Страница 34: ...12 157MHz Computer VGA resized SVGA VGA resized SXGA resized Digital Keystone Vertical 15 degree Correction Horizontal 10 degree Picture in Picture PIP Video window on graphics background Audio Syste...

Страница 35: ...5 000 H V 840 VGA VESA 85 Hz 43 269 85 008 H V 832 800 x 600 SVGA VESA 56 Hz 35 156 56 250 H V 1024 SVGA VESA 60 Hz 37 879 60 317 H V 1056 SVGA VESA 72 Hz 48 077 72 188 H V 1040 SVGA VESA 75 Hz 46 875...

Страница 36: ...6 User s Manual Projector Preset Signals Horizontal Vertical Active fH kHz fV Hz Active Pixel Pixel 480p 720 480 31 469 59 940 720p 1280 720 45 000 60 000 1080i 1920 1080 33 716 29 970 HDTV Preset Sig...

Страница 37: ...ojector Control port USB port Projector Computer Mouse cable for USB Mouse cable for PS 2 Control port PS 2 port Projector Computer Mouse Cable Mouse Cable Monitor OUT cable for data Monitor OUT Cable...

Страница 38: ...Manual Projector Connecting the HDTV data OUT Audio Cable Audio OUT HDTV to DVI Cable Green Blue Red HDTV IN OUT OUT IN Projector IN OUT Computer Computer Cable DVI or VGA OUT Connecting the Computer...

Страница 39: ...39 English User s Manual Projector Connecting to a Video Source S Video Component Composite S Video Cable AV Composite Cable R W Y Cb Cr Component Video Cable DVD Player Video out VCR IN OUT Y OUT IN...

Отзывы: