background image

Selecting a Destination

14

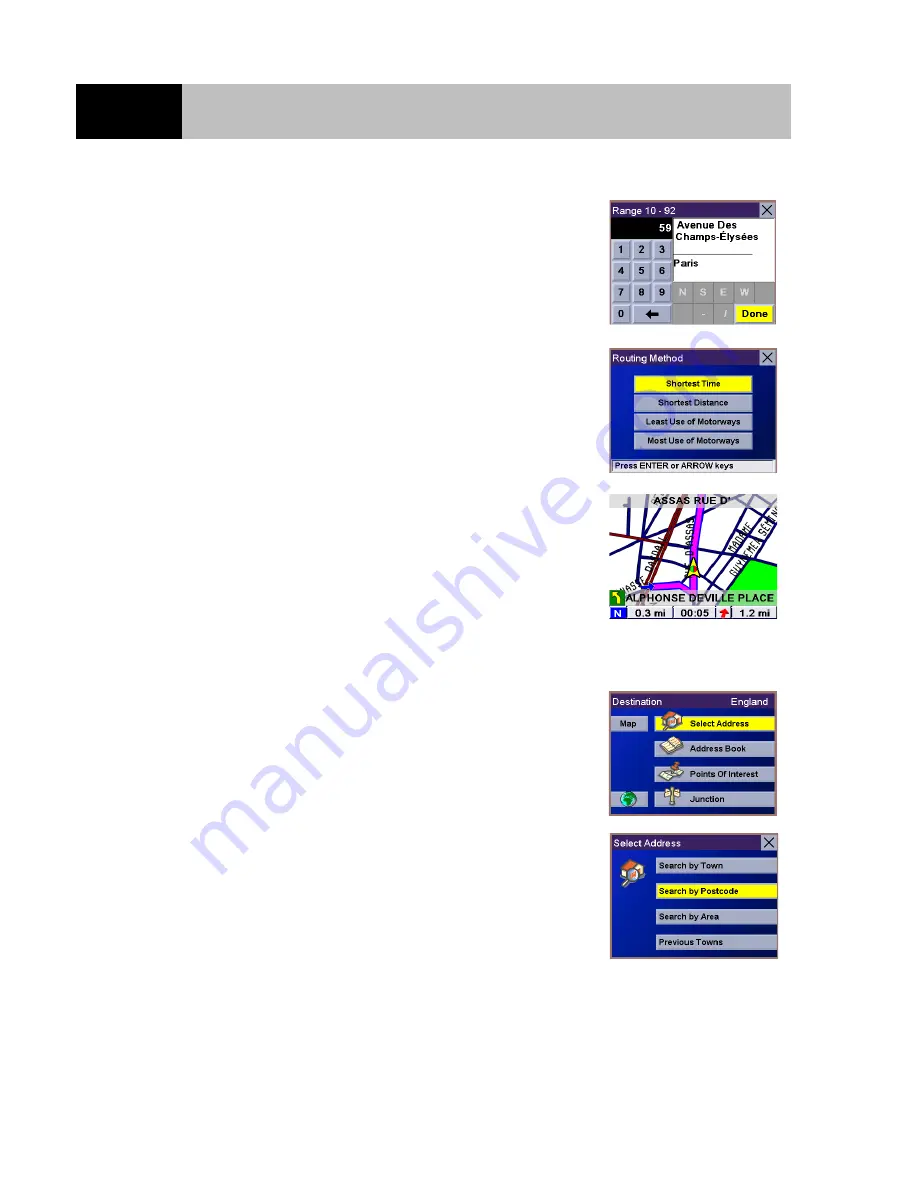
Use the 8-way arrow keypad to enter the street address. The
acceptable range of numbers is displayed at the top of the screen.
Once an acceptable street address has been entered, the "Done"
button will become active. Select "Done" and press Enter when
you are ready to continue.

Select the desired Routing Method and press Enter.

The Magellan RoadMate will calculate the route. When the
calculations are complete, the Guidance screen will be displayed.

Select a Destination - Search by Postcode

From the Destination screen check that the correct country is
selected (if not, select the Earth icon and choose it from the list)
then highlight the "Select Address" option and press Enter.

Select "Search By Postcode" and press Enter.

Содержание RoadMate 700 - Automotive GPS Receiver

Страница 1: ...Reference Manual Magellan RoadMate 700 Magellan RoadMate ...

Страница 2: ...Thales Navigation ZAC de la Fleuriaye BP 60433 44474 Carquefou cedex France www magellangps com PN 631161 18A ...

Страница 3: ... or other limits population density neighbourhood quality or safety availability or proximity of law enforcement emergency rescue medical or other assistance construction work zones or hazards road or lane closures road traffic or traffic facilities safety or condition weather conditions pavement characteristics or conditions special events traffic congestion It is your responsibility to disregard...

Страница 4: ......

Страница 5: ...rea 16 Select a Destination Search in Previous Towns 18 Selecting a Destination Using the Address Book 20 Selecting a Destination from a Previous Destination 20 Selecting a Destination from a Previous Destination and Saving it to the Address Book 21 Selecting a Destination from the Address Book 23 Saving a New Address to your Address Book and select it as your destination 24 Selecting a Point of I...

Страница 6: ...nt Trip Report 45 Viewing a Saved Trip Report 45 Deleting a Trip Report 46 Configuring the Magellan RoadMate 47 Setting the Map Options 48 Setting the Map Colours 49 Setting the Route Preferences 50 Setting the Voice Options 51 Setting the Colour Options 52 Setting the Contrast 53 Setting the Brightness 54 Setting the Display Options 55 Setting the Tone Options 56 Selecting the Language 57 Perform...

Страница 7: ... Press to confirm highlighted selections Cancel Button Press to stop the current function 8 Way Arrow Keypad Press to move the cursor or to highlight other options Locate Button Press to display the current location details Light Sensor Automatically the contrast and brightness of the display to allow for changes in lighting View Button Press to view map display list of directions or TrueView 3D d...

Страница 8: ...he touchscreen touch the key directly on the screen with your finger Please use the method that is easiest for you Speaker Used for spoken directions Repeat Button Press to repeat the last spoken prompt Volume Control Adjust to set the volume of the speaker Detachable Antenna Rotate upwards when in use to receive signals from the GPS satellite network Compact Flash Storage compartment for the Comp...

Страница 9: ...s not interfere with the operation of vehicle safety devices such as air bags You assume the risks associated with damage to your vehicle or vehicle s occupants as a result of how you choose to mount the Magellan RoadMate Installation using the Windscreen Mount Attach the mounting plate to the cradle using the four supplied Phillips screws Slide the cradle and plate assembly onto the windscreen mo...

Страница 10: ...le To do this simply connect the small end of the vehicle power cable to the power connector on the cradle see the illustration below Plug the cigarette lighter connector into an appropriate 12V socket cigarette lighter in your car Rotate the antenna upwards Installation is complete and you are ready to turn the Magellan RoadMate on and go Power connector ...

Страница 11: ...nect the vehicle power cable and remove the assembly Magellan RoadMate and its cradle from the vehicle Connect the small end of the External Power Cable to the power port on the cradle and plug the other end of the cable into a standard socket Connecting to a personal computer When connecting to a personal computer leave the Magellan RoadMate attached to the cradle disconnect the vehicle power cab...

Страница 12: ...p of the Magellan RoadMate Use the thumbwheel to set the speaker volume to the desired level Repeating the Last Command If you missed the last voice command you can repeat it by pressing the Repeat button The Repeat button is located on the top of the Magellan RoadMate Volume Control Repeat Button ...

Страница 13: ...llan RoadMate will use the saved profile settings for the user who you select here Please refer to the User Options section of this manual for information about how to change the name of the 3 different user profiles that are available in your Magellan RoadMate Either the Destination screen or the Resume Guidance screen will be automatically displayed The Resume Guidance screen is displayed if you...

Страница 14: ...need to input names street addresses etc the Magellan RoadMate will display a keyboard that allows you to use the 8 way arrow keypad and the Enter key to highlight and select the alphanumeric characters You can also simply touch the screen to select the required letter Power Button Space Bar Cancel Backspace Numerical Characters Accept Entry Additional Characters ...

Страница 15: ... same way as alphabetic characters Using QuickSpell What Is QuickSpell The Magellan RoadMate uses QuickSpell technology to provide you with the fastest possible method of entering characters QuickSpell eliminates the possibility of a misspelled word or looking for a town or street that is not in the map database As you begin entering characters the QuickSpell feature of the Magellan RoadMate greys...

Страница 16: ...rrow keypad to select PARIS from the list and press Enter If you are using the touchscreen to select the town use the scroll bar to the right of the list to scroll the list up and down If the list is still too long press Cancel to return to the keyboard to continue entering characters The list of items found in the database is limited to 100 items When over 100 items have been found Matches 100 wi...

Страница 17: ...name Example Suppose you want to go to Place Charles de Gaulle in Paris Either enter CHARLES to be presented with a list of all places containing Charles in their names and pick Place Charles de Gaulle from the list or enter GAU and press OK to be presented with a list of all places beginning with these three letters Both methods allow you to quickly select the same destination ...

Страница 18: ...ea when you do not know or are unsure of the town name but you do know which area it is in You will be given a listing of all the towns for the area you entered which have the street name you are looking for Please note that the type of area depends of the country currently selected County in England Département in France Kreis in Germany etc use Previous Towns to select the town that the address ...

Страница 19: ...he list of all matching towns Remember if the list is too long press Cancel while viewing the list to return to this screen and continue to input characters Use the 8 way arrow keypad to scroll the list up and down When you see the name of the town you are looking for select it and press Enter Use the 8 way arrow keypad to enter the first few characters of the street name After you have selected t...

Страница 20: ...when you are ready to continue Select the desired Routing Method and press Enter The Magellan RoadMate will calculate the route When the calculations are complete the Guidance screen will be displayed Select a Destination Search by Postcode From the Destination screen check that the correct country is selected if not select the Earth icon and choose it from the list then highlight the Select Addre...

Страница 21: ...the first few characters for the street name After you have selected the characters select OK and press Enter If you wish you may enter the entire street name Remember that FlexAddress allows you to enter any significant word in the street name Use the 8 way arrow keypad to scroll the list up and down When you find the street name select it and press Enter Use the 8 way arrow keypad to enter the s...

Страница 22: ...d if not select the Earth icon and choose it from the list then highlight the Select Address option and press Enter Select Search By Area and press Enter Note that the name of this option changes depending of the currently selected country e g If England is the selected country the option is named Search by County Use the 8 way arrow keypad to enter the first few characters of the area Select OK a...

Страница 23: ...towns These are all the towns in the selected county which have the street name you selected Press Enter Use the 8 way arrow keypad to enter the street address The acceptable range of numbers is displayed at the top of the screen Once an acceptable street address has been entered the Done button will become active Select Done and press Enter when you are ready to continue Select the desired Routin...

Страница 24: ... street name After you have selected the characters select OK and press Enter If you wish you may enter the entire street name Remember that FlexAddress allows you to enter any significant word in the street name Use the 8 way arrow keypad to scroll the list up and down When you find the street name select it and press Enter Use the 8 way arrow keypad to enter the street address The acceptable ran...

Страница 25: ...Selecting a Destination 19 Select the desired Routing Method and press Enter The Magellan RoadMate will calculate the route When the calculations are complete the Guidance screen will be displayed ...

Страница 26: ... your address book List Addresses displays a list of all the addresses you have in your address book Create New Entry lets you create a new address and put it in your address book before setting it as your destination Selecting a Destination from a Previous Destination From the Destination screen select Address Book and press Enter Select Previous Destinations and press Enter Select from the list ...

Страница 27: ...nce screen will be displayed Selecting a Destination from a Previous Destination and Saving it to the Address Book From the Destination screen select Address Book and press Enter Select Previous Destinations and press Enter Select from the list of previous destinations and press Enter To save this destination to the Address Book select the Edit button and press Enter ...

Страница 28: ...keypad to enter the desired text When complete select OK and press Enter When the Address Book entry is as desired select the Save button and press Enter The address is saved to the Address Book The Previous Destination screen is displayed to continue the routing to the previous destination Select the Route button and press Enter Select the desired Routing Method and press Enter The route will be ...

Страница 29: ... the destination from the list of addresses in the Address Book and press Enter Select the Route button and press Enter Note before continuing the address information can be edited and saved to the Address Book or the address can be deleted from the Address Book Select the desired Routing Method and press Enter The route will be calculated and the Guidance screen will be displayed ...

Страница 30: ...s please refer to the Selecting a Destination using Street Address section in this manual Once your address is selected the Edit Address Book screen will be displayed From this screen you can choose to Edit the Name and Information and to set a priority for this address Select the Edit Name option to display the keypad screen Enter a name for this address and select OK The address will be stored t...

Страница 31: ...st followed by 2nd and 3rd This priority supersedes the alphabetical order Select Save and press Enter to save this address to your address book Select the List Addresses option from the Book Screen Scroll up and down the list to pick the address you want to set as your destination and press Enter Select the desired Routing Method and press Enter The route will be calculated and the Guidance scree...

Страница 32: ...ing to add them to your address book manually These POIs are very useful when you are travelling through an unfamiliar area You can search for a POI by name or by category N o t e p a d Your Magellan RoadMate uses one Points of Interests database for each European country The first step in searching for a new POI is to check that the correct country is selected Selecting a Point of Interest as a D...

Страница 33: ...in the upper part of the screen Select your desired POI and press Enter to select it as your destination Select your desired Routing Method and press Enter The route will be calculated and the Guidance screen will be displayed Selecting a Point of Interest as a Destination Choose by Category Check in the title bar of the Destination screen that the correct country is selected Select Points of Inte...

Страница 34: ...he POIs in the category that are nearest to your position select OK and press Enter with no text entered To narrow the list down use the 8 way arrow keypad to enter the first few characters for the POI you are looking for Select OK and press Enter Select the POI from the list Select the desired Routing Method and press Enter The route will be calculated and the Guidance screen will be displayed wi...

Страница 35: ...nter the first few charactersof the town where the POIs will be looked for Select OK and press Enter Select the town from the list Select the POI for the chosen category that is located in the town you selected from the list Select the desired Routing Method and press Enter The route will be calculated and the Guidance screen will be displayed with all of the necessary guidance information ...

Страница 36: ...untry Use the keypad to enter the first few characters of the POI you are looking for Select OK and press Enter To see all of the POIs in the selected category select OK and press Enter with no text entered Select the POI from the list Select the desired Routing Method and press Enter The route will be calculated and the Guidance screen will be displayed with all of the necessary guidance informat...

Страница 37: ...and press Enter Note for more information about searching for an address please refer to the Selecting a Destination using Street Address section in this manual Select one of the streets in the junction you are looking for Select the second street in the junction you are looking for You can either enter the partial or full name of the street or select OK and press Enter without entering any text t...

Страница 38: ...Selecting a Destination 32 Select the desired Routing Method and press Enter The route will be calculated and the Guidance screen will be displayed with all of the necessary guidance information ...

Страница 39: ...of the required destination is displayed beside the cursor Note check the User Options section in this User Manual for information about how to display POI icons on the map The Route to This Address screen displays information about the street or POI which you selected on the map Select the Save button and press Enter to save this address in your address book or select the Route button and press E...

Страница 40: ... taking into account speed limits and other information in the database Other factors such as traffic conditions cannot be used in the calculation of shortest time Shortest Distance This option calculates the route using the most direct route to the destination This route may not be the fastest due to lower speed limits numerous traffic lights or other factors Least Use of Motorways This selection...

Страница 41: ...creen It can also be selected by pressing the View button when you are viewing the TrueView 3D screen List of Directions This screen is available only when you are travelling to a destination This screen displays a list of the changes in direction also known as manoeuvres you will need to follow to arrive at the destination It can also be used to exclude a manoeuvre and re route you to your destin...

Страница 42: ...ly updates your location and provides you with not only a map but also a visual indication of where you are on the map Changing the Map Zoom Levels You can zoom in by pressing the button or zoom out by pressing the button Planned Route pink Estimated Time to Destination Position Cursor shows your location and the direction in which you are heading Distance to Destination Direction of Destination D...

Страница 43: ...le to compute your location the display will automatically switch to the TrueView 3D display This will give you the information needed for your next manoeuvre List of Directions Screen Distance to Destination Direction of Travel and GPS Signal Strength Distance to Next Manoeuvre Estimated Time to Destination Direction of Destination ...

Страница 44: ...n which switches the Magellan RoadMate back on you would be presented with a screen asking if you wanted to resume your route Selecting Resume causes the Magellan RoadMate to recalculate the route using the same desti nation as before Selecting Cancel clears the route and displays the Destination screen 2 If you deviated from the planned route and kept driving Suppose you deviated from the planned...

Страница 45: ...st of Directions This could be due to an accident or street maintenance you want to avoid The Magellan RoadMate allows you to select a specific manoeuvre exclude it from the planned route and re route the trip Within an active planned route and while viewing the Guidance screen press View to display the List of Directions screen Use the 8 way arrow keypad to select the manoeuvre to be excluded and...

Страница 46: ...ssing Enter returns the display to the last viewed screen Changing the Route Method When you selected the destination for the first time you indicated which route method you wanted the Magellan RoadMate to use to calculate the route The Magellan RoadMate provides a way of letting you change the Route Method during the trip While viewing the Guidance screen the Manoeuvre List screen or the TrueView...

Страница 47: ...Travelling to a Destination 41 Select the new Route Method and press Enter The route will be re calculated using the newly chosen Route Method and the Guidance screen will be displayed ...

Страница 48: ...ame of the street you are on the name of the next and previous adjacent streets and information about the town you are in At the bottom of the screen you can also read your position in Latitude and Longitude If you need assistance when travelling you can communicate this information to ensure that the road assistance or emergency services can quickly locate you The right hand side of the screen di...

Страница 49: ...uture refer ence Ideal for the business traveller who needs to record mileage and time spent on the road Configuration Provides access to customise the look and operation of the Magellan Road Mate Tutorial Provides instructions on how to use the Magellan RoadMate for some of the common functions available N o t e p a d The driver of the vehicle should never customise the look and operation of the ...

Страница 50: ...the Trip Computer There you can save the information displayed for the current trip if needed and reset the Trip Computer to zero in preparation for your new trip Viewing the Current Trip on the Trip Computer From any screen press the Option button Select Trip Computer and press Enter Select Current from the list of saved Trip Reports The current Trip Report is displayed with useful information su...

Страница 51: ...he status of the computer to Running if it had been previously stopped Saving the Current Trip Report Select the Save button and press Enter Use the keypad to enter a name for the saved Trip Report When the name is acceptable select the OK button and press Enter Viewing a Saved Trip Report From any screen press the Option button With Trip Computer selected press the Enter button ...

Страница 52: ... and you will be returned to the User Options screen Deleting a Trip Report From any screen press the Option button With Trip Computer selected press the Enter button Use the 8 way arrow keypad to select the Trip Report to be deleted and press Enter The saved Trip Report is displayed With the Delete button selected press Enter The Trip Report is deleted and you will be returned to the User Options...

Страница 53: ...the map and the unit of measurement used Select Map Colour Select the map display from nine colour themes Route Preferences Set your preferences for the calculation of your route and switch automatic re routing on or off Voice Options Choose between a Male or Female voice for the guidance instructions Colour Options Select from four colour themes Contrast Set display contrast level Brightness Set ...

Страница 54: ... Map Always only shows the Guidance screen and the highlighted route Map Manual allows the TrueView 3D screen to be displayed only when the View button is pressed Scrolling Map When ticked the position of the vehicle will be in the centre of the screen When unticked the vehicle icon will move on the Guidance screen until it approaches the edge at which point it will return to the centre of the dis...

Страница 55: ...n button Select Configuration and press Enter Use the 8 way arrow keypad to select Select Map Colour and press Enter Use the 8 way arrow keypad to set your preferred colour theme for the map display Once you are happy with your choice select the Save button and press Enter ...

Страница 56: ...t the option to be changed and press Enter When the route preferences are correctly set select the Save button and press Enter Avoid Toll Roads When ticked it instructs Magellan RoadMate to avoid known toll roads when calculating a route Automatic Re Routing When ticked the Magellan RoadMate will makeup to three attempts to automatically re route to the destination when it detects that the vehicle...

Страница 57: ...ect Configuration and press Enter Use the 8 way arrow keypad to select Voice Options and press Enter Use the 8 way arrow keypad to select the Male or Female voice for the guidance instructions and press Enter When the voice option is correctly set select the Save button and press Enter ...

Страница 58: ...lect Configuration and press Enter Use the 8 way arrow keypad to select Colour Options and press Enter Use the 8 way arrow keypad to select your preferred colour theme and press Enter When you are happy with your choice select the Save button and press Enter Default Pastel Forest Desert ...

Страница 59: ...screen press the Option button Select Configuration and press Enter Use the 8 way arrow keypad to select Contrast and press Enter Use the left and right arrows of the 8 way arrow keypad to adjust the contrast Select the Save button and press Enter ...

Страница 60: ...en press the Option button Select Configuration and press Enter Use the 8 way arrow keypad to select Brightness and press Enter Use the left and right arrows of the 8 way arrow keypad to adjust the brightness level Select the Save button and press Enter ...

Страница 61: ...keypad to select the option to be changed and press Enter When the options are correctly set select the Save button and press Enter Enable automatic brightness When ticked it instructs the Magellan RoadMate to use its built in sensor to automatically adjust the brightness of the display Enable automatic contrast When ticked it instructs the Magellan RoadMate to automatically adjust the contrast of...

Страница 62: ...n Select Configuration and press Enter Use the 8 way arrow keypad to select Tone Options and press Enter Use the 8 way arrow keypad to select the desired tone and press Enter to hear the sample sound Select the Save button and press Enter when your preferred tone has been selected ...

Страница 63: ...o select Language and press Enter Select the top button and press Enter to step through the different languages available You can choose from English French German Spanish Italian and Dutch The language you select will be set for both the displays and the voice guidance When the language has been selected select the Save button and press Enter ...

Страница 64: ... d Most of the options available from the Diagnostics screen are not necessary for the normal operation of your Magellan Road Mate Simulator Mode This menu also features the Simulator Mode option that you can use to simulate your route from your current position to any destination Select Simulator Mode from the Diagnostics screen Select the Start button and press Enter to activate the simulator mo...

Страница 65: ...creen press the Option button Select Configuration and press Enter Use the 8 way arrow keypad to select User Edit Name and press Enter Spell out the desired user name for the selected current user When the name is completed select OK and press Enter ...

Страница 66: ...er Use the 8 way arrow keypad to select POI Selection and press Enter Use the 8 way arrow keypad to scroll down the list and press Enter to check all Points of Interest categories which you want to be displayed on the map Select Mark All and press Enter to display all categories select Clear All to not display any category of Points of Interest ...

Страница 67: ... operating the vehicle please come to a complete standstill before you review the tutorial topics From any screen press the Option button Select Tutorial and press Enter Select the desired tutorial topic and press Enter Moving around the Tutorial To skip ahead one step within a topic Press right side of 8 way arrow keypad To go back one step within a topic Press left side of 8 way arrow keypad To ...

Страница 68: ...same IRDA protocol Palm OS Pocket PC Symbian and for SmartPhone Simply activate the address transfer function on your PDA or SmartPhone and stand it in front of and in close proximity to your Magellan RoadMate A message will be displayed on your Magellan RoadMate to confirm that the addresses have been successfully transferred to its address book Do not transfer addresses to your Magellan RoadMate...

Отзывы: