background image

Create Menu

12

4.

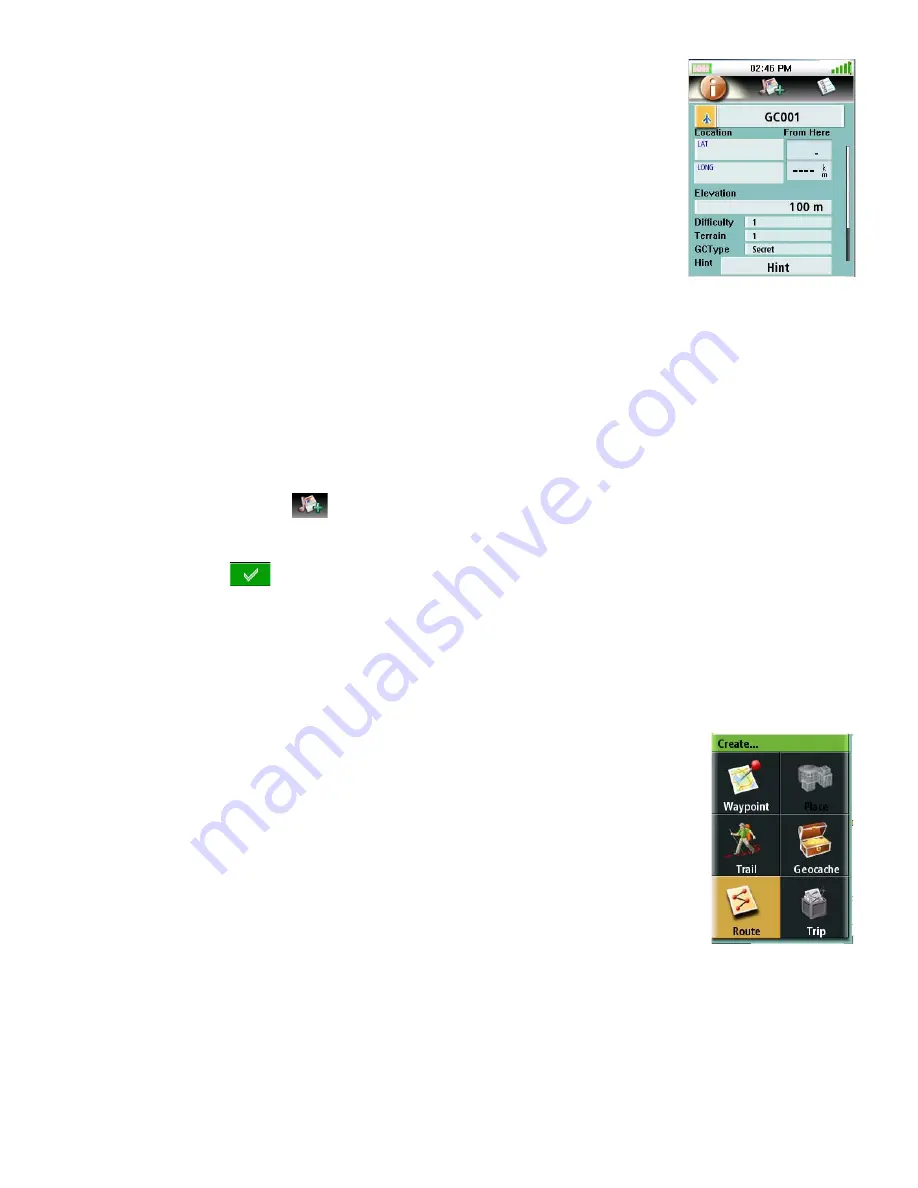
The Geocache screen provides the fields needed to identify the 

waypoint and its location. The fields can be modified to 
customize the waypoint.

5.

Icon: Tap the icon to display all possible icons that can be used 

to represent the waypoint. Tap the desired icon to select and 
close the window.

Geocache Name: (Default “GCXXX”). Tap the waypoint name field 

to display the keyboard. Enter the name and tap the green 
button.

Location: Tap the latitude or longitude fields brings up the 

keyboard that can be used to enter the desired data.

Difficulty: Assign a difficulty rating to this cache.

Terrain: Indicate the type of terrain the cache is located in.

GCType: Geocache type.

Hint: Field for including hints about the cache site.

Date: Date the cache site was created.

Add Media: 

 (Top center of display). Tap the add media icon to add pictures for this 

cache site.

6.

Tap

 to accept the information and save the cache waypoint.

Route

Creating a Route

1.

Access the Main Menu and tap “Create”.

2.

Tap “Route” from the Create Menu.

3.

Select the starting location for the route.

Current Location displays the Waypoint screen with the 

coordinates for your present location filled in.

Point on Map displays the Map screen. Pan around the map until 

the pan cursor is at the point you want the waypoint created for 
and press ENTER. The Waypoint screen is displayed with the 
coordinates for the pan cursor filled in.

Waypoint displays a list of saved waypoints.

Geocache displays a list of saved geocache waypoints.

Place displays the categories of places (only if a detailed map is loaded).

4.

After selecting the starting location the Route Screen is displayed.

Содержание Magellan Triton 1500

Страница 1: ...Magellan Navigation Inc 960 Overland Court San Dimas CA 91773 Magellan Triton 1500 User Manual...

Страница 2: ...y poor satellite geometry and obstructions like buildings and large trees USE PROPER ACCESSORIES Use only Magellan cables and antennas the use of non Magellan cables and antennas may severely degrade...

Страница 3: ...onditions 1 This device may not cause harmful interference and 2 this device must accept any interference received including interference that may cause undesired operation FCC Caution Any changes or...

Страница 4: ...iters Laboratories Inc UL has not tested the performance or reliability of the Global Positioning System GPS hardware operating software or other aspects of this product UL has only tested for fire sh...

Страница 5: ...6 Changing a Navigation Field 6 Speedometer Screen 7 Resetting the Odometer or Maximum Speed 7 Compass Screen 7 Changing a Navigation Field 7 Calibrating the Electronic Compass 7 Calibrating the True...

Страница 6: ...ng a Geocache Go To 17 Deleting a Geocache Waypoint 18 Duplicating a Geocache 18 Route 19 Activating a Route 19 Editing a Route 19 Duplicating a Route 19 Deleting a Route 19 View Menu 21 Local Info 21...

Страница 7: ...Media 25 Settings 26 Navigation 26 Setting Navigation Options 26 Volume Brightness 26 Setting Volume Brightness 26 Memory 26 View Memory Usage 26 Clearing Memory 26 Restoring Factory Settings 27 Form...

Страница 8: ...u when you are nearing your destination drifted off course your boat has drifted from its anchor point as well as other alarms for a wide variety of choices View images stored on an SD card that can b...

Страница 9: ...for optional external antenna D Flashlight E Stylus F Zoom out button G Page Goto Press to step through the navigation screens Press and hold for 2 3 seconds to access the GO TO function quickly H Es...

Страница 10: ...while providing access to all of the information needed at the touch of a finger Map Screen Overview A Battery Level B Saved Waypoint Preloaded or User Entered C Present Position Marker points toward...

Страница 11: ...elative to the map Panning cursor Displays the location on the map that would be used to create a waypoint or goto while panning The red dot around the panning cursor indicates the direction of your p...

Страница 12: ...lays the GO TO screen Current Location Screen The Current Location Screen provides general information about your current location Large Data Screen This screen allows you to display four navigation f...

Страница 13: ...hown making it simple to align your heading marker inside the compass to your destination Changing a Navigation Field Each navigation field can be customized to display latitude longitude heading bear...

Страница 14: ...ing used to compute your location This is a handy screen to view when you are getting weak to poor signal reception There are also two navigational screens displayed at the bottom of the display Chang...

Страница 15: ...enter names notes latitude longitude or data that the user needs to enter Key Functions Moves the cursor to the left Moves the cursor to the right Deletes the character to the left of the cursor Carri...

Страница 16: ...reated for and press ENTER The Waypoint screen is displayed with the coordinates for the pan cursor filled in Coordinates displays the Waypoint screen with all values set to zero 4 The Waypoint screen...

Страница 17: ...name entered 5 When the name has been entered tap Geocache Creating a Geocache 1 Access the Main Menu and tap Create 2 Tap Geocache from the Create Menu 3 Select Current Location Point On Map or Coord...

Страница 18: ...e cache site Date Date the cache site was created Add Media Top center of display Tap the add media icon to add pictures for this cache site 6 Tap to accept the information and save the cache waypoint...

Страница 19: ...o the route 6 Tap Done when the route is complete 7 Tap Save Route 8 The Save Route Screen is displayed Tap on the Route name default RouteXXX to assign a name to the route Tap on the alert button to...

Страница 20: ...and tap GO TO 2 Tap Waypoint icon 3 Select a waypoint from the list of saved waypoints 4 Tap 5 The Waypoint information screen is displayed 6 If it is correct waypoint tap 7 Tap Editing a Waypoint 1...

Страница 21: ...ypoint icon 3 Select a waypoint from the list of saved waypoints 4 Tap 5 Confirm deleting the waypoint by tapping Duplicating a Waypoint 1 Access the Main Menu and tap GO TO 2 Tap Waypoint icon 3 Sele...

Страница 22: ...tap 6 Select a subcategory and tap 7 Select a place from the list and tap 8 The Place Information screen is displayed To activate the Go To tap 9 Tap Trail Activating a Trail 1 Access the Main Menu an...

Страница 23: ...he Go To 1 Access the Main Menu and tap GO TO 2 Tap Geocache from the Go To Menu 3 Select a saved geocache waypoint from the list and tap 4 The Geocache Information screen provides the fields needed t...

Страница 24: ...ite was created Add Media Top center of display Tap the add media icon to add pictures for this cache site 5 To activate the Go To tap 6 Tap Deleting a Geocache Waypoint 1 Access the Main Menu and tap...

Страница 25: ...p Route from the Go To Menu 3 Select a saved route 4 Tap 5 Tap to save the route Duplicating a Route 1 Access the Main Menu and tap GO TO 2 Tap Route from the Go To Menu 3 Select a saved route 4 Tap 5...

Страница 26: ...Go To Menu 20 4 Tap 5 Tap Delete Route 6 Tap to confirm...

Страница 27: ...and tap View 2 Tap Fish And Hunt 3 The Fish and Hunt screen is displayed for your current location 4 Use the left and right arrows to change the date or tap in the date field to open a calendar 5 Tap...

Страница 28: ...ess the navigation options Tap to access the alert options Display options BackLight Level Off Low Medium High Decreasing backlight levels will increase battery life Backlight Timer Off 15 sec 30 sec...

Страница 29: ...ch ones are to be displayed on the map screen Trail Lines On or Off Display of trail track lines on the map screen Orientation North or Course Sets orientation for the top of the display Position Dest...

Страница 30: ...from 5 Use the keyboard to enter a name for the trail Default name is TrailXXX Tap to save the trail with the name entered Erasing a Track 1 Access the Main Menu and tap View 2 Tap Track 3 Tap Erase...

Страница 31: ...how track logs are recorded 5 Tap to accept Maps Viewing Map Information 1 Access the Main Menu and tap View 2 Tap Maps to view details on the installed background map and detail map if loaded 3 Tap...

Страница 32: ...me Brightness 4 Tap on the slider bars to set the display brightness and alarm volume 5 Tap OK to accept Memory View Memory Usage 1 Access the Main Menu and tap View 2 Tap Settings 3 Tap Memory 4 Tap...

Страница 33: ...t the Triton Receiver 1 Access the Main Menu and tap View 2 Tap Settings 3 Tap About 4 Tap Version Copyright or Owner Version displays information about the firmware version application versions and m...

Отзывы: