background image

Assembly Instructions

Page 5 of 9

IMPORTANT NOTES BEFORE YOU BEGIN:

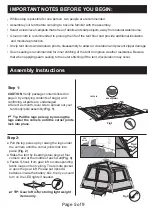
Step 1:

CAUTION

Verify package contents listed on 

page 3 by emptying contents of bag(s) and 

confirming all parts are undamaged.

● Select a smooth, level site to spread out your 

   tent body/pole assembly 

(Fig. 1)

.


      Tip

Pull the legs pole up by raising the 

legs under the corners until the corner joints 

lock into place.

HUB ASSEMBLY

Fig.1

FRP POLE

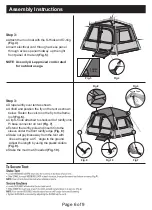
Step 2:

● Pull the leg poles up by raising the legs under 

   the corners until the corner joints lock into 

   place 

(Fig. 2)

.

● Stake the tent by inserting steel pegs at four 

   corners and at the middle of each wall 

(Fig. 3)

.

● Fasten S-hook from gear loft to corresponding 

   fabric loops on tent ceiling. The remote pocket 

   is upon the gear loft. Please put 3pcs AA 

   batteries inside the battery box, then you could 

   turn on the LED lights if needed.

Fig.3

LOCKING

BUTTON

Fig.2

TIP: Gear loft is for storing light weight 

        items only.

FRP

POLE

  Assemble your tent before camping to become familiar with the assembly.

  While setup is possible for one person, two people are recommended.

•  Select a clean level campsite that is free of debris and sharp objects, away from natural watercourse.  
•  Ground cloth is recommended to prolong the life of the tent floor and provide additional insulation 

   and moisture protection. 

•  Unzip tent doors and windows prior to disassembly to allow air circulation and prevent zipper damage 
•  Seam sealing is recommended for inner stitching of the tent to improve weather resistance. Beware 

  that when applying seam sealing to the outer stitching of the tent, discoloration may occur.

Содержание SwiftRise 6P

Страница 1: ...e 6P Instant Tent Customer Service 888 922 2336 7 00 am to 12 00 am CST daily Live Chat at www academy com Email customerservice academy com 877 579 1550 8 30am to 5 30pm Monday thru Friday EST Made i...

Страница 2: ...nformation 8 Page 2 of 9 Note Before assembling the product make sure all parts are present Compare product parts with package content list and hardware content list If any part is missing or damaged...

Страница 3: ...are recommended During assembly poles are under tension If not held in place during assembly poles could break or up possibly causing serious injury Safety glasses may be worn throughout the assembly...

Страница 4: ...y bag Plastic mold Tent body with pre attached poles Tent rainfly Fiberglass awning pole 1 1 1 1 1 1 1 4 4 9 Guyline Steel stake G H I J Page 4 of 9 Lighted gear loft Gear loft battery compartment Det...

Страница 5: ...The remote pocket is upon the gear loft Please put 3pcs AA batteries inside the battery box then you could turn on the LED lights if needed Fig 3 LOCKING BUTTON Fig 2 TIP Gear loft is for storing ligh...

Страница 6: ...ver tent as shown Unfold and position the fly on the tent as shown below Fasten the velcro on the fly to the frame roof Fig 6 Clip S hook attached to shockcord of rainfly onto Pl base connector on ten...

Страница 7: ...them in a small floor nail bag Take out the plastic D hook at the bottom of the inner curtain Take off the external account and fold it into a 3 fold or 4 fold strip Push the silver locking button and...

Страница 8: ...stant to the sun s Ultraviolet UV light However no fabric can withstand prolonged exposure to sunlight Do not leave your tent set up for weeks at a time Exposure to ultraviolet rays from the sun can d...

Страница 9: ...use of other than genuine parts are not covered by this warranty This warranty shall be effective from the date of purchase as shown in the purchaser receipt This warranty is valid for the original co...

Отзывы: