7
EN
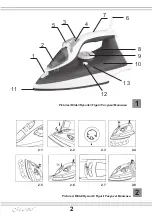
emission when the plate temperature control light (8/Picture 1) comes on, than
start ironing again only after the light has gone off.
DRY IRONING
To iron without steam, follow the instructions in section “steam ironing”, leaving the steam
selector (8/Picture 1) in the position ”no steam”.
SPRAY FUNCTION
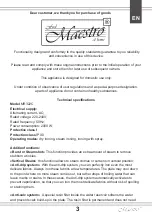
Picture 2.6
Make sure that there is water in the water tank. Press the spray button (4/Picture 1) slowly
(for a dense spray) or quickly (for a vaporized spray).
Warning:
for delicate fabrics, we recommend moistening the fabric beforehand using the
spray function , or putting a damp cloth between the iron and the fabric. To avoid staining,
spray on silk or synthetic fabrics.
SELF-CLEANING
The self-cleaning feature cleans inside the plate, removing impurities. We recommend
using it every 10-15 days. Directions:
-Fill the reservoir according to the “filling the water reservoir” section.
-Plug the product into a standard electrical outlet near a sink , turn the temperature control
dial the MAX position, rest the heel of the iron on a flat, stable surface and allow it to heat
until the temperature light (8/Picture 1) goes out.
-Hold the iron horizontally over the sink and press the button (12/Picture 1) ”self-clean”.
- When the soleplate has cooled down, you can clean it with a damp cloth.
Maintenance and care
Warning!
Before cleaning the iron in any way, make sure that the appliance plug is not connected to
the socket.
Before cleaning unplug the appliance and let it cool completely.
Do not let water get inside the appliance, except the parts are special made for it.
-Avoid scratching the plate with steel wool or metallic objects.
-Any deposits, starch residue or size left on the plate can be removed using a damp cloth
or an unabrasive liquid detergent.
The plastic parts can be cleaned with a damp cloth then wiped over with a dry cloth.
Storage
- Before cleaning unplug the appliance and let it cool completely.
- Turn the temperature control dial and steam adjustment knob to the «0» position.
- Open filler cover, turn appliance upside down and pour out the water.
- Keep the appliance in cool dry place, away from children and persons with reduced
mental or physical abilities Picture 2.8.
Содержание MR322C
Страница 31: ...31 MR322C 50 220 240 2000 I IP 0 RU...
Страница 32: ...32 1 2 1 2 3 4 5 6 7 MAX 8 9 10 11 12 13...
Страница 33: ...33 OFF RU...
Страница 34: ...34 1 3 1 0 2 1 2 1 2 2 MAX 9 1...
Страница 35: ...35 RU 0 2 3 9 1 1 8 1 8 1 2 1 3 1 0 0 2 4 5 1 2 5 5 1 8 1...
Страница 36: ...36 0 2 6 4 1 10 15 0 8 1 12 1 40 60...
Страница 37: ...37 RU 0 2 8...
Страница 38: ...38 MR322C 50 220 240 2000 I IP 0 UA...
Страница 39: ...39 1 2 1 2 3 4 5 6 7 8 9 10 11 12 13...
Страница 40: ...40 MAX OFF UA...
Страница 41: ...41 1 3 1 0 2 1 2 2 MAX 9 1 0...
Страница 42: ...42 2 3 9 1 1 8 1 8 1 2 1 3 1 0 0 2 4 5 1 2 5 5 1 8 1 0 UA...
Страница 43: ...43 2 6 4 1 10 15 0 H 1 12 1 40 60...


