


MADRAX MADLOCKER ™ Assembly Instructions
MADRAX DIVISION
MLN-1
GRABER MANUFACTURING, INC.
10-3-18
Page 4 of 6
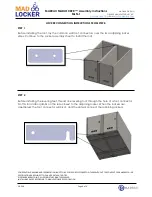
STEP 8
If this is a bank of lockers please see Locker Connection Instructions before installing the
ROOF
PANEL
.
There is a hole
on the lock side, nearest to the door, where the
SIDE
and the
ROOF PANEL
should
be screwed together. Install the
accessory hooks
and
jamb nut
into this hole by inserting the
hook and tightening the nut.
Install the
ROOF PANEL
with
1/4”
-20 x 1/2" Button Head Socket Cap Screws.
STEP 9
Install the
DOOR PANEL
with
1/4”
-20 x 1/2" Button Head
Socket Cap Screws
and tighten these fasteners
.
STEP 10
Level the locker by adjusting the bottom nut on the
LEVELING FEET
and
securing by tightening the inside nut.
Verify that the spacing around the
DOOR PANEL
is nearly equal on all
sides, the
DOOR PANEL
swing freely, and the lock and lock bar engage
properly and securely. If there is binding in the door closure, loosen all
door hinge fasteners, straighten hinge(s) and re-tighten.
Use
Spike Anchors
to attach the locker to the concrete surface through the holes provided in
the threshold.


