background image

21 


Custom Command Creation 

Until now, this guide has dealt with the pre-made commands in the Command Library. This section will take 

you through the process of creating your own commands and adding them to your profiles.  


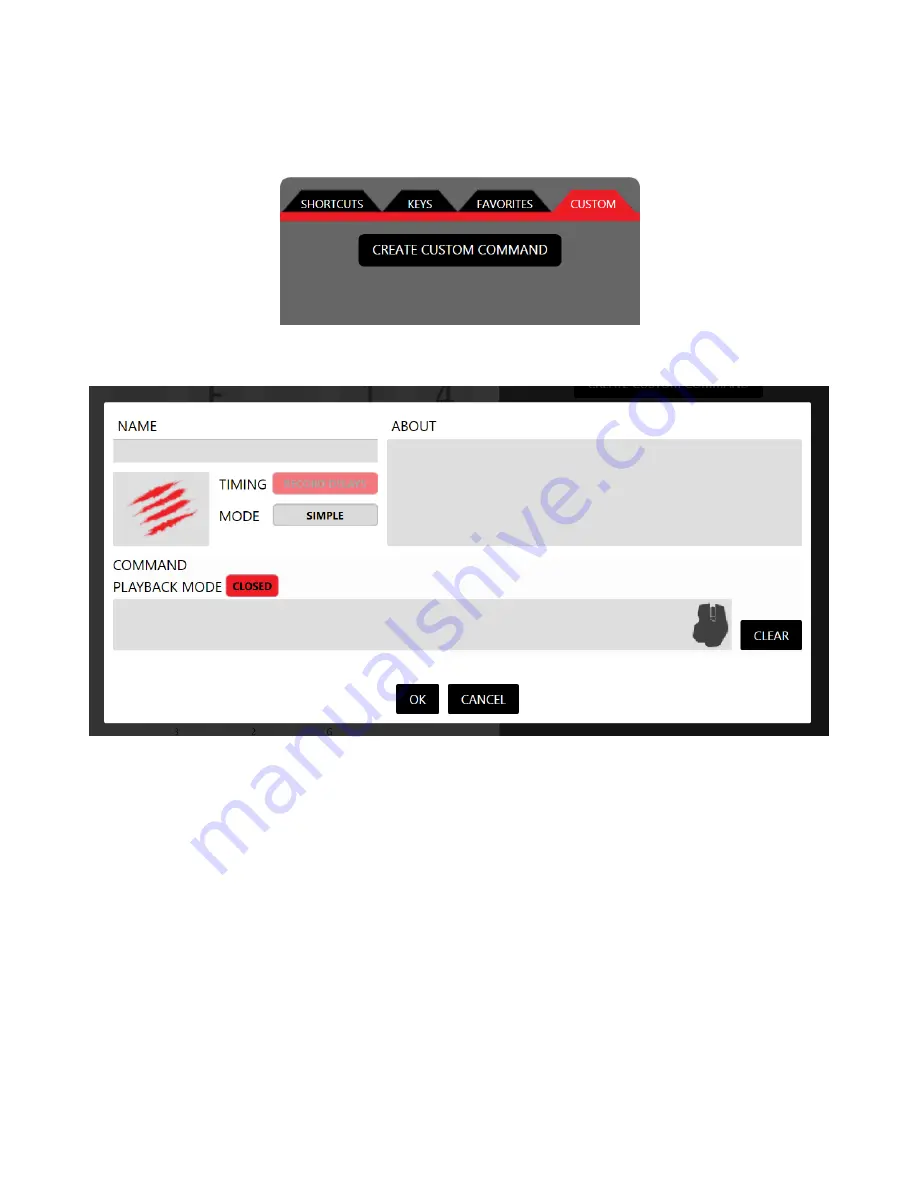
In the Command Library, click the Custom tab and then click Create Custom Command. 


This will open the Custom Command Editor. 


Key Elements: 

1.


At the top of the Editor is the Name box. This is where you type the name of the command.


2.


Beneath  the  Name,  is  a  box  that  contains  the  Mad  Catz  scratches.  Our  software  enables  you  to 

associate your commands with icons or images. For example, the command for selecting a Pistol in 

Battlefield could be an image of the pistol itself. The default command icon is the Mad Catz slash logo. 

Click the icon box to open up a file explorer window. You can now browse to the image you want to 

add to the command. Alternatively, drag and drop the image file straight into the box to quickly assign 

it. To delete an icon image, hover your RAT cursor over the icon until the cross appears, then click to 

delete it. 


3.


To the right of the Icon box are two buttons that set the type of command you want to create:


a.


Timing. The editor can either record the exact timing of your key  presses or ignore them. If 

Record  Delays  is  turned  off  any  gaps  between  key  presses  will  be  removed  so  that  the 

command will output as fast as possible.  

b.


Mode. When this is set to Simple, your command options are limited. Firstly, the delays between 

key  press  events  are  not  recorded.  Secondly,  you  can  only  program  the  press  event  of  a 

physical button. If you click the Mode button to change it to Advanced, you are free to record 

Содержание rat 6

Страница 1: ...1 PRODUCT GUIDE Version 1 0 ...

Страница 2: ... FLUXTM Software for Windows 10 FLUX Programming Overview 12 Quick Programming of the Mad Catz Default Profile 13 Profile Management 16 Create your own Profile 17 Custom Command Creation 21 Create a Simple Custom Command 23 Create a Complex Custom Command 24 Using the System Tray Icon 26 FLUX Settings Overview 27 D P I Response 28 D P I Switch 29 D P I Multiplier 30 Precision Aim 31 Poll Rate 32 A...

Страница 3: ...rfect for them The world s most customizable mice wrapped in a bold colour scheme designed to appeal to gamers and non gamers alike have also been given integrated intelligent lighting powered by Kameleon RGB technology Multiple illumination zones enable users to select from up to 16 8 million colour variations and apply various illumination effects making the RAT mouse the centrepiece of their ga...

Страница 4: ... This section will provide you with an overview of all of the controls indicators and features that make up the product Controls and Indicators RAT6 has 11 programmable controls these are highlighted red in the below image ...

Страница 5: ...e available slots in the on board memory of the device So depending on what Profile Slot is selected you can have a completely different setup configuration You could have specific profiles for different character classes within a single game or have each slot dedicated to a different game or application It s up to you These profiles remain in the slots of the RAT so that you connect it to another...

Страница 6: ... best cursor response in game or in general use There are multiple ways this feature can be adjusted Firstly D P I up or down can be assigned to any of the programmable buttons on the RAT Or if you prefer to stick with one D P I level it can be turned off entirely In addition if you prefer to use just one button to cycle through your D P I levels this can be assigned to any of the programmable but...

Страница 7: ... overall length of the product can be adjusted by altering the palm rest This results in a much more natural grip and reduces fatigue over a long period of use To alter the palm rest position locate and press the release catch on the lower right side of the palm rest With the release catch held in pull the palm rest back Gradually ease off pressure on the release catch and it will naturally click ...

Страница 8: ... a lighter product or slightly heavier The baseline weight of the product is 125g A further 18g can be added via the three 6g weights Changing weights is a simple case of removing the end cap and spring setting the correct weight and then replacing the spring and end cap ...

Страница 9: ...ed slider is set to the middle position and that the Enhance Pointer Precision option does not have a tick Driver and Software Installation In order to customize the product settings and make game profiles you will need to download the software application from Madcatz com 1 Go to http madcatz com downloads 2 Select your operating system and product in the Software Download area You will then be g...

Страница 10: ...rs As well as offering first line support and setup tips the software s two key functions are to allow the user to configure the performance settings of the product and to create game specific profiles The following section will tell you everything you need to know to get the product functioning how you want it to ...

Страница 11: ...t s up to you These profiles remain in the slots of the RAT so that you can take it to another PC and all your different settings will be ready to go without the need to install any software Once a profile has been created it can also be linked to a game or application So that when the program or game window is in focus the profile is automatically activated on the product FLUX is also fully compa...

Страница 12: ...mmable controls 4 To the right of the image is the Command Library The first tab contains pre made shortcuts such as copy paste and other useful functions The second tab contains single keyboard key presses These are useful for ultra quick profile setup The third tab is for your favourite commands If you right click a command you can add it to favourites This command will then always be visible re...

Страница 13: ... make browsing the Internet and controlling media quick and intuitive You don t have to use this profile though as you can create your own profiles more on that later To assign a command to a button left click and drag an icon from Command Library over to one of the callouts When you release the left RAT button the command will be assigned Repeat this process to assign all of the commands you need...

Страница 14: ...14 To remove a command from a button hover your RAT cursor over the callout When the cross appears left click it Once you are happy with the assignments click the Apply button ...

Страница 15: ...15 This will reveal the Profile Menu and allow you to select a memory slot for the profile Click Upload and the assignments will now be active on the RAT ...

Страница 16: ...so highlighted red This means that the profile is currently selected for editing 4 The Import button opens a file explorer window This allows you to browse your hard disk or removable storage to import previously backed up profiles 5 Each profile has a context menu that contains additional options This can be accessed by either left clicking the black triangle to the right of the profile name or b...

Страница 17: ...te New button It will generate a new untitled profile It will be automatically selected for you to begin editing Right click the profile to reveal the context menu and select Rename Enter the desired profile name and hit enter on your keyboard ...

Страница 18: ...ew profile is selected for editing it will not change until you select a different profile 2 Right click inside the Command Library to reveal its context menu This will allow you to quickly jump to the different command tabs and resize the command icons to your preference In the image below I have selected the Keys tab in the Command Library and added my preferred in game actions to the programmab...

Страница 19: ... in focus If the linked profile is not already on the RAT it will be temporarily loaded into Slot A until the linked program window is no longer in focus If the linked profile is already in a memory slot on the RAT that slot will be automatically selected when the linked program window is in focus When the linked program window is not in focus the profile slot will revert back to its original stat...

Страница 20: ...20 Select a memory slot and then click the Upload button to make the programming active on the RAT ...

Страница 21: ... Mad Catz slash logo Click the icon box to open up a file explorer window You can now browse to the image you want to add to the command Alternatively drag and drop the image file straight into the box to quickly assign it To delete an icon image hover your RAT cursor over the icon until the cross appears then click to delete it 3 To the right of the Icon box are two buttons that set the type of c...

Страница 22: ...ant to assign Hover your RAT cursor inside the box to start entering your key presses If you move your cursor out of this area the editor will stop recording keyboard or RAT input Note the RAT icon in the Command Entry Box If you hover your RAT cursor over this icon it will turn red At this point you can click any of the main RAT buttons or scroll up or down and the editor will record this input T...

Страница 23: ...on area to browse to the image I want associated with the command When the command is complete click ok It will now appear on the Custom tab ready to be dragged and dropped onto one of the programmable buttons To delete a Custom Command hover your RAT cursor over the icon and then click the X If you want to edit an existing custom command go to the Custom tab and left click the command icon ...

Страница 24: ...it in the game The timing delay between each key press event is denoted by the red bars in milliseconds ms Note how that when the Mode is set to Advanced both the down and the up component of a keyboard key press is recorded Don t worry if you make a mistake You won t need to clear the whole command and start again If you input the wrong key press just hover your cursor over the keypress and click...

Страница 25: ...e you are happy with your timing delay you can either apply the update to a single delay between two key press events or apply the same delay to all the events in the command Once you are happy with the command click ok It can now be dragged onto one of the programmable buttons If you are happy with your profile click the Apply button and re Upload the profile changes to the RAT ...

Страница 26: ...FLUX interface will open If you right click the icon a profile menu will appear From here you can quickly upload profiles to the RAT or clear existing memory slots The black dot shows which profile slot is selected To clear a memory slot click the Clear option To upload a profile hover your cursor over the Profile Files folder and then left click a Profile name to upload it to the RAT ...

Страница 27: ...the left hand side of the screen are the different settings that you can configure Once selected the various options for that setting will be displayed on the right hand side of the screen 3 Once a change has been made an Undo button will become active so that you can revert the setting back the last saved value 4 The Apply and Reset buttons function in the exact same way as they do on the Program...

Страница 28: ... interpolation or any other additional onboard processing is used to achieve a certain D P I level Simply select a D P I level drag the slider to the desired value and then click apply If you want to change the X and Y values separately then make sure Link Axis is set to off Any acceleration that is experienced would be at the OS level and can be tweaked For more information visit our blog http cy...

Страница 29: ...utton can be assigned to any of the programmable buttons on the RAT To do so simply select the preferred button from the drop down menu Alternatively if you are happy with one D P I level at all times you can choose No Button from the drop down menu This is recommended if you would rather program the buttons with in game commands and would like to avoid changing the D P I by accident ...

Страница 30: ...ned to give an additional performance boost to the sensor response Selecting a value on this page will multiply the data counts from the sensor to boost the overall D P I If you want unaltered sensor data keep the setting at the default setting of 1 ...

Страница 31: ...n the RAT To do so simply select the preferred button from the drop down menu Adjust the slider to set the desired precision aim D P I value Alternatively if you do not need the Precision Aim feature you can choose No Button from the drop down menu This is recommended if you would rather program the buttons with in game commands and would like to avoid changing the D P I by accident ...

Страница 32: ...32 Poll Rate This setting determines how often input data is sent to the host computer A higher value means faster data updates up to 1 ms 1000Hz ...

Страница 33: ...nsor movement This can be beneficial in CAD CAM applications where sometimes it is necessary to draw straight lines However when gaming it is often better to have no interference between the movement of your hand and what gets reports to the PC and the game With this in mind this feature is turned off by default ...

Страница 34: ...nsor is tracking correctly on your surface It can also affect unwanted cursor movement if you lift the RAT a lot during gaming We recommend Smooth or Metallic Surfaces 0 3 mm Silicon mats or lightly textured surfaces 0 6 mm Cloth Mats or heavily textured surfaces 0 6 mm ...

Страница 35: ...35 Indicator Brightness This setting allows you to alter the brightness of both the Profile LED and the D P I Level LEDs ...

Страница 36: ...the corresponding LED can be altered 2 The right hand side of the page shows the different configuration options a LED Colour Individual Each independent lighting zone can be a different colour applied to it b Effect Type Global Effects can be assigned to the lighting zones An effect plays across all LEDs simultaneously 3 The Apply and Reset buttons function in the exact same way as they do on the...

Страница 37: ...e drop down menu Effects may have different options associated with them For example the Rainbow effect allows you to set the speed and the brightness of the effect In the example below the breath effect has been selected with a duration of 10 seconds Once you are happy with the lighting options click Apply Select a memory slot and then click the Upload button to update the lighting on the RAT ...

Страница 38: ...ofiles backed up In addition if you use your RAT on multiple PCs you can always access and use the same profiles First locate the folder on your PC that is associated with the cloud service In in the image below I have created RAT specific folders within the main Dropbox directory Next drag and drop your cloud service folder into the profile list and it will appear ...

Страница 39: ...ou can create and edit profiles and they will remain consistent across multiple computers that are using the same cloud service Click the back button to navigate back out to the main profile folder on your system You can always remove the folder link by right clicking it and selecting the option from the context menu ...

Страница 40: ...my PC boots up Yes By nature of how the onboard memory works once a profile has been uploaded to the RAT it will always be active when the memory slot is selected So if you have a custom profile for Windows or your favourite application just switch to the right memory slot and the RAT will be ready to go 4 Can the D P I and other product settings be set per profile Yes RAT settings including D P I...

Отзывы: