background image

10

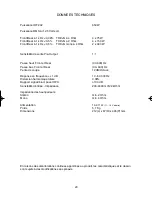
TECHNICAL DATA

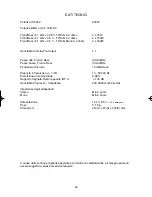
Power IHF 202

650W

RMS Power at (12.5 Volts DC)

Front/Rear at 1 kHz < 0.08 %  THD+N at 4 Ohm

4 x 75 W 

Front/Rear at 1 kHz < 0.5 %  THD+N at 2 Ohm

4 x 150 W 

Front/Rear at 1 kHz < 0.5 %  THD+N Mono at 4 Ohm

2 x 300 W 

Pre-Out Sensitivity

1:1

High pass, Front and Rear

(30-600)Hz

Low pass, Front and Rear

(30-600)Hz

Crossover slope

12 dB/Octave

Response in fre/- 1 dB 

10 - 50.000 Hz

Total harmonic distortion 

0.08%

Weighted IHF A Signal-Noise Ratio

> 100 dB

Input sensitivity - Impedance 

200-4000 mV/22 kOhm

Loudspeaker impedances 
Stereo

min. 2 Ohms

Mono 

min. 4 Ohms

Power supply              

14.4 V DC 

(11 - 16 V permissible)

Weight                       

5,1 kgrs

Dimensions

212(I) x 67(H) x 445(D) mm

Due to the continual incorporation of improvements in this product, the characteristics and
design may be subject to variation without prior notice.

O/M ST 4.075  25/06/02 18:35  Page 10

Содержание Syn Tech 4.075

Страница 1: ...Syn Tech 4 075 Owner s Manual Bedienungsanleitung Manuel d Emploi Manuale di Istruzioni Manual de Instrucciones CAR AUDIO EQUIPMENT ...

Страница 2: ...ATORS 8 9 10 TECHNICAL DATA 11 DEUTSCH INTRODUCTION 12 PRECAUTIONS 12 EIGENSCHAFTEN 12 EINSTELLUNGEN UND ANZEIGEN 13 14 15 TECHNISCHE DATEN 16 FRANCAIS INTRODUCTION 17 PRECAUTIONS 17 CARACTERISTIQUES 17 CONTROLES ET INDICATEURS 18 19 20 DONNEES TECHNIQUES 21 ITALIANO INTRODUZIONE 22 PRECAUZIONI 22 CARATTERISTICHE 22 CONTROLLI INDICATORI 23 24 25 DATI TECNICI 26 ESPAÑOL INTRODUCTION 27 PRECAUTIONS ...

Страница 3: ...ft Right 4V 0 2V 30 600 30 600 Flat Low High Flat Low High Rear Low Only Front Filter Control Rear Gain Control Input Front 2ch Input Input Mode Output Gain Control Input Rear External Bass Control Hz Hz CONNECTIONS ANSCHLUSSE CONNEXIONES COLLEGAMENTI CONEXIONES Low Only External Bass Control On Off M i n M a x P e a k CONNECTIONS ANSCHLUSSE CONNEXIONES COLLEGAMENTI CONEXIONES EBC ...

Страница 4: ...III INSTALLATION EINBAU INSTALLATION INSTALLAZIONE INSTALACION Self Screwing screw ...

Страница 5: ...ajo Front y Rear 30 600 Hz Inclinación de cruce 12 dB Octave Respuesta en frecuencia 1 dB 10 50 000 Hz Distorsión armónica total 0 08 Relación Señal Ruido pesado IHF A 100 dB Sensibilidad de entrada Impedancia 200 4000 mV 22 komhs Impedancia de altavoces Estéreo Min 2 Ohms Mono min 4 Ohms Alimentación 14 4 V DC 11 16 V admitidos Peso 5 1 Kg Tamaño 212 L x 67 A x 445 P mm Debido a las continuas mej...

Страница 6: ... Just one faulty connection could damage the unit so read the connection instructions provided in this manual very carefully 2 Connect the battery lead to the battery terminal last of all and only after having completed and checked all the other connections 3 Take care to install the amplifier in a position where both good air circulation and heat dissipation are guaranteed 4 The fuses must always...

Страница 7: ...e must be connected to the Front input to allow all four output channels to function In this configuration the Rear inputs function as a By pass output together with the Front input In other words you will obtain exactly the same signal as far as form and amplitude are concerned Note Sensitivity adjustments will in any case remain independent 6 4CH 3CH 2CH Output mode switch selects the output con...

Страница 8: ...rted the crossover frequency can be adjusted between 30 Hz and 600 Hz in continuous mode 9 Adjustment of the Rear Input gain adjusts the input sensitivity of the amplifier which varies from 200 mV to 4V 10 Rear RCA input connectors Connect the Pre output leads of your main unit to the amplifier input These inputs will drive the final stages of the Rear section 17 Selector switch for the External L...

Страница 9: ...an point on any metallic part of the car chassis if possible to an already installed screw Never attach this clamp directly to the negative point of the battery which could give rise to an unpleasant buzzing noise while the car is being driven 16 Check control indicator This LED indicates the amplifier functioning status WHITE The unit is switched off GREEN The amplifier is functioning perfectly R...

Страница 10: ...r 30 600 Hz Crossover slope 12 dB Octave Response in frequency 1 dB 10 50 000 Hz Total harmonic distortion 0 08 Weighted IHF A Signal Noise Ratio 100 dB Input sensitivity Impedance 200 4000 mV 22 kOhm Loudspeaker impedances Stereo min 2 Ohms Mono min 4 Ohms Power supply 14 4 V DC 11 16 V permissible Weight 5 1 kgrs Dimensions 212 I x 67 H x 445 D mm Due to the continual incorporation of improvemen...

Страница 11: ...Das Batteriekabel zuletzt an den Pluspol der Batterie anschließen und nur nachdem alle anderen Anschlüsse ausgeführt worden sind 3 Man vergewissere sich daß die elektronische Frequenzweiche an einer Stelle installiert wird wo gute Luftzirkulation und eine gute Wärmeabgabe gewährleistet sind 4 Die Sicherungen müssen immer durch Sicherungen mit der gleichen Amperezahl ersetzt werden um schwere Besch...

Страница 12: ...rfügung stehen die von der Head Unit kommen so müssen sie an den Front Eingang angeschlossen werden damit alle vier Ausgangskanäle funktionieren In dieser Konfiguration dienen die Rear Eingänge als By pass Ausgänge d h daß man mit dem Front Eingang ein von der Form und Amplitude identisches Signal erhält Die Empfindlichkeitseinstellungen bleiben auf jeden Fall unabhängig 6 Ausgangs Wahlschalter 4C...

Страница 13: ...bergangsfrequenz stufenlos zwischen 30 Hz und 600 Hz eingestellt werden 9 Einstellung des Eingangsgewinns Rear Ermöglicht die Einstellung der Eingangsempfindlichkeit der Endstufe zwischen 200 mV und 4V 10 RCA Rear Eingangsanschlüsse Sie ermöglichen den Anschluß der Pre Ausgangskabel Ihrer Head Unit an den Eingang der Endstufe Diese Eingänge steuern die Endstufen der Rear Sektion 17 Wahlschalter fü...

Страница 14: ...schnitt an eine Metallstelle des Fahrgestells möglichst mit Hilfe einer schon vorhandenen Schraube anschließen Diese Klemme nie direkt an den Minuspol der Batterie anschließen da beim Betrieb des Fahrzeugs störende Summgeräusche auftreten können 16 Check control Anzeige Diese LED zeigt den Betriebszustand der Endstufe an WEISS Das Gerät ist ausgeschaltet GRÜN Das Gerät funktioniert einwandfrei ROT...

Страница 15: ... Front und Rear 30 600 Hz Tiefpaß Front e Rear 30 600 Hz Flankensteilheit 12 dB Oktave Frequenzgang 1 dB 10 50 000 Hz Harmonische Verzerrung gesamt 0 08 Rauschabstand IHF A gewägt 100 dB Eingangsempfindlichkeit Impedanz 200 4000 mV 22 kOhm Lautsprecherimpedanz Stereo min 2 Ohm Mono min 4 Ohm Stromversorgung 14 4 V DC 11 16 V zulässig Gewicht 5 1 Kg Maß 212 L x 67 H x 445 T mm Änderungen der techni...

Страница 16: ...ONS 1 Toute mauvaise connexion des fils pourrait endommager votre unité Lire attentivement les instructions données dans ce manuel pour une correcte connexion des fils 2 Il faut relier le fil de la batterie au terminal de la batterie même en dernier et seulement après avoir terminé et contrôlé toutes les autres connexions 3 Assurez vous d installer votre amplificateur dans une position qui garanti...

Страница 17: ...nibles en provenance de l unité principale il faut les relier à l entrée Front pour que les quatre canaux de sorties fonctionnent correctement Dans cette configuration les entrées Rear ont la fonction de sorties By pass avec l entrée Front Vous trouverez donc exactement le même signal comme forme et comme amplitude Nota Les réglages de la sensibilité resteront de toute façon indépendants 6 Sélecte...

Страница 18: ...de coupe comprise entre 30 Hz et 600 Hz de façon continue 9 Réglage du gain d entrée Rear il permet de régler la sensibilité du mode d entrée de l amplificateur qui varie de 200 mV à 4 V 10 Connecteurs d entrée RCA Rear ils permettent de relier les fils de sortie Pré de votre unité principale à l entrée de l amplificateur Ces entrées piloteront les étages finals de la section Rear 17 Sélecteur pou...

Страница 19: ...équate à un point propre sur la partie métallique du châssis de la voiture si possible à une vis déjà installée Il ne faut en aucun cas relier ce connecteur directement au pôle négatif de la batterie cela pourrait causer un grésillement désagréable pendant le fonctionnement de la voiture 16 Indicateur check control ce led indique l état de fonctionnement de l amplificateur BLANC l unité est éteint...

Страница 20: ...as Front et Rear 30 600 Hz Pente de coupe 12 dB Octave Réponse en fréquence 1 dB 10 50 000 Hz Distorsion harmonique totale 0 08 Rapport signal bruit pesé IHF A 100 dB Sensibilité d entrée Impédance 200 4000 mV 22 kOhm Impédance des haut parleurs Stéréo min 2 Ohm Mono min 4 Ohm Alimentation 14 4 V cc 11 16 V admis Poids 5 1 Kg Dimensions 212 L x 67 H x 445 P mm En raisons des améliorations continue...

Страница 21: ...retto potrebbe danneggiare l unità Leggere attentamente le istruzioni per il collegamento riportate da questo manuale 2 Collegare per ultimo il filo della batteria al terminale della stessa e solo dopo aver completato e controllato tutti gli altri collegamenti 3 Assicurarsi di installare l amplificatore in una posizione nella quale sia garantita una buona circolazione dell aria e una buona dissipa...

Страница 22: ... disposiposizione solo due segnali provenienti dall unità principale è necessario collegarli all ingresso Front per far si che tutti e quattro i canali in uscita funzionino Inquesta configurazione gli ingressi Rear fungono da uscita By pass con l ingresso Front cioè troverete esattamente lo stesso segnale per forma ed ampiezza Nota Le regolazioni della sensibilità resteranno comunque indipendenti ...

Страница 23: ...glio di frequenza in modo continuo compresa fra 30Hz a 600Hz 9 Regolazione del Guadagno di Ingresso Rear Permette di regolare la sensibilità di ingresso dell amplificatore che varia da 200mv a 4V 10 Connettori d Ingresso RCA Rear Permettono di collegare i cavi di uscita Pre della vostra unità principale all ingresso dell amplificatore Questi ingressi piloteranno gli stadi finali della sezione Rear...

Страница 24: ...0 600 Hz Pendenza d incrocio 12 dB Octave Risposta in frequenza 1 dB 10 50 000 Hz Distorsione armonica totale 0 08 Rapporto Segnale Rumore pesato IHF A 100 dB Sensibilità d ingresso Impedenza 200 4000 mV 22 komhs Impedenza degli altoparlanti Stereo Min 2 ohms Mono Min 4 ohms Alimentazione 14 4 V DC 11 16 V ammessi Peso 5 1 Kg Dimensioni 212 L x 67 A x 445 P mm A causa delle continue migliorie appo...

Страница 25: ...legare questo morsetto di massa tramite un cavo di sezione adeguata ad un punto pulito della parte metallica dello scassis dell automobile se possibile ad una vite gia installata Non collegare mai questo morsetto direttamente al negativo della batteria potrebbe causare dei fastidiosi ronzii durante il funzionamento del veicolo 16 indicatore check control Questo led indica lo stato di funzionamento...

Страница 26: ...erjudicar a la unidad Lean cuidadosamente las instrucciones para la conexión indicadas en este manual 2 Conectar por último el hilo de la batería al terminal de la misma y sólo tras haber completado y controlado las demás conexiones 3 Cerciorarse de haber colocado el amplificador en una posición que garantice buena circulación de aire y buena disipación del calor 4 Los fusibles tendrán que sustitu...

Страница 27: ... unidad principal habrá que conectarlas a la entrada Front para hacer funcionar los cuatro canales En esta configuración las entradas Rear juegan el papel de salida By pass con entrada Front es decir que hallarán exactamente la misma señal en cuanto a forma y amplitud Nota los ajustes de sensibilidad quedarán siempre independientes 6 Selector del modo de Salida 4CH 3CH 2CH permite seleccionar la c...

Страница 28: ... puede ajustar el corte de frecuencia en continua comprendida entre 30Hz y 600Hz 9 Ajuste de ganancia de entrada Rear permite ajustar la sensibilidad de entrada del amplificador que va de 200mv a 4V 10 Conectores de entrada RCA Rear permiten conectar los cables de salida Pre de su unidad principal a la entrada del amplificador Estas entradas guiarán los estadios finales de la sección Rear 15 Selec...

Страница 29: ...e un cable con sección apropiada a un punto limpio de la parte metálica del chasis del coche Si fuera posible a un tornillo instalado ya No conecten nunca este borne directamente al negativo de la batería podría originar un zumbido molesto al funcionar el vehículo 16 Indicador de check control Este diodo indica el estado de funcionamiento del amplificador BLANCO la unidad está apagada VERDE la uni...

Страница 30: ...MACROM LTD 3 MOREE ST 6850 MENDRISIO SWITZERLAND ...

Отзывы: