background image

GB-11 

REMOTE CONTROL 
 
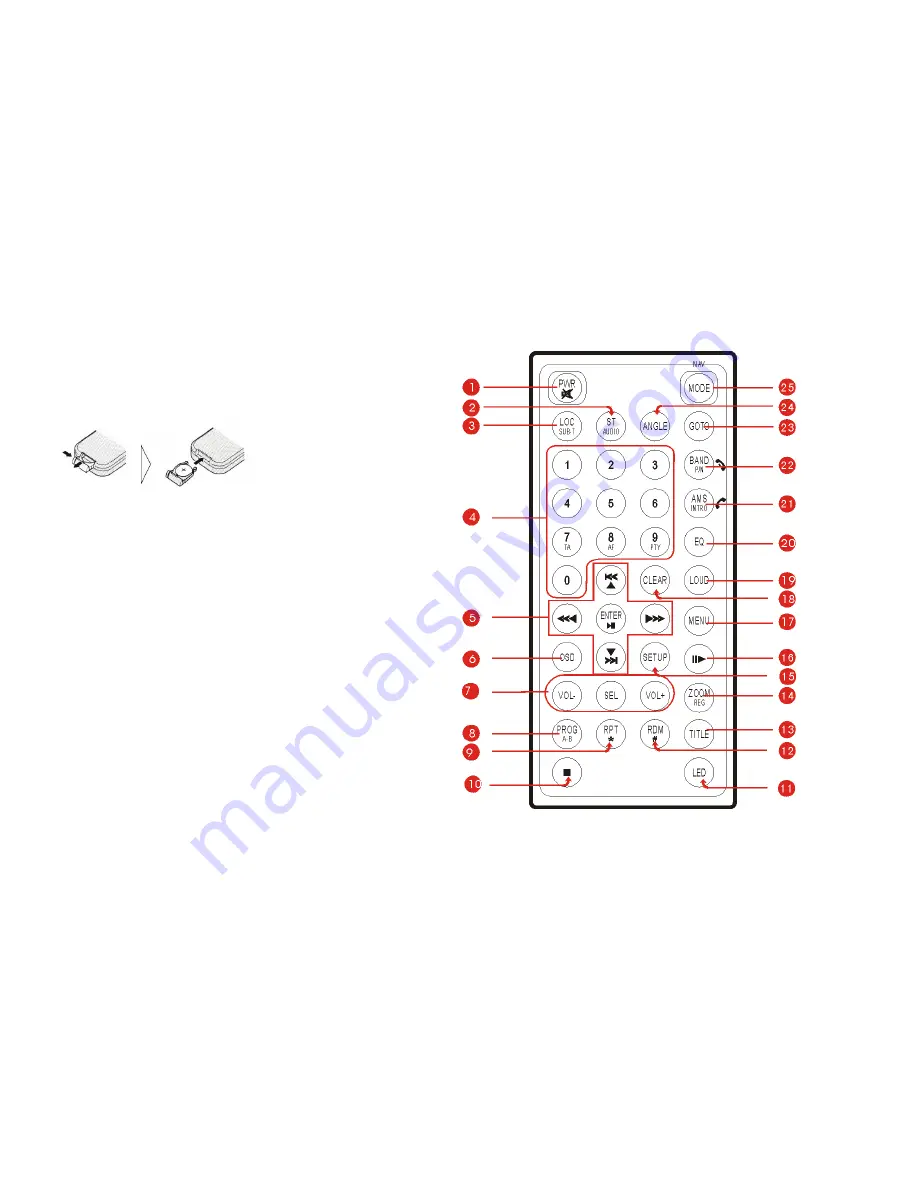
Installing the battery 
Slide the tray out on the back of the remote control and 
insert the battery with the plus (+) and minus (-) poles 
pointing in the proper direction. 


Use and care of the remote control 
Point the remote control in the direction of the front 
panel to operate to use it. 
 
Notes: 
Using batteries improperly can cause them to explode. 
Take note of the following points:   
* Keep the battery out of the reach of children. Should 
the battery be swallowed, immediately consult a doctor. 
* Use one CR2025 (3V) lithium battery.   
* Remove the battery if the remote control is not to be 
used for a month or longer. 
* Do not short-circuit, disassemble or heat batteries. 
* Do not dispose of batteries into fire or flames. 
* Dispose of spent batteries properly. 
* Do not let it fall onto the floor, where it may become 
jammed under the brake or accelerator pedals. 


REMOTE CONTROL 


Содержание M-DVD7601

Страница 1: ...NAVIGATION MULTIMEDIA RECEIVER INSTRUCTION MANUALS ...

Страница 2: ... MODES SWITCH 7 SYSTEM SETUP 9 REMOTE CONTROL 11 BASIC OPERATION 13 RADIO OPERATION 14 BLUETOOTH OPERATION 17 DVD VCD CD OPERATION 19 DVD SETUP 21 MP3 OPERATION 25 NAVIGATION OPERATION 26 INSTALLATION 27 CABLE CONNECTION 29 SPECIFICATION 30 TROUBLE SHOOTING 31 Note Due to continuous product improvement specifications and design are subject to change without prior notice IMPORTANT Please adjust scr...

Страница 3: ...ve X1 Removable Trim Ring equipped on the unit X1 Mounting Screw M5 X1 Rubber X1 Remote Control X1 Mount Strap X1 Wire connector X1 User manual X1 AV in cable X1 Screws M5X6 X 4 Screws M24 X 1 Release key X2 Washer X1 Desiccant X1 GPS antenna X1 ...

Страница 4: ...vents or radiator panels Doing so many cause heat to build up inside and may result in fire 6 After completing the installation and beginning to play the unit including replacing the battery please press RESET button on the front panel with pointed object such as ballpoint pen to set the unit to initial status Replacing the Fuse Make sure the amperage matches the specified value when replacing the...

Страница 5: ... inside the vehicle is between 60 C and 10 C before turning on your unit To enjoy optimum sound and images while playing handle the discs as follows Handle the disc by its edge to keep the disc clean and do not touch the surface do not use your disc with paste residue or ink attached does not use disc with labels or stickers attached which may leave a sticky residue while beginning to peel off Sho...

Страница 6: ...n off the unit When the unit is switched on press the button to shut off the sound output Press it again to resume previous sound level 5 SRC NAV Press this button to select one of the following sources Press and hold the button to start the navigation operation 6 LCD display 7 DISC Loading Slot 8 9 I I In radio mode press one of these buttons to seek a station automatically Hold down one of the b...

Страница 7: ...entally 15 PTY In radio mode press the button to select one of the program types 16 TA In radio mode press this button to turn on or off the TA mode 17 AF DISP In radio mode press this button to turn on or off the AF mode Press and hold the button to display the current time soft version current sources and medias Disc USB SD available 18 OPEN Press to open or close the TFT display 19 Anti theft l...

Страница 8: ...ing your finger to scroll will not choose or activate anything on the screen RADIO OPERATION 1 9 Touch once to seek a station automatically downwards upwards 2 station preset button Touch once to select the preset station Touch and hold to store the current station into the preset station position 3 BAND To switch bands 4 LOC To select strong or weak stations reception mode 5 AMS Touch once to bro...

Страница 9: ... the touch screen displays as following after touch at random position top right left area 1 PLAY PAUSE To start the playback and touch again to resume the playback 2 STOP To stop playing touch twice to stop completely 3 4 PREV NEXT To select previous next tracks 5 SETUP To display the DVD SETUP screen Note In DVD playback mode touch on the left middle position twice and TITLE MENU will display to...

Страница 10: ...1 the user can adjust the value of BASS TREBLE and SUB WOOFER by tapping on on the touch screen In AUDIO setting the user can adjust the sound output effect leftwards or rightwards by tapping button the sound output effect front wards or rearwards by tapping button 3 Video Press on the VIDEO button and the screen will display as following In this setting the user can adjust the value of CONTRAST B...

Страница 11: ...OUD ON To turn on the LOUNNESS function OFF To turn off the LOUDNESS function RADIO REGION To select the right region as per the user locates TOUCHSCREEN Tapping on TOUCHSCREEN button to turn to time TOUCHSCREEN adjust mode Touch Adjust When the display position on the screen and the touch position on the touch panel not matched or initiating the productat first time the adjustment becomes necessa...

Страница 12: ...y can cause them to explode Take note of the following points Keep the battery out of the reach of children Should the battery be swallowed immediately consult a doctor Use one CR2025 3V lithium battery Remove the battery if the remote control is not to be used for a month or longer Do not short circuit disassemble or heat batteries Do not dispose of batteries into fire or flames Dispose of spent ...

Страница 13: ...nd press again to resume play 6 OSD Press the button to display title elapsed title remain chapter elapsed chapter remain display off 7 8 VOL VOL SEL Press the button to increase or decrease volume level Press repeatedly SEL to switch the sound characteristics 9 A B PROG In DVD VCD CD mode press the button to set the program order In DVD VCD CD mode press and hold the button to play the selected A...

Страница 14: ...ands In DVD VCD mode press the button to select PAL AUTO or NTSC system In bluetooth mode press this button to function as what does on the mobile 24 GOTO In DVD VCD CD mode press to set the playback time In MP3 mode press this button to select the desired track by number buttons on the remote control 25 ANGLE Press to change the viewing angle in DVD playback mode 26 MODE NAV Press the button to s...

Страница 15: ...Auto switch to video When playing DVD in driving car there is YOU CANNOT USE THIS FUNCTION WHILE DRIVING display in TFT Just braking car the TFT can switch to video automatically 7 Auto switch when revering the car The unit can switch to the radar of revering the car automatically when revering the car So you can reverse the car easily and the sound will be shut off if the unit is playing RADIO OP...

Страница 16: ...e of the station preset buttons on the remote control also to select the preset stations 4 Store stations 4 1 Auto store It is a function for storing up to 6 stations Follow the two steps Select the desired band hold down AMS button the stations with good reception are stored automatically 4 2 Manual store To turn in a station to be stored in the preset memory press and hold any one of the preset ...

Страница 17: ...ly When a traffic information station is tuned in the TP mark display on touchable screen If you do not want to listen to the traffic information being received press TA button to skip that traffic information message The TA function will remain in the ON position And the unit will be back to previous mode 3 Press it again to switch off TA mode Traffic information is heard only when it is being br...

Страница 18: ...ap on the BLUETOOTH ICON at the MAIN MENU on the screen HANDS FREE PHONE The unit is compatible with Bluetooth international standard wireless communication technology You can place a hands free call by using a Bluetooth compatible with the mobile phone When you place a call speak loudly and clearly Shut the windows before calling It is normal that some unnatural voice may be heard during your cal...

Страница 19: ...ed on the DISPLAY COLUMN 2 PHONE BOOK Tap on PHONE BOOK button on the screen shown above the screen will display as following FIG 2 There are three items DIALED CALLS RECEIVED CALLS and MISSED CALLS A maximum of 15 numbers can be stored in each call history A maximum of 5 numbers will be displayed in each page Tap on button to turn to previous next page FIG 3 You can place a call by selecting a nu...

Страница 20: ...n eject a disc by pressing EJ button on the unit If the disc does not eject press MODE button to switch to the radio mode and press and hold EJ button for 3 seconds Quick track selection fast forward fast reward playback During playback mode press I or I on the remote control to select next previous chapter or track Press I or I button on the unit also perform the same operation Press the or butto...

Страница 21: ...r 2X 3X 4X 1 2 1 3 1 4 OFF This function is operated by using the remote control Programmed playback In VCD CD mode press the PGM button on the remote control and the program menu will be displayed Press the number buttons to select the track number Use the direction buttons to move the cursor to START and press ENTER to start programmed playback Move the cursor to EXIT and press ENTER to exit the...

Страница 22: ...ve constant parameters The user also can set it as needed by moving the cursor and using buttons and then presses ENTER to execute the selecting or entering item This function is operated by using the remote control Notes The selections are the preferred options that will be chosen if they are available on a disc If the inserted disc does not have the preferred option then the discs own preference...

Страница 23: ... the 4 3 aspect ratio The display format of DVD titles may vary please refer to the information that accompanies your specific DVD title If the DVD title is recorded in 16 9 wide display format while the TV is a standard 4 3 screen horizontal compression of the image will display Some DVD titles may be recorded in special formats In such cases the DVD titles will always appear on the screen in the...

Страница 24: ...pletely and the setting is effective on next time power on till exchanging the saved setting 3 1 AUDIO AUDIO Sets the preferred audio language as the default when playing DVD IF DVD supports these languages 3 2 SUBTITLE SUBTITLE Sets the preferred subtitle language as the default when playing DVD If DVD supports these languages 3 3 DISC MENU DISC MENU Sets the preferred menu language as the defaul...

Страница 25: ...ental control please set the password as ON to perform the lock of changing 3 5 DEFAULT DEFAULT Resets to all the manufacturer s original settings for this DVD player Press ENTER to perform the reset 4 PASSWORD SETUP PAGE 4 1 PASSWORD MODE PASSWORD MODE Sets the function operation to be ON for locking the parental function and OFF for changing the parental level There will be old password confirma...

Страница 26: ...a disc an SD MMC card or a USB device containing MP3 files Connect a USB device or press OPEN button to release the front panel insert a disc into the disc slot or SD MMC card into the card slot The unit will automatically switch on when a disc card or USB device is inserted The screen will display as follow During MP3 playback press the I or I button on the remote control or on the panel or touch...

Страница 27: ...s again to resume play SKIP FORWARD BACKWARD PLAY Press or on the remote control or press and hold I or I on the panel to performed fast rewind or fast forward 2X 4X 8X 16X 32X ISO FILE OPERATION When playing the media with folders the unit will play the first track in the first folder automatically Press the I or I on the remote control or PREV NEXT buttons on the screen to move the cursor to cur...

Страница 28: ...ge on the tunnel or near the building which can infect the signal received For safety please avoid operate the system while driving GPS system is operated in background at any modes INSTALLATION Notes Before finally installing the unit connect the wiring temporarily making sure it is all connected up properly and the unit and the system work properly Use only the parts included with unit to ensure...

Страница 29: ...tal 2 Fix the mounting bracket into place by pressing its tags outwards 3 Slide the main unit slowly inside the mounting bracket until the tags on either sides of the bracket lock into the respective holes on the sides of the main unit 4 Install the removable trim ring Detach the unit 1 Detach the removable trim ring 2 Insert the keys supplied to the unit at both sides of the unit shown as illustr...

Страница 30: ...le while connected to 12 V 2 The tel mute line should be available while connected to B 3 The parking break line should be available while connected to the car break A wrong connection can be easily detected by our technical service for a repair request under the warranty ...

Страница 31: ...2 65KG DVD PLAYER S N ratio more than 70dB 1 kHz Dynamic range more than 80dB 1 kHz Distortion less than 0 2 Video output 1 0Vp p 0 2V 75Ω Audio output RCA 2 0Vrms 0 3V 10KΩ FM TUNER Frequency range 87 5 108 0MHz Usable sensitivity 10dB S N ratio 55dB mono Distortion 0 5 mono Stereo separation 30dB 65dBu 1 kHz MW TUNER Frequency range 522 1620 kHz Usable sensitivity 30dB Signal to noise ratio 50dB...

Страница 32: ...s Check using another disc The disc is dirty Clean the disc The loaded disc is a type this unit cannot play Check the disc type with the Technical Specifications Playback is not possible Non compatible video system disc is loaded Change to a disc compatible to your video system The speaker connections are incorrect Check speaker connections or the connection with an amplifier if used With some dis...

Страница 33: ...th one featuring the same region code as this unit The DVD playing does not have multiple language recordings You cannot select among multiple languages if they aren t recorded on the disc Dialog language and subtitle language can not be selected You can only select between options indicated in the disc menu Select using the disc menu The DVD playing does not have subtitles Subtitles are not displ...

Страница 34: ...ng copying the picture may suffer from horizontal stripes or other imperfections when viewed on some displays This does not mean this unit is malfunctioning If at any time in the future you should need to dispose of this product please note that waste electrical product should not be disposed of with household waste Please recycle where facilities exist Check with Your Local Authority or retailer ...

Страница 35: ...liga egenskapskrav och övriga relevanta bestämmelser som framgår av direktiv 1999 5 EG Danish Undertegnede Macrom erklærer herved at følgende udstyr M DVD7701 overholder de væsentlige krav og øvrige relevante krav i direktiv 1999 5 EF German Hiermit erklärt Macrom dass sich dieser diese dieses M DVD7701 in Übereinstimmung mit den grundlegenden Anforderungen und den anderen relevanten Vorschriften ...

Страница 36: ...red trademarks owned by the Bluetooth SIG Inc and any use of such marks by ALDINET S p A is under license The MACROM brand is a registered trade mark of MACROM SA and any use of such marks by ALDINET S p A is under license Declaration of Conformity ...

Отзывы: