background image

- 7 - 

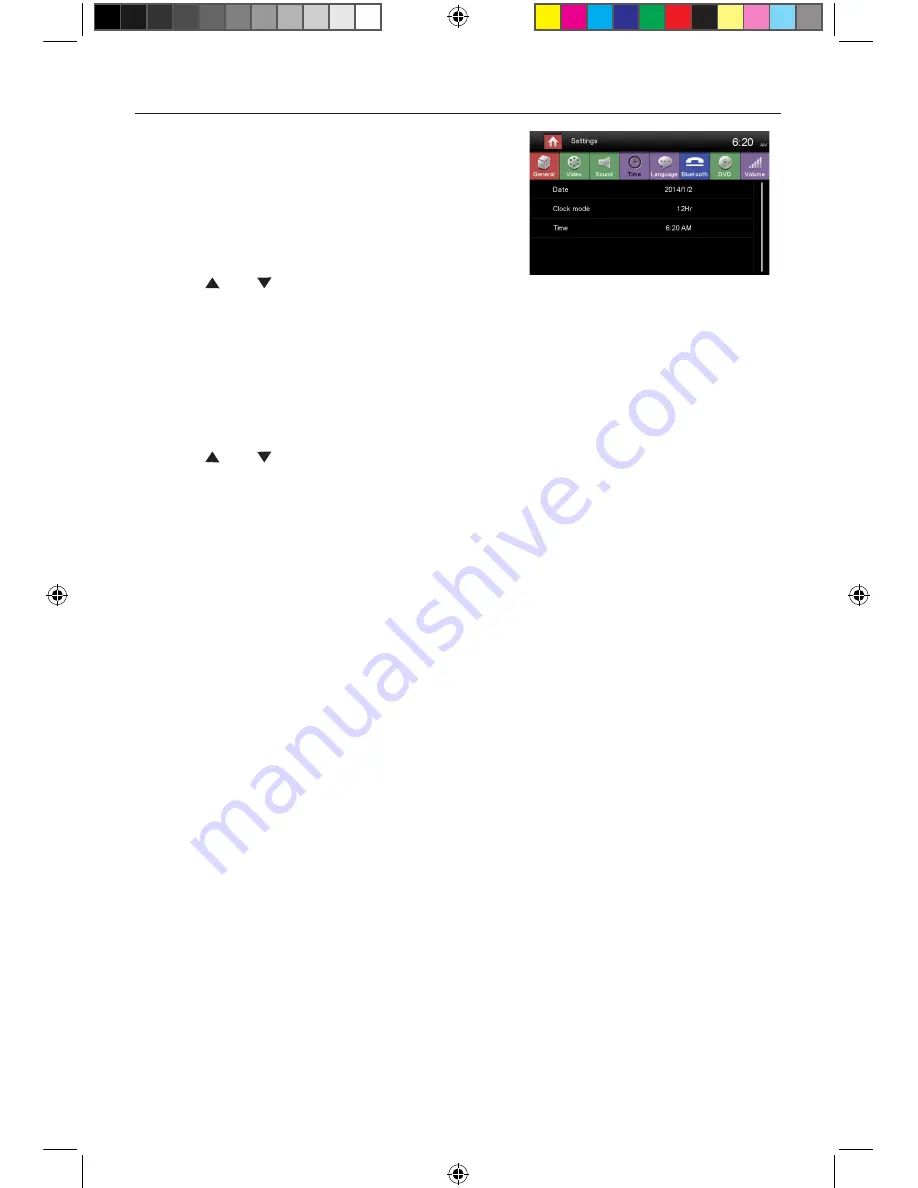
Setting Date /Time

1.  Touch [ Settings].

2.  Touch [ Time ].

  The date/time setup menu is displayed.

Set Date

1.  Touch [ Date ].

2.  Touch the date information on the screen .

  A submenu is displayed.

3.  Touch [   ] or [   ] to set year, month and day.

Set Clock Mode

1.  Touch [Clock mode].

2.  Touch [12Hr] or [24Hr] to switch clock mode.

Set Time

1.  Touch [ Time ].

2.  Touch the time on the screen, a submenu is displayed.

3.  Touch [   ] or [   ] to set hour and minute.

4.  When date/time is set, touch [ Save ] to confirm or [ Cancel ] to exit.

M-DVD6560 User manual_ENG.indd   7

23/05/2014   14:36:28

Содержание M-DVD6560

Страница 1: ...USER MANUAL M DVD6560 M DVD6560 User manual_ENG indd 1 23 05 2014 14 36 25 ...

Страница 2: ...w w w m a c r o m i t M DVD6560 User manual_ENG indd 2 23 05 2014 14 36 25 ...

Страница 3: ... MUTE OK Never install this unit where the operation condition for safe driving is impaired Never use the video display function in the front when driving to prevent the violation of laws regulations and also to reduce the risk of traffic accident except for using rear view video camera MUTE OK MUTE OK Thank you for purchasing this product Please read through these operating instructions so you wi...

Страница 4: ...e in the car becomes normal before operating the unit 5 Using the car heater in low temperature environment may result in moisture inside the unit DO NOT use the unit in this situation Eject the disc and wipe off the moisture on the disc If the unit still doesn t work after a few hours please contact the service center 6 Do not impact the LCD monitor which could cause damage 7 To prevent damage to...

Страница 5: ...ayback 11 Connect a USB Device 11 Remove a USB Device 11 Play Pause 11 Previous Next 11 Search for a Folder 12 Repeat 12 Repeat A B 13 Shuffle Random Play 13 Select Audio Mode 13 Select Subtitle Language 13 Playback Information 14 Direct Track Entry 14 Rotate Pictures 14 Zoom 14 Video Setup 14 Bluetooth Mode 15 Pair the Bluetooth enabled Devices 15 Disconnect Bluetooth Device 15 Make a Call 15 Rec...

Страница 6: ...ct overview Notice The graphic in this manual is for reference only and may be different from the actual unit 1 2 3 9 8 MUTE Key Press briefly to activate the MUTE function Press again to resume normal sound 9 Reset Load the original settings 10 USB connector Connect an USB device for playback of music video picture files 11 Map card slot The MicroSD card slot is used for the Navigation Map not fo...

Страница 7: ...es cancels the mute function Power On Off Press the knob on the unit or the POWER button on the remote control to turn the unit on The buttons on the front of the unit light up for a moment and the last working mode appears on the screen Press the knob again to turn off the unit Audible Beep Confirmation An audible beep tone confirms each function selection The Beep tone can be disabled through th...

Страница 8: ... 1 Enter the EQ setup mode Touch the icon in the user interface and the EQ setup interface will display on the screen 2 Adjust subwoofer volume Touch or drag to adjust subwoofer volume from 12 to 12 3 Adjust fader balance value Touch to adjust fader balance value from 20 to 20 Front speaker Rear speaker Left speaker Right speaker Basic Operations EQ Menu The Audio Control feature allows you to eas...

Страница 9: ...ubmenu is displayed 3 Touch or to set year month and day Set Clock Mode 1 Touch Clock mode 2 Touch 12Hr or 24Hr to switch clock mode Set Time 1 Touch Time 2 Touch the time on the screen a submenu is displayed 3 Touch or to set hour and minute 4 When date time is set touch Save to confirm or Cancel to exit M DVD6560 User manual_ENG indd 7 23 05 2014 14 36 28 ...

Страница 10: ... Touch to delete the input number step by step 3 Touch OK to enter Radio Mode 1 Touch to view the MENU and select a new playback source 2 Strong Local signal broadcasting indicator 3 Stereo broadcasting indicator 4 Current radio band indicator 5 Broadcaster information stored at the preset 6 Touch to view more on screen buttons 7 Touch to seek backward 8 Touch for quick access to EQ level settings...

Страница 11: ...off RDS function CT To turn on or off Clock Time synchronization function EON To turn on or off EON function TA To turn on or off TA function PTY To show PTY list VOL Touch to adjust TA volume Radio Mode Preset Station The unit has 5 bands such as FM1 FM2 FM3 AM1 AM2 and each band can store 6 stations the unit can store 30 stations in total Search Stations Automatically Touch to search station and...

Страница 12: ...eset stations including the one that currently tuned into TA Function The TA Traffic Announcement function lets the unit receive traffic announcements automatically The TA function can be activated by a TP Traffic Program station broadcasting traffic information When TA is activated and a traffic announcement is received the current playing source will be overridden by the traffic announcement The...

Страница 13: ...the on screen controls touch the screen except upper left corner and touch again to cancel display Touch to view all function icons Connect a USB Device 1 Open the USB door 2 Insert the small end of the USB cable to mini USB socket then connect the other end of the cable to your USB device Remove a USB Device 1 Select other source on the main menu 2 Remove the USB device Play Pause 1 Once a disc U...

Страница 14: ...Folder Control 1 Touch to display all available folders 2 Touch a folder then touch the desired file 3 Touch the file again to start play Repeat For DVD VCD movie disc 1 Touch bottom half of the screen to display menu on the screen 2 Touch to display the 2nd menu 3 Touch repeatedly to select DVD Repeat chapter Play the current chapter repeatedly Repeat title Play all chapters in the title repeated...

Страница 15: ...d Shuffle Random Play You can play audio tracks files in random order 1 Touch the screen to display control menu if necessary 2 Touch to display the 2nd menu if necessary 3 Touch on the screen repeatedly to turn random play on or off Select Audio Mode When you play VCDs you can select an audio mode R L Stereo 1 During play touch bottom half of the screen to display menu on the screen if necessary ...

Страница 16: ...ack information 01 08 indicates that this VCD has 8 tracks and the track playing back now is the first track Elapsed Time 1 Elapsed time of the current track 2 Total time of the current track DVD T 01 08 C 005 012 1 2 3 VCD Track 01 08 1 2 00 01 20 00 30 17 1 2 Rotate Pictures 1 When you view pictures touch the screen to display menu on the screen if necessary 2 Touch to display the 2nd menu 3 Tou...

Страница 17: ...ies of the device Compatibility with all Bluetooth device is not guaranteed Any obstacle between this unit and a Bluetooth device can reduce the operational range Keep this unit away from any other electronic device that may cause interference Disconnect Bluetooth Device To disconnect one device touch Tip The device will also be disconnected when the device is moved beyond the operational range If...

Страница 18: ...st Bluetooth settings in the Settings menu Bluetooth Music Mode A2DP A2DP is short for Advanced Audio Distribution Profile The mobile phones supporting this function can transmit stereo audio whereas the ones not supporting this function can transmit mono audio only AVRCP AVRCP is short for Audio Video Remote Control Profile The mobile phones supporting this function can control the playback of a ...

Страница 19: ...or valid you should calibrate the touch screen through calibration setting function Adjust the response positions of the touch panel as followings 1 Press the Calibration option on the setup menu to enter 2 Touch Start to enter 3 Aim at center of follow the path as shown of the figure after steps from 1 to 5 touch anywhere on the screen to save and exit from calibration Or wait for 30 seconds to e...

Страница 20: ...it Language settings Description OSD Select on screen display language DVD audio Select DVD audio language Options available depend on DVD disc DVD subtitle Select DVD subtitle language Options available depend on DVD disc Disc menu Select DVD menu language Options available depend on DVD disc Bluetooth settings 1 Touch Bluetooth 2 Touch an option repeatedly to select 3 Touch or press the Menu but...

Страница 21: ... 17 to view R Restricted recommend parents to guide children under 17 to view NC 17 Unsuitable for children under age 17 Adult Acceptable for adults only DRC On Off Dynamic range compression on or off Load factory Restore to default settings Volume settings You can set different volume for different modes 1 Touch Volume 2 Touch on a source DVD Bluetooth USB AV IN1 front SDHC AV IN2 rear optional R...

Страница 22: ...he navigation software 3 For instructions on using of navigator refer to the manufacturer s user manual Nota While Navigation is running you can view the previously selected source by holding the MENU button Press again and hold the MENU button to return to the navigation mode Where it was used the Bluetooth function you can display the navigation following the procedure described above Other Mode...

Страница 23: ... 80dB Dynamic Range 80dB Distortion line out 0 1 Frequency Response 3dB 20Hz 20KHz Maximum Output Power 4 45W Load Impedance 4Ω AUX IN Distortion 0 5 Frequency Response 3dB 20Hz 20KHz Audio Input Level 1Vrms Audio Audio Output Impedance 100Ω Audio Output Level 2Vrms Max Video Normal Video Input Level CVBS 1 0 0 2V Video Input Impedance 75Ω Video Output Impedance 75Ω Video Output Level 1 0 0 2V Env...

Страница 24: ...VD MP4 Xvid optional Region Code According to DVD sale region the whole world is divided into six regions A DVD disc can be played back only when its region code is compatible with that of the player in use Region 1 USA Canada East Pacific Ocean Islands Region 2 Japan West Europe North Europe Egypt South Africa Middle East Region 3 Taiwan of China Hong Kong of China South Korea Thailand Indonesia ...

Страница 25: ...nnection between ACC and BATT Check wiring and correct TFT monitor Warning information is shown at all times Parking break wiring is not correct Check wiring and correct Flashing image or interference appears on screen The color system of DVD disc does not match the monitor Adjust the color system of the DVD disc playing back or the monitor in use Pirated disc is in use Use original disc Video cab...

Страница 26: ... GPS ANT RED WHITE YELLOW BLUE RED WHITE YELLOW RED WHITE RED BLACK BATTERY 12V GROUND SUBWOOFER REAR R REAR L FRONT R FRONT L FRONT R REAR R FRONT R REAR R FRONT L REAR L FRONT L REAR L GRAY VIOLET GRAY BLACK VIOLET BLACK GREEN WHITE BLACK GREEN BLACK ORANGE DIMMER WHITE BLACK WHITE PURPLE YELLOW WHITE BROWN BROWN BLACK PINK Steering Wheel controls M DVD6560 User manual_ENG indd 24 23 05 2014 14 ...

Страница 27: ...w w w m a c r o m i t M DVD6560 User manual_ENG indd 25 23 05 2014 14 36 42 ...

Страница 28: ...tered trademark of ALDINET S p A Declaration of Conformity ALDINET S p A Viale C Colombo 8 20090 Trezzano s N MI Itlaly Tel 39 02 484781 w w w m a c r o m i t M DVD6560 User manual_ENG indd 26 23 05 2014 14 36 42 P N 127075005965 ...

Отзывы: