background image

- 4 - 

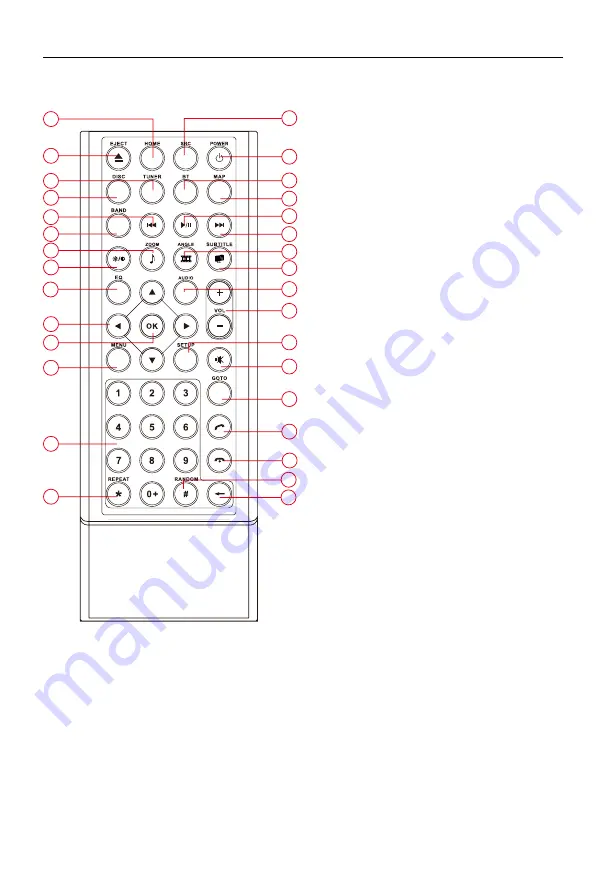
Front view

Remote control overview

1

2

3
4

5
6

7
8

9

10

11

12

13

14

15

16

17

18

19

20

21

22

23

24

25

26

27

28

29

31

30

1.  Return to the home menu

2.  Eject the disc

3.   Access to tuner source

4.  Access to disc source

5.  Search an available radio station by 

decreasing tuning frequency 


Select the previous chapter/track for playback

6.   Select radio band

7.  Zoom in (Picture menu)


Access to music list

8.  Adjust screen settings

9.   Open EQ menu

10. Menu cursor

11. Enter 

12. Open route menu (DVD)


Turns on/off PBC (VCD)

13. Digit area

14. Repeat playback

15. Change to next source

16. Power on/off

17. Access to Bluetooth source

18. Access to navigation source

19. Pause playback/Start playback

20. Search an available radio station by increasing 

tuning frequency 


Select the next chapter/track for playback

21. Playback disc in different angle for a scene 

(DVD)


Rotate (photo playing)


Access to video list

22. Language selection for subtitle (DVD)

      Access to photo list

23.  Change the audio language for disc playback 

(DVD)

24. Increase/Decrease volume

25. Access to settings source

26. Mute on/ off audio output 

27. Activate direct access mode 

28. Dial/Receive a call

29. Hang up

30. Play all chapter/tracks in random order

31. Press to clear the number one by one


Hold to clear all the numbers

Содержание M-DVD6000

Страница 1: ...USER MANUAL M DVD6000...

Страница 2: ...isc 12 Touch Screen Controls 12 Controlling Playback 12 Connect a USB Device 12 Remove a USB Device 12 Play Pause 12 Previous Next 12 Search for a Folder 13 Repeat 13 Repeat A B 14 Shuffle Random Play...

Страница 3: ...wer supply with negative grounding Never install this unit where the operation condition for safe driving is impaired Never use the video display function in the front when driving to prevent the viol...

Страница 4: ...o prevent damage to the screen avoid touching it with sharp objects 8 To provide a clear demonstration and an alternative for easy understanding to the operation of this unit graphic illustrations are...

Страница 5: ...and parental lock settings 5 Auxiliary Audio Video Input Accepts a 3 5mm jack through which signals from various audio video devices can be applied to the unit 6 USB Connector Connect a USB device fo...

Страница 6: ...playback 15 Change to next source 16 Power on off 17 Access to Bluetooth source 18 Access to navigation source 19 Pause playback Start playback 20 Search an available radio station by increasing tuni...

Страница 7: ...unshine fire or the like CAUTION Danger of explosion if battery is incorrectly replaced Replace only with the same or equivalent type Correct Disposal of this product This marking indicates that this...

Страница 8: ...cancels the mute function Power On Off Press the VOL knob on the unit to turn the unit on The buttons on the front of the unit light up for a moment and the current mode status appears in the LCD Pres...

Страница 9: ...oundings and your interest 1 Enter the EQ setup mode Touch the icon in the user interface and the EQ setup interface will display on the screen 2 Adjust subwoofer volume Touch or drag to adjust subwoo...

Страница 10: ...ion on the screen A submenu is displayed 3 Touch or to set year month and day Set Clock Mode 1 Touch Clock mode 2 Touch 12Hr or 24Hr to switch clock mode Set Time 1 Touch Time 2 Touch the time on the...

Страница 11: ...number to input frequency 2 Touch to delete the input number step by step 3 Touch OK to enter Radio Mode 1 Touch to view the MENU and select a new playback source 2 Strong Local signal broadcasting in...

Страница 12: ...setting RDS To turn on or off RDS function CT To turn on or off Clock Time synchronization function EON To turn on or off EON function TA To turn on or off TA function PTY To show PTY list VOL Touch t...

Страница 13: ...updates the AF list of preset stations including the one that currently tuned into TA Function The TA Traffic Announcement function lets the unit receive traffic announcements automatically The TA fu...

Страница 14: ...olling Playback To access the on screen controls touch the screen except upper left corner and touch again to cancel display Touch to view all function icons Connect a USB Device 1 Open the USB door 2...

Страница 15: ...e again to start play For Folder Control 1 Touch to display all available folders 2 Touch a folder then touch the desired file 3 Touch the file again to start play Repeat For DVD VCD movie disc 1 Touc...

Страница 16: ...Repeat A B off is displayed Shuffle Random Play You can play audio tracks files in random order 1 Touch the screen to display control menu if necessary 2 Touch to display the 2nd menu if necessary 3 T...

Страница 17: ...r VCD 1 Disc type 2 VCD Track information 01 08 indicates that this VCD has 8 tracks and the track playing back now is the first track Elapsed Time 1 Elapsed time of the current track 2 Total time of...

Страница 18: ...th the Bluetooth capabilities of the device Compatibility with all Bluetooth device is not guaranteed Any obstacle between this unit and a Bluetooth device can reduce the operational range Keep this u...

Страница 19: ...etup Tip You can also adjust Bluetooth settings in the Settings menu Bluetooth Music Mode A2DP A2DP is short for Advanced Audio Distribution Profile The mobile phones supporting this function can tran...

Страница 20: ...u should calibrate the touch screen through calibration setting function Adjust the response positions of the touch panel as followings 1 Press the Calibration option on the setup menu to enter 2 Touc...

Страница 21: ...nguage settings Description OSD Select on screen display language DVD audio Select DVD audio language Options available depend on DVD disc DVD subtitle Select DVD subtitle language Options available d...

Страница 22: ...under age 13 PG R Recommend parents to restrict children under 17 to view R Restricted recommend parents to guide children under 17 to view NC 17 Unsuitable for children under age 17 Adult Acceptable...

Страница 23: ...ouch Navigation to start the navigation software 3 For instructions on using of navigator refer to the manufacturer s user manual Nota While Navigation is running you can view the previously selected...

Страница 24: ...tivity 9KHz 50dB Frequency range 522 1620KHz BT Frequency 2 480 GHz EIRP power 4 60 dbm GPS Frequency 1 500 GHz LCD Screen size 6 2 inches 16 9 Display resolution 800X480dots Contrast radio 400 Bright...

Страница 25: ...it rate Supported Video Formats DVD MP4 Region Code According to DVD sale region the whole world is divided into six regions A DVD disc can be played back only when its region code is compatible with...

Страница 26: ...engine is off Incorrect connection between ACC and BATT Check wiring and correct TFT monitor Warning information is shown at all times Parking break wiring is not correct Check wiring and correct Flas...

Страница 27: ...PARKING REVERSE SWC GND SWC2 SWC1 P CONT Video Out Yellow CONNECTOR A CONNECTOR B CONNECTOR A CONNECTOR B Yellow Red White Yellow Red White Red White Brown Brown USB 0 5A Pink Green with White Black...

Страница 28: ...that the type of radio equipment Multimedia Navigation Receiver model M DVD6000 brand Macrom complies with the 2014 53 EU Directive The full text of the EU Declaration of conformity is available at th...

Отзывы: