IM213D-MC Issue 10 © 2017
Page 2 of 8
Operational Overview
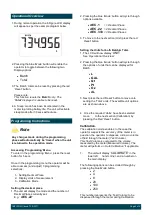
1. During normal operation the 6 Figure LCD display
will appear as per the example diagram below.
2. Pressing the blue ‘
Mode
’ button will enable the
operator to toggle between the following two
Display options.
•
Batch
•
Total
3. The ’Batch’ total can be reset by pressing the red
‘
Reset
’ button.
Please note:
This function resets the ‘
Batch
’ only. The
‘
Total’
displayed is unable to be reset.
4. A ‘
Sleep
’ mode has been incorporated in the
meter to prolong battery life. The unit will activate
sleep mode after 30 secs without use.
2. Pressing the blue ‘
Mode
’ button will cycle through
options available
•
dEC .1
= 1 Decimal Place
•
dEC .22
= 2 Decimal Places
•
dEC .333
= 3 Decimal Places
3
.
To move to the next section (Unit) press the red
‘
Reset
’ button
Setting the Units for both Batch & Total.
1. The LCD will now display ‘
UNIT
’.
See ‘
Operational Overview’
.
2. Pressing the blue ‘
Mode
’ button will cycle through
the options of units that can be displayed for
Batch.
•
L
•
GAL
•
Qt
•
Pt
•
Oz
•
dL
3. Next press the red ‘Reset’ button to move onto
setting the ‘Total’ units. The availible unit options
are as shown above.
4. Once the required ‘Units’ have been selected
move
to the next section (Calibration) by
pressing the Red ‘
Reset
’ button.
Programming Instructions
Note
Any changes made during the programming
phase will automatically be ‘
Saved’
when the unit
is returned to the operation mode.
Accessing ‘Programming’ Menu
To enter in the programming ‘Menu’, press the reset
button for 5 secs.
Once in the programming menu the operator will be
able to access (and adjust) 3 programming
selections.
1- Setting Decimal Place
2- Display Units of measurement
3 - Calibration Mode
Setting the decimal place.
1.The unit will display the mode and the number of
Decimal Places currently set.
E.g. ‘
dEC .22
”
Calibration.
The calibration mode enables, in the case the
operator suspects the accuracy of the meter is in
question, the operator to dispense a known volume
of fluid through the meter (Test Volume)
This Test Volume is compared to the volume
measured by the meter (Measured Volume). The
meter will perform an ‘Auto Calibration’ if applicable.
1.
The unit will display ‘
CALIBRATE
’ in the
lower left
hand corner, and a number on
the main display.
The following options can be scrolled through by
pressing the blue
Mode
button
•
2
•
4
•
8
•
20
•
100
•
250
This number represents the ‘Test Volume’ to be
dispensed through the meter during Calibration.


