10
QUAD EQ
Quad EQ
11
Owner’s Manual
Owner’
s Manual
You can also select a group of filters by holding one,
then turning the KNOB to select a band of adjacent
filters. Let go of the first one, then turn the KNOB to
adjust the level of this group.
Setting a filter to 0 dB
Press and hold the EDIT [13] button and any
FILTER SELECT button to return that filter to unity
(0 dB).
Setting all filters to 0 dB
Press and hold the EDIT [13] button and the MAS-
TER SELECT [11] button to reset all the channel
filters to unity (0 dB).
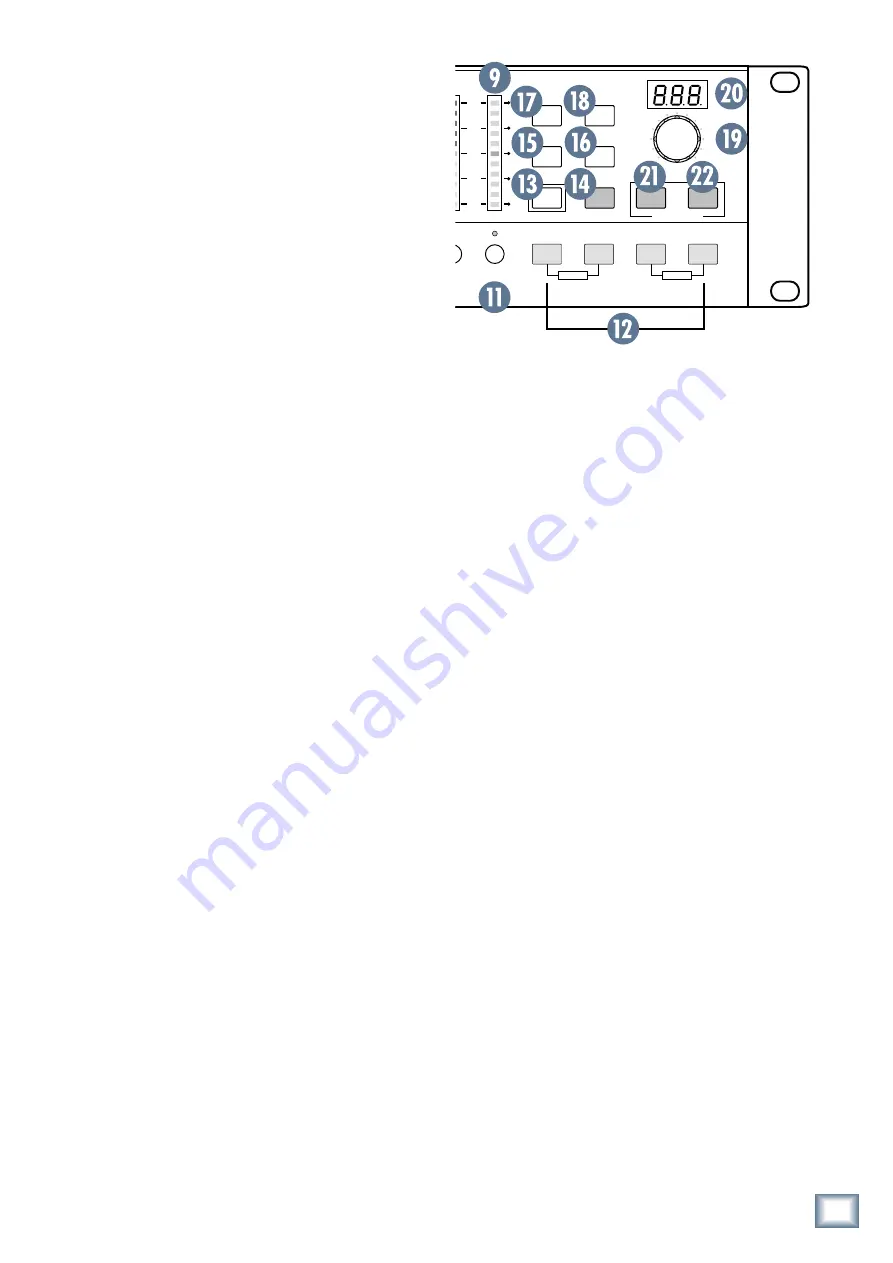
11. MASTER SELECT button and LED
Press this button to select the main output, then turn
the KNOB [19] to adjust the main output level. The
dB reading (±12) appears temporarily in the DISPLAY
above the KNOB.
12. CHANNEL SELECT buttons A/B/C/D
These backlit buttons allow you to select the channel
to be adjusted.
There are options to link pairs in stereo, and to lock a
channel as follows:
Stereo Linking
Pressing and holding A and B at the same time will
link/unlink these channels in stereo. When linked,
the pair take on channel A’s settings.
Pressing and holding C and D at the same time will
link/unlink these channels in stereo. When linked,
the pair take on channel C’s settings.
If two channels are linked, then any changes to the
filters will affect both channels equally.
If you use the NOISE function, then the noise will be
present in both of the linked channels.
Locking a channel
Press and hold the EDIT [13] button and A, B, C or
D to lock/unlock that channel.
A channel is unlocked when the channel A-D buttons
are lit solid, and it is locked when they are blinking.
When a channel is locked, its filters cannot be edited
until it is unlocked using the same press-and-hold
method.
Function Buttons
The function buttons include RTA [17], MIC [18],
NOISE [15], FILTER [16], and EDIT [13].
These buttons have two modes of operation:
1. Pressing the RTA, MIC, and FILTER buttons
toggles them on/off (the button lights when
on). To activate the noise feature, press a chan-
nel button first (A, B, C or D), then NOISE.
2. Pressing EDIT and then any of the four func-
tions allows deeper access to the settings of
these functions. Details below…
13. EDIT button
This button is your friend. It lets you access the extra
features of the other function buttons. Press EDIT
first, followed by a button such as RTA [17], MIC [18],
NOISE [15], or FILTER [16]. What happens then is
described in the sections below, under Noise Edit, RTA
Edit, MIC Edit, and Filter Edit. (See back cover table.)
EDIT blinks when engaged, and while it is blinking
you can jump around to any mode to make adjustments.
For example, you can adust RTA, NOISE and FILTER all
without quitting the EDIT mode.
To quit the EDIT mode, you can press EDIT again, or
press the KNOB [19] in. (Its a knob and a button, wow!)
14. BYPASS button
Press this button to bypass the currently-selected EQ
channel. The incoming signals will pass through to the
outputs of the Quad EQ, without being affected by any
changes in EQ or other controls. The button will illumi-
nate when a channel is bypassed.
The channel will stay bypassed even when another
channel is selected, and recalled when the channel is
reselected. Press BYPASS again to leave Bypass mode.
���������
����
���������
���
�����
���
��
��
��
��
�����
����
����
�����
����
��
���
���
���
���
���
���
���
���
���
���
��
��
��
��
����
��
�
�
�
���
����
��
�
�
�
���
���
���
���
�
��
�
�������
�������
���������������������������
����
�����
���
���
������
������
������
�����
�
�
�
�
��������������
���
����
���
�����
���
��
��
��
��
�����
����
����
�����
����
��
���
���
���
���
���
���
���
���
���
���
��
��
��
��
����
��
������
������
��������������
Содержание QUAD EQ
Страница 1: ...OWNER S MANUAL 4 CHANNEL DIGITAL GRAPHIC EQUALIZER QUAD EQ...
Страница 3: ......
Страница 4: ...4 QUAD EQ Quad EQ...
Страница 5: ......
Страница 6: ...6 QUAD EQ Quad EQ Hookup Diagrams...
Страница 7: ...7 Owner s Manual Owner s Manual FRONT OF HOUSE MAIN MIX EQ...
Страница 8: ...8 QUAD EQ Quad EQ STUDIO TUNING...
Страница 16: ...16 QUAD EQ Quad EQ...
Страница 21: ...21 Owner s Manual Owner s Manual Block Diagram...


