9
CONVERTING TO RACKMOUNT MODE
Not only is the new CR1604-VLZ a compact,
professional-quality tabletop mixer, it’s rack-
mountable! Its unique rotating input pod
makes this possible.
One of the things that revolutionized the com-
pact mixer industry was the “convertible pod”
found on the original, classic CR-1604. Using
an ordinary Phillips screwdriver, the mixer
could be converted from desktop mode (as it
comes from the factory) to rackmount mode.
Fear not. We wouldn’t dare take that feature
out of the New Improved CR1604-VLZ. It’s
still there and still takes just a few minutes
with your screwdriver. Here’s how it’s done:
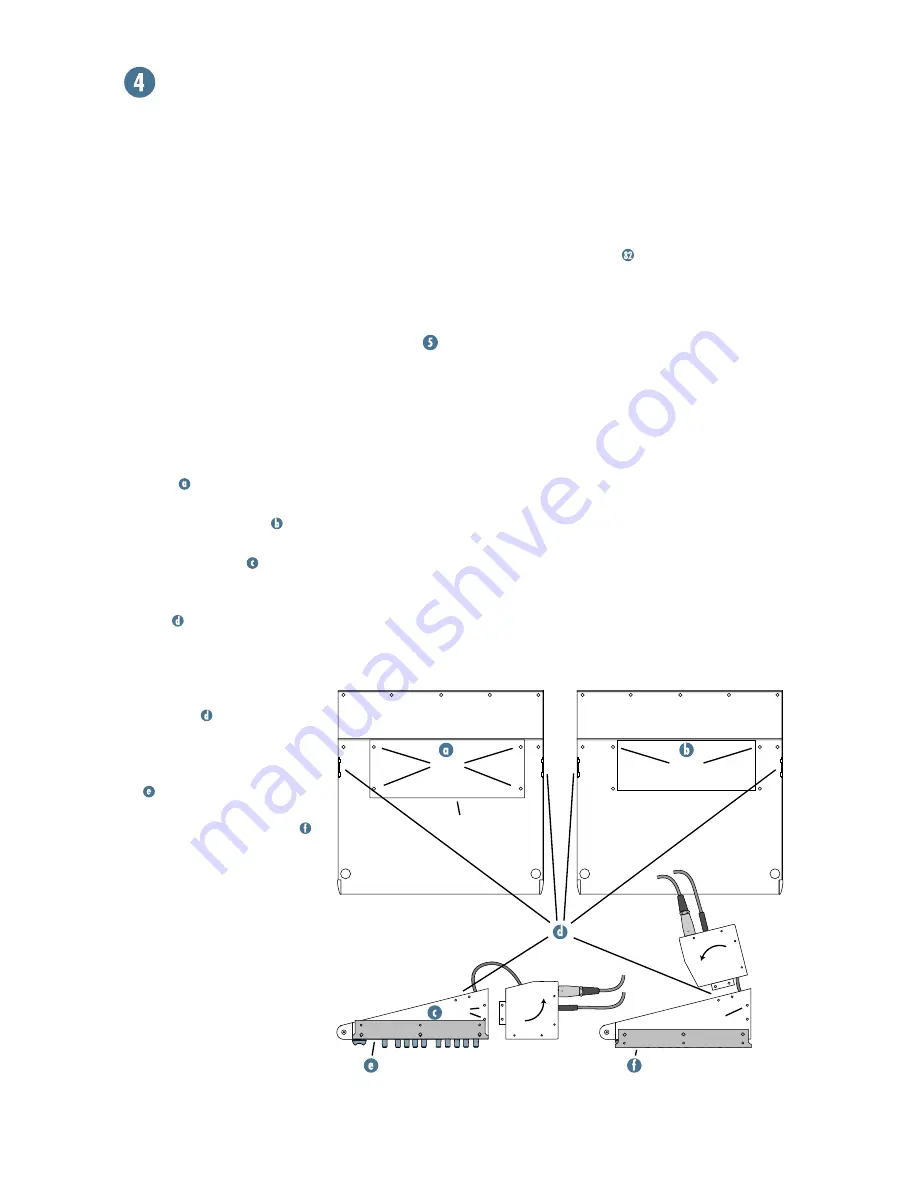
1.
Remove ALL the cords from the mixer —
audio, power, lamps, everything.
2.
Place the mixer, face down, on a clean soft
surface, like a blanket or very large dog.
3.
Remove the four screws securing the cable
cover and set the plate aside.
4.
Replace two of the screws; the ones at the
pod end of the mixer .
5.
Remove two pod-mounting screws on each
side of the mixer .
6.
Gently pull the pod away from the slots, rotate
it, and place it, tabs first, into the rackmount
tabs , located on the underside of the
main chassis. Be careful not to constrict or
pinch any of the ribbon or power cables.
7.
Carefully install the pod-
mounting screws in their new
locations
.
8.
Install the rack ears that came
with the mixer. They can be in-
stalled in either of two depths:
mixer’s surface flush with
the rack rails, like ordinary
rackmount equipment, or
mixer’s surface sunken into
the rack, to protect the
knobs from being bumped.
An optional accessory called the ROTOPOD-
VLZ is available and can be used in desktop or
rackmount installations. It will put the patchbay
jacks on the same plane as all the knobs, buttons
and faders. This is a lifesaver in applications that
demand frequent repatching, and costs a heck of a
lot less than an external patchbay, not to mention
all the interface and patch cords:
. Please
visit your dealer for more exciting details. Be
sure to order the “VLZ” version so you don’t
end up with the one for the classic CR-1604!
SWITCHING POSITIONS
You may have noticed the white stripes printed
just above most of the pushbutton switches on
your CR1604-VLZ. We’ve put them there to
make it easier for you to see if the switch is
engaged (down). Here’s how they work:
With the mixer in desktop mode, you’ll be
sitting just in front of it, viewing the control
panel at an oblique angle. When a switch is
disengaged (up), the button will hide the
white stripe from your field of vision. When
you engage the switch, the stripe will suddenly
appear. Although it may not seem obvious at
first, you’ll soon find that the indicator stripe
really helps you determine switch positions at
a glance. Clever, ain’t it?
remove
screws
rackmount
tab slots
remove
plate
replace
screws
remove
screws
flush mount
rotate
pod
replace
screws
sunken


