Machine Mart airmaster TIGER 9/24 Скачать руководство пользователя страница 24

24

Содержание airmaster TIGER 9/24

Страница 1: ...1 TIGER 9 24 AIR COMPRESSOR OPERATION MAINTENANCE INSTRUCTIONS 1107...

Страница 2: ...chase Please keep your receipt as proof of purchase This guarantee is invalid if the product is found to have been abused or tampered with in any way or not used for the purpose for which it was inten...

Страница 3: ...the air compressor WARNING Compressed air can be dangerous Death or serious injury could result from improper or unsafe use of this compressor To avoid these risks use your common sense and follow the...

Страница 4: ...or attachments and ensure that any people in the work area are suitably dressed KEEP THE WORK AREA CLEAN Cluttered areas invite accidents clear the work area of all unnecessary tools debris and furnit...

Страница 5: ...are under the influence of alcohol drugs or any medication that makes you drowsy BEFORE EACH USE CHECK THE AIR COMPRESSOR AND HOSE FOR DAMAGED PARTS Never use the air compressor if it has been damage...

Страница 6: ...remove the plug from the mains supply and slowly undo the drain valve to release the pressure from the tank Remember to close the drain valve before storage and ensure it is fully tightened before use...

Страница 7: ...tive pressure switches must be replaced prior to further use of the compressor ONLY USE WITHIN THE RECOMMENDED OPERATING TEMPERATURE RANGE This compressor should only be used in an ambient temperature...

Страница 8: ...ent of a power cut and subsequent reset Do not carry the compressor while it is connected to the power source or when the tank is filled with compressed air This compressor contains surfaces which may...

Страница 9: ...marked with a letter N or coloured BLACK If this appliance is fitted with a plug which is moulded onto the electric cable i e non rewireable please note 1 The plug must be thrown away if it is cut fr...

Страница 10: ...ir pressure gauge 4 Output pressure regulator 5 Output pressure gauge 6 Handle 7 Support foot 8 Drain valve 9 Compressed air reservoir 10 Wheel 11 Motor housing 12 Pressure regulator and cut out 13 Oi...

Страница 11: ...ing sure it has not been damaged in transit Fitting the transportation wheels Fit the transportation wheels to either side of the compressor as shown in figures 1 using a 17mm spanner Figure 2 1234567...

Страница 12: ...ves or fittings The compressor is heavy get assistance when lifting and moving this compressor to avoid personal injury PREPARING FOR USE Before connecting your compressor to the mains supply Check th...

Страница 13: ...pressed air is DANGEROUS WARNING Before connecting any airt tool make sure you have read and fully understood the manufacturers instruction booklet for the tool being used Also ensure that the tool is...

Страница 14: ...ls below a certain level 2 Check the operation of the safety valve under pressure daily by pulling the ring as shown in figure 7 Air should be released you pull the ring and stop when the ring is rele...

Страница 15: ...op the power supply by pressing down on the on off button red button located on top of the pressure regulator 2 Close the air outlet tap and trigger the equipment spraygun air tool etc to release air...

Страница 16: ...and remove the plug from the mains supply Place a suitable container underneath the compressor to catch any condensation 2 Carefully rotate the drain valve anticlockwise until you hear a hissing noise...

Страница 17: ...ny liquid that may have condensed is drained off See page 16 Monthly The air intake filter should be inspected on a MONTHLY basis and more often in dusty conditions To clean the air intake filter 1 Pu...

Страница 18: ...rst 100 hours use replace the oil completely using Clarke SAE 40 compressor oil Then replace the oil after every 500 hours of operation or every 6 months To empty the oil from the machine remove the o...

Страница 19: ...s s e r p m o C e v l a v r o n w o l b t e k s a g n e k o r b o t r o s s e r p m o c r o f t i a W e l b m e s s a s i d n w o d l o o c y n a e c a l p e r d n a d a e h s t n e n o p m o c n e k...

Страница 20: ...Cycle S1 continuous Part No 2225335 Please note that the details and specifications contained herein are correct at the time of going to print However Machine Mart reserve the right to change specific...

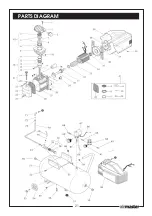
Страница 21: ...21 PARTS DIAGRAM...

Страница 22: ...FAN FN116001003 39 SHROUD FN116093006 40 TAPPING SCREW FN014006121 41 GASKETS KIT FN216093001 42 VALVE KIT FN216093004 50 PLUG FN011008000 51 TANK FN168H95001 52 TAPPING SCREW FN014013042 53 WHEEL SPI...

Страница 23: ...23...

Страница 24: ...24...

Отзывы: