


SECTION 7 MAINTENANCE AND SERVICING
169000
118
Revision F
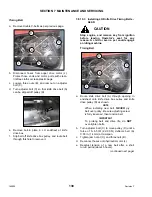
7.8.3 Installing Knife
WARNING
Stand to rear of knife during installation to
reduce risk of injury from cutting edges.
Wear heavy gloves when handling knife.
IMPORTANT
Align guards, and reset knife hold-downs
while replacing knife.
a. If knife head pin (A) is installed in the knife
head (B), remove the pin.
b. Slide knife into place, and align knife head (B)
with pitman arm.
c. Install knife head pin (A) in pitman arm (C), and
tap it down into the knife head, ensuring pin is
bottomed out in the knife head.
d. Tap underside of the knife head until pin is flush
with the upper face of the pitman arm (C).
e. Carefully adjust to achieve a 0.010 in. (.25 mm)
gap at (D) with the knife laying flat on the first
few guards.
f.
Replace bolt (E), and nut.
g. Tighten nut to 160 ft·lbf (220 N·m).
h. Replace grease zerk (F) in pin.
i.
Grease bearing (if it has been replaced).
7.8.4 Removing Knife Head Bearing
a. Remove the knife. See Section 7.8.2
Removing Knife.
b. Using a flat-ended tool (G) with approximately
the same diameter as the plug (H), tap out the
seal (J), bearing (K), and plug (H) from the
underside of the head.
NOTE
The seal can be replaced without
removing the bearing. When changing
seal, check pin and needle bearing for
wear. Replace if necessary.
7.8.5 Installing Knife Head Bearing
a. Place O-ring (L), and plug (H) in knife head.
IMPORTANT
Assemble bearing with the stamped end
(the end with identification markings)
against the tool.
b. Using a flat-ended tool (G) with approximately
the same diameter as bearing (K), push bearing
into the knife head until the top of the bearing is
flush with the step (M) in knife head.
c. Install seal (J) in top of knife head with lip
facing outwards.
IMPORTANT
To avoid premature knife head or knife
drive box failure, be sure there is
NO
looseness in the following:
•
Fit of knife head pin and needle bearing.
•
Fit of knife head pin and pitman arm.
d. Install
knife.
C
A
E
D
B
REMOVAL
G
K
H
L
M
J
F
Содержание A30-D
Страница 2: ...MACDON A40 D SELF PROPELLED AUGER HEADER MACDON A30 D PULL TYPE MOWER CONDITIONER...
Страница 3: ...169000 1 Revision F...
Страница 4: ...169000 2 Revision F...
Страница 6: ...169000 4 Revision F...
Страница 181: ...NOTES 169000 179 Revision F...
Страница 182: ......


