background image

AMACAM AM-M81 


USER MANUAL


Page 6 


6.2. 

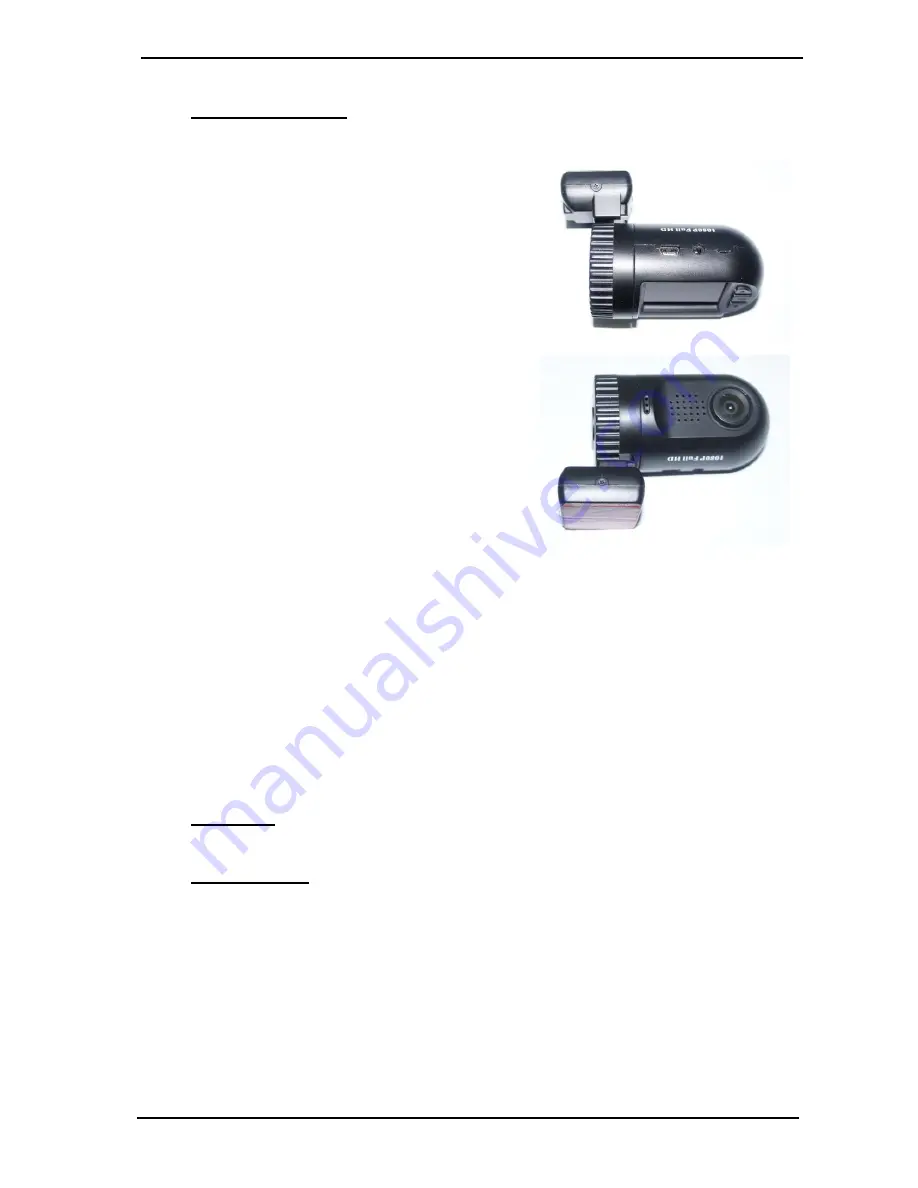
Mounting in the car 


  The mounting bracket (1) is fixed to the car 

windscreen using the 3M adhesive sticker.   

Peel off the film covering the sticker pad, 

and then press onto the windscreen in the 

desired position. 

  The camera slides into the connecting 

position on the mounting bracket. 

  The camera can be rotated to any position 

between 0 and 90° on the mounting ring, to 

accommodate the slope angle of the car 

windscreen. 

  The charging cable can be permanently 

connected from the cigarette lighter to the 

mounting bracket connection (9), allowing 

the camera to be easily removed from the car when desired. The supplied 

adapter should be used as this transforms the 12v car supply to 5 volts required 

by the camera, Use of higher voltages will damage the camera.   

  Alternatively the power cable can be hard wired to the mounting bracket, but this 

requires an auto-electrician to carry out the wiring work.    Cables for this are not 

provided, and a 12v/5v transformer will be required. 


6.3. 

Recording 


6.3.1.  In car operation 


If set up as above with Motion detection set to “ON”, (See Main menu below) the 

camera will start recording automatically when the ignition is switched on and the 

car starts to travel.    Recording will stop when the car ignition is switched off. 

(See also ‘Auto Power Off’ in Main Menu) 


Содержание AM-M81

Страница 1: ...AM M81 USER MANUAL Please Register Your AM M81 www amacam net product registration...

Страница 2: ......

Страница 3: ...Recording 6 6 4 Play back 7 7 MENU OPTIONS 9 7 1 Main menu 9 7 2 Playback mode Menu 9 7 3 MAIN MENU 10 7 4 PLAYBACK MENU 14 8 FURTHER OPERATIONS 15 8 1 Indicator light 15 8 2 External power supply Ch...

Страница 4: ...rear windscreen of a car This is for the purpose of recording the car movements and externals activities and would be of use in providing evidence for Insurance purposes It is designed in this mode t...

Страница 5: ...housing GPS Tracker if fitted 2 USB Port on camera for charging or connection to computer 3 AV out 3 5mm jack 4 Menu UP Button 5 OK Key 6 Playback DOWN Button 7 Indicator light 8 Lens 9 USB Port for...

Страница 6: ...ution 2008 01 01 01 07AM Date and Time Display loop recording time 1 min GPS if installed 5 INDICATOR LIGHT The indicator light 7 will indicate the status of the camera as follows Solid Red and Blue s...

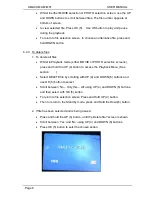
Страница 7: ...on by pressing Power button 10 once See below Set up Time Zone date and time in settings See Main Menu Section 7 1 below Set up Loop recording See Main Menu Section 7 1 below Camera will now operate...

Страница 8: ...tion 9 allowing the camera to be easily removed from the car when desired The supplied adapter should be used as this transforms the 12v car supply to 5 volts required by the camera Use of higher volt...

Страница 9: ...left corner of screen whilst still photo is being taken Still photos can be taken during video recording by pressing and holding the OK button 5 during the recording Recording will continue after pho...

Страница 10: ...MOVIE or PHOTO selection screens press and hold the UP 4 button to access the Playback Menu See section Select DELETE file by scrolling with UP 4 and DOWN 6 buttons and use OK 5 button to select Scro...

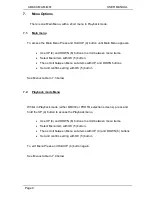
Страница 11: ...tems with UP and DOWN buttons Set and confirm setting with OK 5 button See Menus table in 7 3 below 7 2 Playback mode Menu Whilst in Playback mode either MOVIE or PHOTO selection screens press and hol...

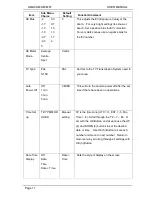
Страница 12: ...ontrast Standard Soft Hard Standard The contrast refer to the degree of differentiation between darker and lighter elements of the image Flicker Auto 50 Hz 60Hz 50 This should be set to AC Mains frequ...

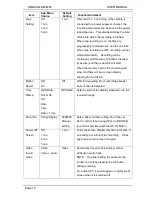
Страница 13: ...TV Transmission System used in your area Auto Power Off Off 1 min 3 min 5 min 3 MINS This will turn the camera power off after the set time if there have been no operations Time Set up TZ YY MM DD HH...

Страница 14: ...isplay showing the card is full Motion Detect Off On Off Will start recording if not recording already when motion is detected Time Stamp GPS Data Driver No Off Date Time Date Time GPS Data Sets the s...

Страница 15: ...f the G Sensor G Sensor calibration Yes No No This switches the G sensor protection off and on GPS Open Close Open Velocity Units MPH KMH MPH Units for Speed of car as determined by GPS Language Engli...

Страница 16: ...etting Function Comment Delete File No Only This All For this item use UP 4 and DOWN 6 buttons to choose between No Only this or All files Press OK 5 button to delete No confirmation is requested be s...

Страница 17: ...tting in the Main Menu must be set to the correct frequency for the mains supply used 8 3 Protecting Files Files may be protected This will prevent them from being deleted on the camera Thus when loop...

Страница 18: ...owing this all access is through the computer to which the camera is connected Note that the mini USB connection 9 on the mounting bracket 1 is only used for charging and will not function for accessi...

Страница 19: ...Image Sensor OV2710 2 0 Megapixel sensor Viewing Angle 120 degrees Lens 4x Fixed focus LCD Screen 1 5 TFT Display Video Format H264 MOV Video resolution 1920x10850 30fps 1440x1080 30fps 1280x720 30 fp...

Страница 20: ...her the SD TF card is locked and make sure the card has enough memory available Stopped automatically while recording HD Video results in very large files Ensure that the SD TF card is high speed and...

Страница 21: ...played on the screen When the Motion Detect is ON the camera will start recording when a moving object appears within the range of camera When the screen is stationary the recording will stop automat...

Страница 22: ...s link www amacam net product registration Once registered you will be kept up to date with firmware and new products You will also receive 10 discount off your next Amacam product User Manual Downloa...

Отзывы: