background image

English

8

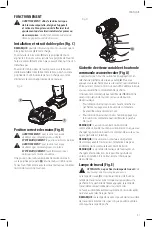
Installing and Removing the Battery Pack 

(Fig. C)

nOTE:

 For best results, make sure your battery pack is 

fully charged.
To install the battery pack 

 1 

 into the tool handle, align the 

battery pack with the rails inside the tool’s handle and slide 
it into the handle until the battery pack is firmly seated in 
the tool and ensure that it does not disengage.

OPERATION


WARNING: To reduce the risk of serious personal 
injury, turn unit off and remove loads and 
fastenersremove the battery pack before 
making any adjustments or removing/installing 
attachments or accessories.

 An accidental start-

upactuation can cause injury.

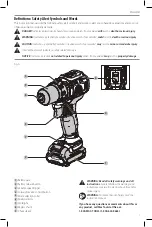
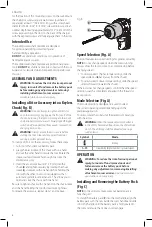
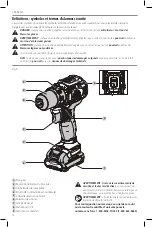
Mode Selection (Fig. A)

The mode selection collar 

 5 

 can be used to select 

the correct operating mode depending upon the 
planned application.
To select, rotate the collar until the desired symbol aligns 
with the arrow.


WARNING:

 When the torque adjustment collar is 

in the drill or hammerdrill positions, the drill will not 
clutch. The drill may stall if overloaded, causing a 
sudden twist.

symbol

Mode

Drilling

1–15

Screwdriving (higher number = greater torque)

Speed Selection (Fig. A)

The tool features two speed settings for greater versatility.

nOTE: 

Do not change speeds when the tool is running. 

Always allow the tool to come to a complete stop before 
changing speed.

1.  To select speed 1 (higher torque setting), slide the 

speed selector 

 6 

 back (away from the chuck).

2.  To select speed 2 (lower torque setting), slide the speed 

selector forward (towards the chuck).

If the tool does not change speeds, confirm that the speed 
selection switch is completely engaged in the forward or 
back position.

ASSEMBLY AND ADJUSTMENTS


WARNING: To reduce the risk of serious personal 
injury, turn unit off and remove the battery pack 
before making any adjustments or removing/
installing attachments or accessories.

 An 

accidental start-up can cause injury.

Intended Use

These drills/drivers/hammerdrills are designed 
for professional drilling, screwdriving and 
hammerdrilling applications.

DO nOT

 use under wet conditions or in presence of 

flammable liquids or gases.
These drills/drivers/hammerdrills are professional power 
tools. 

DO nOT

 let children come into contact with the tool. 

Supervision is required when inexperienced operators use 
this tool.

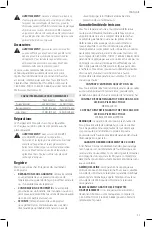
Fig. B

9

8

for the location of the mounting screws on the wall. Mount 
the charger securely using drywall screws (purchased 
separately) at least 1” (25.4  mm) long, with a screw head 
diameter of 0.28–0.35” (7–9 mm), screwed into wood to an 
optimal depth leaving approximately 7/32” (5.5 mm) of the 
screw exposed. Align the slots on the back of the charger 
with the exposed screws and fully engage them in the slots.

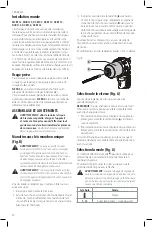
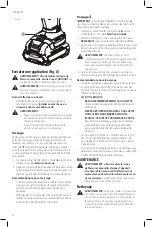
Installing a Bit or Accessory into a Keyless 

Chuck (Fig. B)


WARNING:

 Do not attempt to tighten drill bits (or 

any other accessory) by gripping the front part of the 
chuck and turning the tool on. Damage to the chuck 
and personal injury may result. Always lock off trigger 
switch and disconnect tool from power source when 
changing acces sories.


WARNING:

 Always ensure the bit is secure before 

starting the tool. A loose bit may eject from tool 
causing possible personal injury.

To insert a drill bit or other accessory, follow these steps.

1.  Turn tool off and remove battery pack.
2.  Grasp the black sleeve of the chuck with one hand 

and use the other hand to secure the tool. Rotate the 
sleeve counterclockwise far enough to accept the 
desired accessory.

3.  Insert the accessory about 3/4" (19 mm) into the 

chuck 

 8 

 and tighten securely by rotating the chuck 

sleeve 

 9 

 clockwise with one hand while holding the 

tool with the other. Your tool is equipped with an 
automatic spindle lock mechanism. This allows you to 
open and close the chuck with one hand.

Be sure to tighten chuck with one hand on the chuck sleeve 
and one hand holding the tool for maximum tightness.
To release the accessory, repeat steps 1 and 2 above.

Содержание MCD701

Страница 1: ...aladro Destornillador sin Escobillas 12 V M X Instruction Manual Guide D utilisation Manual de instrucciones If you have questions or comments contact us Pour toute question ou tout commentaire nous c...

Страница 2: ...English original instructions 1 Fran ais traduction de la notice d instructions originale 12 Espa ol traducido de las instrucciones originales 24...

Страница 3: ...or moderate injury Used without word Indicates a safety related message NOTICE Indicates a practice not related to personal injury which if not avoided may result in property damage WARNING Read all s...

Страница 4: ...these instructions to operate the power tool Power tools are dangerous in the hands of untrained users e Maintain power tools and accesories Check for misalignment or binding of moving parts breakage...

Страница 5: ...perations Hold the power tool by insulated gripping surfaces when performing an operation where fasteners may contact hidden wiring Fasteners contacting a live wire may make exposed metal parts of the...

Страница 6: ...se in water or other liquids Do not store or use the tool and battery pack in locations where the temperature may reach or Additional Safety Information WARNING Never modify the power tool or any part...

Страница 7: ...g in the battery pack The fuel gauge is an indication of approximate levels of charge remaining in the battery pack according to the following indicators 67 100 charged 33 66 charged 33 charged Pack n...

Страница 8: ...e charger on a soft surface that might block the ventilation slots and result in excessive internal heat Place the charger in a position away from any heat source The charger is ventilated through slo...

Страница 9: ...ol will automatically turn off if the Electronic Protection System engages If this occurs place the lithium ion battery pack on the charger until it is fully charged Important Charging Notes 1 Longest...

Страница 10: ...rt up can cause injury Intended Use These drills drivers hammerdrills are designed for professional drilling screwdriving and hammerdrilling applications DO NOT use under wet conditions or in presence...

Страница 11: ...fa suddenreaction Proper hand position requires one hand on the main handle 10 and one hand on the battery pack Hold tool firmly with both hands to control the twisting action of the drill Fig D 10 Pe...

Страница 12: ...stener shapes and sizes The numbers 1 15 on the mode selection collar 5 are used to set a torque range for screwdriving The higher the number on the collar the higher the torque and the larger the fas...

Страница 13: ...y have other rights which vary in certain states or provinces In addition to the warranty Mac Tools tools are covered by our 1 YEAR FREE SERVICE Mac Tools will maintain the tool and replace worn parts...

Страница 14: ...propre la s curit AVIS indique une pratique ne posant aucun risque de dommages corporels mais qui par contre si rien n est fait pour l viter pourrait poser des risques de dommages mat riels AVERTISSE...

Страница 15: ...ext rieur r duira les risques de choc lectrique f S il est impossible d viter l utilisation d un outil lectrique dans un endroit humide brancher l outil dans une prise ou sur un circuit d alimentation...

Страница 16: ...uer un incendie s il est utilis avec un autre type de b loc piles b Utiliser les outils lectriques uniquement avec les blocs piles con us cet effet L utilisation de tout autre bloc piles risque de cau...

Страница 17: ...auser une blessure corporelle Si un blocage se produit rel chez imm diatement la g chette et d terminez la cause du blocage avant de red marrer Retirez toujours le bloc piles lorsque vous fixez ou ret...

Страница 18: ...cin rer le bloc piles m me s il est s v rement endommag ou compl tement usag car il pourrait exploser et causer un incendie Pendant l incin ration des blocs piles au lithium ion des vapeurs et mati re...

Страница 19: ...des voyants suivants Charg de 67 100 Charg de 33 66 Charg de 33 Le bloc piles doit tre recharg Pour activer le t moin de charge maintenez appuy le bouton du t moin de charge Une combinaison des trois...

Страница 20: ...ndommag e les remplacer imm diatement Ne pas utiliser le chargeur s il a re u un coup fait une chute ou a t endommag de quelque fa on que ce soit Le ramener dans un centre de r paration agr Ne pas d m...

Страница 21: ...placez le bloc piles au lithium ion sur son chargeur jusqu ce qu il soit compl tement recharg Remarques importantes concernant le chargement 1 Pour augmenter la dur e de vie du bloc piles et optimise...

Страница 22: ...AVERTISSEMENT ne pas essayer de resserrer ou desserrer les m ches ou tout autre accessoire en agrippant la partie avant du mandrin tout en mettant l outil en marche pour pr venir tout risque de domma...

Страница 23: ...EMARQUE Une utilisation continue une gamme de vitesses variable n est pas recommand e Cela peut endommager le commutateur et doit tre vit REMARQUE au premier d marrage de l outil apr s un changement d...

Страница 24: ...travail Recommandations pour le vissage Commencez par des r glages de couples moins lev s puis avancez vers les r glages de couples plus lev s afin d viter d endommager la pi ce de travail ou la fixa...

Страница 25: ...tes d avertissement deviennent illisibles ou sont manquantes composer le 1 800 MAC TOOLS 1 800 622 8665 pour en obtenir le remplacement gratuit Registre Merci pour votre achat Enregistrez d s maintena...

Страница 26: ...a un mensaje de seguridad relacionado AVISO Se refiere a una pr ctica no relacionada a lesiones corporales que de no evitarse puede resultar en da os a la propiedad ADVERTENCIA Lea todas las advertenc...

Страница 27: ...fines de recolecci n y extracci n de polvo aseg rese de que est n conectados y que se utilicen correctamente El uso de dispositivos de recolecci n de polvo puede reducir los peligros relacionados con...

Страница 28: ...nes diferentes de aqu llas para las que fue dise ada podr a originar una situaci n peligrosa h Mantenga las manijas y superficies de sujeci n secas limpias y libres de aceite y grasa Las manijas y sup...

Страница 29: ...con la punta de la broca en contacto con la pieza de trabajo A velocidades m s altas es probable que la broca se doble si se permite que gire libremente sin entrar en contacto con la pieza de trabajo...

Страница 30: ...e producir una ruptura en la unidad de bater a y causar lesiones corporales graves Consulte la tabla al final de este manual para ver la compatibilidad entre bater as y cargadores Cargue las unidades...

Страница 31: ...mente descargadas La unidad de bater a deber recargarse antes de ser usada Instrucciones de Limpieza del Bater a Para limpiar la suciedad y grasa del exterior del cargador puede usarse un pa o o cepil...

Страница 32: ...240V 50 15 2 100 30 5 200 61 0 300 91 4 Amperaje nominal AWG M s de No M s de 0 6 18 16 16 14 6 10 18 16 14 12 10 12 16 16 14 12 12 16 14 12 No recomendado No coloque ning n objeto encima del cargado...

Страница 33: ...o autorizado Permanencia de la Unidad de Bater a en el Cargador El cargador y la unidad de bater a pueden dejarse conectados con la luz del cargador indicando que la unidad est cargada Retraso por Bat...

Страница 34: ...r supervisado d Si el problema de carga contin a lleve la herramienta unidad de bater a y el cargador a su centro de servicio local 4 La unidad de bater a deber a ser recargada cuando no sea capaz de...

Страница 35: ...ee la unidad de bater a con los rieles en el interior del mango de la herramienta y desl cela en el mango hasta que la unidad de bater a quede firmemente insertada en la herramienta verifique que sta...

Страница 36: ...ducir y eliminar una amplia variedad de formas y tama os de sujetadores Los n meros 1 15 en el collar de selecci n de modo 5 se utilizan para establecer un rango de par para atornillar Cuanto mayor se...

Страница 37: ...R UNA HERRAMIENTA ATASCADA ESTO PUEDE DA AR LA HERRAMIENTA Para minimizar el estancamiento o rompimiento del material reduzca la presi n sobre el taladro y facilite la perforaci n a trav s de la ltima...

Страница 38: ...ostal 01210 Delegaci n Alvaro Obreg n M xico D F Tel 52 555 326 7100 R F C BDE810626 1W7 Garant a Limitada por Tres A os Mac Tools reparar sin cargo cualquier falla que surja de defectos en el materia...

Страница 39: ...onsultar la informaci n de la garant a espec fica del pa s que viene en el empaque llamar a la compa a local o visitar el sitio Web a fin de obtener esa informaci n REEMPLAZO GRATUITO DE LAS ETIQUETAS...

Страница 40: ...X 40 X DCB120 12 X X X X 30 30 20 60 45 35 X 20 X X X 45 X X DCB122 12 X X X X 35 35 30 90 60 50 X 30 X X X 60 X X DCB124 MBR124 12 X X X X 55 55 45 135 90 75 X 45 X X X 90 X X DCB127 MBR127 12 X X X...

Отзывы: