


JSTLP1100 3
6/3/15
SETUP INSTRUCTIONS
OPERATINg INSTRUCTIONS
JSTLP1100
1100-LBS.
CAPACITY
LOW PROFILE TRANSMISSION JACK
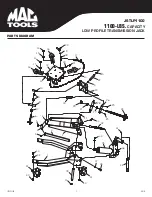
1. Refer to the exploded view drawing on page 5 to identify jack components.
2. Secure the fingers (#16) to the saddle plate (#12) with the hex bolts (#14) and washers (#15)
.
3. Secure the chain (#13) to the saddle plate (#12)
according to the drawing on page 5.
4. Secure the handle (#44) in the hydraulic unit (#35) with the bolt (#31)
.
5. Air may get trapped in the hydraulic system during freight and handling.
PURGING AIR FROM THE HYDRAULIC SYSTEM:
a. Rotate the release valve knob (#36) at the top of the hydraulic block in a clockwise direction until tight.
Now turn it in a counterclockwise direction two full turns.
b. Activate the handle (#44) about 15 times.
c. Rotate the knob at the top of the hydraulic block in a clockwise direction until tight.
d. Activate the hand pump until the lift arm is raised to maximum height. You should experience a full pump stroke with each incremental pump.
e. Repeat steps "a" through "d" until all air is purged from the system.
1. Lift the vehicle to the desired work height, and support the vehicle in accordance with the lift manufacturer's recommended lifting and
support procedures.
2. Position the transmission jack directly under the transmission. Turn the release valve knob (#36) all the way in a clockwise direction until it stops.
Pump the handle (#44), and the saddle assembly will start to rise. Raise the saddle to a height very close to the center of balance point of the
transmission, but do not touch the transmission.
3. Loosen the four bolts that secure the four fingers to the saddle. The fingers can be adjusted in and out to help position the transmission on the saddle.
Now gently raise the saddle so it supports the transmission. Adjust the four fingers in position against the transmission, and tighten. Fore and aft
saddle tilt adjustments are sometimes necessary to properly position the transmission on the saddle. Side to side tilt positioning may be necessary
for the same reason and can be accomplished by activating the side to side tilt knob.
4. The chains should be pulled over the center of balance portion of the transmission and secured on the chain hook. Rotate the wing nut to take up
the slack in the chain and secure the transmission to the saddle.
5. Remove the transmission from the engine according to instructions in the vehicle service manual.
6. Once the transmission has been disconnected from the engine, very slowly turn the jack's release valve knob (#36) in a counterclockwise direction to
make sure the jack's saddle and transmission do not hang up on any undercar components, wiring, fuel lines, etc. Continue to lower the jack all the
way down.
7. Remember to secure the transmission to the saddle before removing and installing, and follow the vehicle manufacturer's instructions.
Failure to follow these Setup Instructions may result in serious injury or death, and/or property damage.
Failure to follow these Operating Instructions may result in serious injury or death, and/or property damage.
WARNING
WARNING


