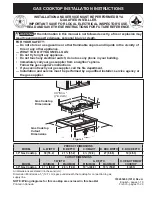
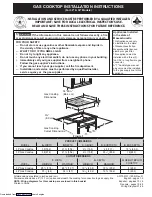
17
�
�
9
�
8
ES
REMPLAZO DE LA LUZ INTERIOR DEL HORNO
(fig. 9)
Asegúrese que el aparato esté desconectado
antes de remplazar la bombilla del horno.
Si la lámpara del horno (L) tiene que ser reemplazada,
la nueva lámpara deberá tener las siguientes
características: 15 W - 230 V - 50 Hz - E 14 y que sea
resistente a altas temperaturas (300º C).
Esperar que el horno se haya enfriado luego,
para sustituir la lámpara efectuar las siguientes
operaciones:
•
Extraer las rejillas laterales del horno de la manera
descrita en el párrafo precedente luego, quitar el
vidrio de protección (V) del portalámparas, haciendo
palanca con un destornillador entre el mismo y
la pared interior del horno. Sustituir la lámpara
y volver a montar todas las piezas siguiendo las
operaciones indicadas anteriormente a la inversa
DESMONTAJE Y MONTAJE DE LA PUERTA
HORNO (fig.10)
Para una limpieza más fácil del horno se puede
desmontar la puerta del mismo siguiendo las
siguientes instrucciones:
•
Abrir la puerta del horno y de insertar un clavo o un
remache (R) en el agujero (F) de la
charnela
•
Cierre la puerta parcialmente forzando al mismo
tiempo hacia arriba para liberar a los dientes y
detener la charnela
• Una vez liberado, la
charnela
, tire de la puerta de
flexión hacia adelante al mismo tiempo un poco ha-
cia arriba para liberar la zona.
• Para el montaje para realizar las mismas operacio-
nes en orden inverso, teniendo cuidado de estable-
cer correctamente sus oficinas en las zonas.
LIMPIEZA CRISTAL INTERNO DE LA PUERTA
HORNO (fig.11)
Una prerrogativa de nuestras cocinas es la
posibilidad de desmontar fácilmente el cristal
interno de la puerta horno, sin la ayuda de personal
especializado, permitiendo así una perfecta
limpieza del mismo. Basta abrir la puerta horno
y extraer el soporte al que el cristal es fijado.
¡¡ATENCIÓN!! Esta operación puede ser hecha
también con la puerta montada sobre el aparato,
pero en este caso, tener cuidado que cuando se
desensarta hacia arriba el cristal, la fuerza de
las charnelas puede hacer cerrar de repente la
puerta.
11
�
�
10
INSTRUCCIONES PARA EL USUARIO
Downloaded from www.vandenborre.be
Содержание MFTW95IXG60B
Страница 28: ...27 NL D o w n l o a d e d f r o m w w w v a n d e n b o r r e b e...
Страница 29: ...NL RUIMTE VOOR GEGEVENSLABEL D o w n l o a d e d f r o m w w w v a n d e n b o r r e b e...
Страница 56: ...27 FR FR ESPACE POUR L ETIQUETTE SIGNALETIQUE D o w n l o a d e d f r o m w w w v a n d e n b o r r e b e...
Страница 83: ...27 DE PLATZ F R TYPENSCHILD D o w n l o a d e d f r o m w w w v a n d e n b o r r e b e...
Страница 84: ...461308148_NL FR DE 001 _05 2013 D o w n l o a d e d f r o m w w w v a n d e n b o r r e b e...
Страница 112: ...27 GB SPACE FOR DATA LABEL D o w n l o a d e d f r o m w w w v a n d e n b o r r e b e...
Страница 139: ...27 ES ESPACIO RESERVADO PARA LA ETIQUETA DE INFORMACI N D o w n l o a d e d f r o m w w w v a n d e n b o r r e b e...
Страница 140: ...461308128_GB ES 001 _04 2013 D o w n l o a d e d f r o m w w w v a n d e n b o r r e b e...