background image

– 21 –

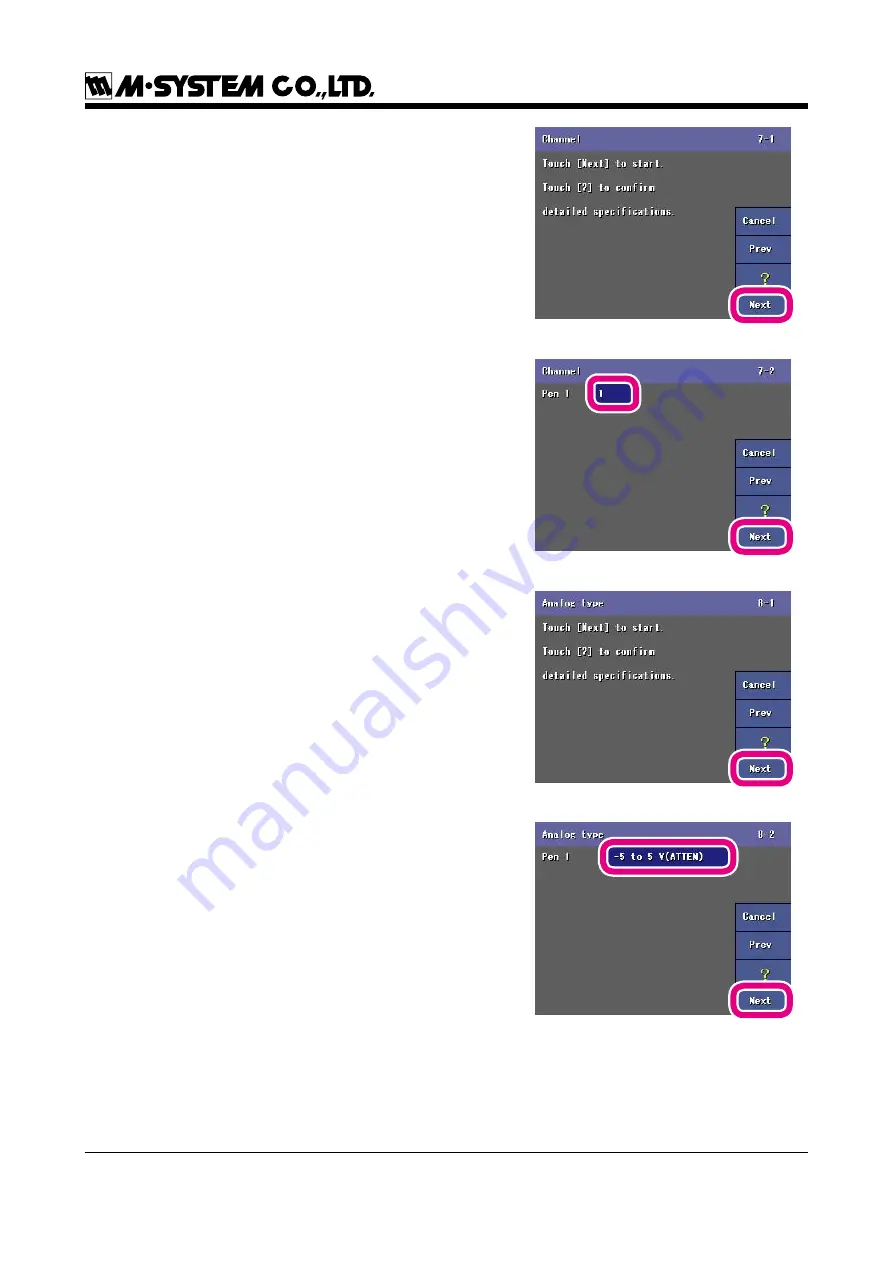
(17) ‘Channel’ view is on the screen.


Touch [ Next ].

(18

) Default channel numbers are on the screen.


Touch these channel numbers to change.


Touch the current unit selection for Pen 1 and a 

keypanel appears on the screen.


Enter ‘1’ and touch [ OK ]


Touch [ Next ].

(19) ‘Analog type’ view is on the screen.


Touch [ Next ].

(20

) Default analog types are on the screen.


Touch these type descriptions to change.


Touch the current type selection for Pen 1 and a 

list of available options will appear.


Leave the default ‘-5 to 5 V(ATTEN)’ as it is in 

this example.


Touch [ Next ].

Содержание 73VR1100

Страница 1: ...ation Contents 1 POINTS OF CAUTION 2 2 PACKAGE INCLUDES 5 3 ITEMS TO PREPARE 6 4 COMPONENT IDENTIFICATION 7 5 EXTERNAL DIMENSIONS 9 6 INSTALLING THE UNIT 10 7 PREPARATION WIRING TO THE UNIT 12 8 SETTI...

Страница 2: ...mmediately install a switch or a circuit breaker according to the relevant requirements in IEC 60947 1 and IEC 60947 3 and properly indicate it Altitude up to 2000 meters Insert a noise filter for the...

Страница 3: ...o clean the 73VR1100 Observe the environmental conditions when using the 73VR1100 Wait at least for 5 seconds before turning on the power supply after it has been turned off The 73VR1100 may not start...

Страница 4: ...not remain for the long time period BACKLIGHT Even when the backlight is failed the screen display can be controlled by touching it Backlight failure is confirmed by the following phenomena The scree...

Страница 5: ...UDES Please confirm that all items mentioned below are included in the package Paperless Recorder Software CD 73VRPAC2 Startup guide this booklet STARTUP GUIDE Mounting bracket two pieces Not included...

Страница 6: ...34C 512 MB 81 2B010 1H34C 1 GB 81 2E010 1H34C Model No AP CFxxxxE3ER ETNDNR Parts No 256 MB 81 2A010 1H10C 512 MB 81 2B010 1H10C 1 GB 81 2E010 1H10C Capacity 256 MB through 1 GB CF card reader The CF...

Страница 7: ...Touch Panel Screen Trend chart and other data views and setup views are displayed 2 Front Cover Access to the CF Card Slot 3 CF Card Slot Insert a CF Card 4 Eject Button Used to retrieve the CF Card...

Страница 8: ...ditions off when the RUN output contact is tripped in an abnormality of the unit 11 Power Indicator LED Light turns on while the power is supplied 12 Power Input Terminal 13 RUN Output Terminal 14 Ala...

Страница 9: ...IONS Unit mm inch 144 5 67 133 5 24 29 2 1 15 2 to 26 panel thickness 08 to 1 02 Attach the mounting bracket either on the top bottom or on the sides 151 5 5 96 144 5 67 136 5 5 37 151 5 5 96 136 5 5...

Страница 10: ...10 144 5 67 133 5 24 29 2 1 15 144 5 67 136 5 5 37 136 5 5 37 DESKTOP TYPE 173 6 81 4 16 25 98...

Страница 11: ...2 0 137 2 0 137 2 0 SINGLE MOUNTING VERTICAL CLUSTERED MOUNTING max 3 units HORIZONTAL CLUSTERED MOUNTING L 2 0 137 2 0 175 min L 2 0 L mm Number 2 3 4 5 6 7 8 9 10 n 282 426 570 714 858 1002 1146 129...

Страница 12: ...es or on the top and bottom of the unit Tighten screws CAUTION Adequate tightening torque for the screws used to mount the unit onto the panel is be tween 0 8 and 1 2 N m If an excessive force is appl...

Страница 13: ...ecording data touch MENU key on the right bottom on the screen and touch Stop to stop the recording 2 Push EJECT button to the right side of the card slot and take the card out 7 2 CONNECTING THE POWE...

Страница 14: ...to enable the new setting 2 Signal type Set the DIP switches at the bottom of the unit In this example 5 to 5V will be used Set the switches for the voltage exceeding 0 8V This setting is actually the...

Страница 15: ...on ON SW311 ch 1 ch 8 SW411 ch 9 ch 16 ON Factory default setting CONNECTING THE R1M GH2 TO THE 73VR1100 The R1M GH2 and the 73VR1100 are connected via RS 485 using a twisted pair cable Refer to the d...

Страница 16: ...1 Insert the CF card into the 73VR1100 Turn on the power supply to the 73VR1100 NOTES Creating Files in the CF Card The 73VR1100 creates files necessary to function once the power is turned on This p...

Страница 17: ...ES Control Key Functions Cancel Return to Main setup view without ap plying changes made in Quick setup Return Go to the previous view page Go to Help view Next Go to the next view page 6 Storing inte...

Страница 18: ...h Next 8 Enable disable pens view is on the screen Touch Next 9 Available selections for Enable disable pens are on the screen Choose Enable for Pen 1 Choose Disable for Pen 2 through 8 Touch Next 10...

Страница 19: ...rete pens are on the screen Choose Analog for Pen 1 Touch Next 13 Tag view is on the screen Touch Next 14 Default tag names are on the screen Touch these names to change Leave the default INPUT001 as...

Страница 20: ...ange Touch the current unit selection for Pen 1 and a keypanel appears on the screen The following is an example to set V for Pen 1 1 Touch A a key once to switch to the capital letter mode 2 Touch ar...

Страница 21: ...for Pen 1 and a keypanel appears on the screen Enter 1 and touch OK Touch Next 19 Analog type view is on the screen Touch Next 20 Default analog types are on the screen Touch these type descriptions t...

Страница 22: ...for Pen 1 and a keypanel appears on the screen Enter 5 0 and 5 0 respectively and touch OK Touch Next 23 Scaling view is on the screen Touch Next 24 Default scaling ranges are on the screen Touch the...

Страница 23: ...23 25 Now the basic setting is complete Touch Record NOTES Scaling range is automatically set as the plot position for the pen when you use Quick setup...

Страница 24: ...nctioning properly using a simulated input signal Connect a voltage simulator to Channel 1 terminals to 1 to 2 and supply 5V DC The digital indicator for Pen 1 now shows 5V 1 2 3 4 5 6 7 8 9 10 11 12...

Страница 25: ...end View Overview Bargraph View and Graphic View plotting recorded data in real time Retrieve View and Alarm History showing data stored in the CF card See 73VR1100 Users Manual EM 7399 C Section 8 fo...

Отзывы: