M-Audio USB Audio Duo Скачать руководство пользователя страница 6

Bottom of Unit:

At  the  bottom  of  the  unit  are  two  DIP switches  that  will  set  the  sampling  rate
while  the  Duo  is  used  in  standalone  mode.  The    Duo  can  be  used  as  an A/D
converter  independent  of  the  computer,  using  either  the  line  inputs  or  the  mic
preamp inputs.  The relative positions of these DIP switches will determine the
sample rate at the S/PDIF output when used in standalone mode.

You will see the rather tiny numbers 1 and 2 at the bottom of the set of two DIP
switches. Using a miniature screwdriver or similar instrument, you can change
the position of each switch. The default setting is both switches “down,” which
is  the  position  closest  to  the  numbers  1  and  2,  representing  a  sample  rate  of
44.1kHz. The full list of settings is as follows:

1.  44.1kHz: Both switches in the down position (down being in the direction of

the numbers).  

2.  48kHz: Switch #1 down, switch #2 up. 
3.  88kHz: Switch #1 up, switch #2 down. 
4.  96kHz: Both switches in the up position.

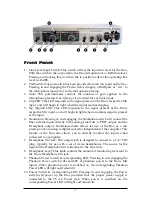
Basic Theory of Operation

The  Duo  attaches  easily  to  your  computer’s  USB  port--no  tools  or  computer
disassembly is necessary. Following the installation of the included driver software,
the  Duo can be attached or unattached to your computer according to your needs.

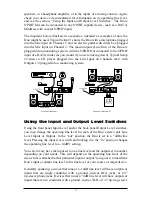
The    Duo  is  a  2x2  audio  interface,  providing  two  channels  of  audio 

TO

the

computer  and  two  channels  of  audio FROM the  computer. The  Duo  gives  you
two  high  quality,  low  impedance  Mic  Inputs  on  XLR  connectors,  plus  two
unbalanced  Line  Inputs  on  1/4” TS  jacks  that  can  be  used  alternately. When  a
Line Input is in use, the corresponding Mic Input is disabled. 

The Duo can be configured for +4 or -10 line level operation simply by pressing
the  “Line  Level”  buttons  on  the  front  and/or  back  panels.  This  allows  for
seamless integration into the studio, giving you compatibility with professional
balanced  (balanced TRS,  +4dBu)  or  semi-pro  (unbalanced TS,  -10dBV)  audio
devices (see section, “Using the Input and Output Level Switches”).

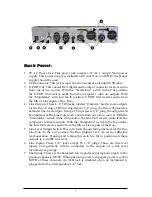
Audio  from  your  computer  is  sent  simultaneously  to  the  Duo’s  two
balanced/unbalanced  Line  Outputs  on  1/4”  TRS  jacks,  the  coaxial  S/PDIF
Output, and the Headphone Out. The Duo can also be used in a Standalone mode,
which connects the Mic/Line inputs directly to the Line Out, S/PDIF Out, and
Headphone  Out.  Pressing  the  “Standalone”  switch  turns  the  Duo  into  a  mic
preamp  and  A/D  converter  that  can  be  used  independent  of  the  computer.
Standalone mode can also give you a direct monitoring option when using the
Duo as an audio interface with your computer.

6

Содержание USB Audio Duo

Страница 1: ...ting the Gain 12 Phantom Power 13 Using the Pad Switch 13 Standalone Mode 13 Duo Operation on the PC 14 The USB Audio Configuration Manager 14 The Duo and the Windows Sound System 15 The Duo MME and Y...

Страница 2: ...Standard USB cable 9V AC 1 Amp Wall Wart power supply Quick Start Guide The USB Audio Duo is a powerful little device that you will find easy to use once you familiarize yourself with its many feature...

Страница 3: ...D 20dB pad available for each microphone input Multitrack recording and mixing using the convenience of your USB port PC drivers include Windows XP 2000 ME and 98SE ASIO EASI and WDM Mac drivers inclu...

Страница 4: ...one switch will connect the Mic and Line inputs directly to the analog Line Outs S PDIF output and the Headphone output Standalone mode allows for use of the Duo as a mic preamp and or analog to digit...

Страница 5: ...tputs will be unbalanced The Line Outs receive audio from one of two sources With the Standalone switch in the Out position the Line Outs receive audio from the computer s software outputs With the St...

Страница 6: ...Duo can be attached or unattached to your computer according to your needs The Duo is a 2x2 audio interface providing two channels of audio TO the computer and two channels of audio FROM the computer...

Страница 7: ...ble is for the computer and the other is the device end Find an appropriate spot on your desktop or work area for the Duo Windows XP Installation 1 Boot Windows XP with your M Audio USB Duo powered OF...

Страница 8: ...your computer s CD drive locate the folder USB_AUDIO DUO WINME Click Next 6 On the next screen Windows will indicate it has found an updated driver for this device Keep the updated driver selected an...

Страница 9: ...ndicate it cannot find a file it is attempting to copy from the Windows 98 CD If so insert your Windows 98 Second Edition CD then use the Browse button to point to this CD and continue 10 Windows will...

Страница 10: ...leeve Each of the Duo s 1 4 TS Direct In jacks are unbalanced and will accept an unbalanced 4dBu or 10dBV signal on 1 4 TS plugs The Duo provides two microphone inputs on balanced XLR connectors Eithe...

Страница 11: ...plugged into a monitoring system Using the Input and Output Level Switches Using the front panel Input Level and or the back panel Output Level switches you may change the operating line level for eac...

Страница 12: ...from the Duo when used in conjunction with a direct box or passive impedance transformer Plug in your mic or instrument with the gain controls turned down then turn the gain up incrementally while te...

Страница 13: ...is bypassed when this switch is in the out position Standalone Mode The Duo can also be used in a Standalone mode independent of your computer Pressing the Standalone switch on the front panel and lo...

Страница 14: ...computer are powered on Duo Operation on the PC The USB Audio Configuration Manager When the Duo drivers are installed a control panel is also installed into the System Tray on your Windows taskbar Th...

Страница 15: ...lly the Duo s ASIO EASI control panel can be launched from the USB Audio Configuration Manager This is very useful in certain circumstances and is covered in greater depth in the section ASIO EASI Con...

Страница 16: ...nd are not ASIO or EASI compliant The Duo s MME drivers use the WDM model which make them compatible with the latest software technology A music program such as Cakewalk s Sonar takes full advantage o...

Страница 17: ...toring and similar to monitoring the record inputs of a tape machine Note that in Windows XP 2000 and ME the WDM drivers will also install automatically and can achieve the same results with a program...

Страница 18: ...IO or EASI driver versions currently in use by the USB Audio Duo Below is a screenshot of the M Audio USB ASIO Driver panel with both pairs of input and output channels activated There are two section...

Страница 19: ...usic program In the Available Channel Sets dropdown list you may also select either Channels 1 2 In or Channels 1 2 Out The Duo will perform at 96kHz sampling rate with any single stereo pair enabled...

Страница 20: ...ve functions of other USB devices such as movements of a USB mouse may cause clicks in the audio during playback or recording If this occurs click on the Advanced tab and select High Note that the def...

Страница 21: ...the advantage of being able to monitor your source through the program similar to monitoring the record inputs of a tape machine with greatly reduced latency ASIO Control Panel and Operating Modes on...

Страница 22: ...of the USB bandwidth As a result the Maximum Sample Rate readout will change to 96000 Hz The Duo will perform at 96kHz sampling rate with any one of the stereo pairs enabled and with either the 16 or...

Страница 23: ...and devices such as print monitors or WinFaxes can cause interference with USB audio the resulting effect being clicks and pops in your audio performance The Duo requires a lot of the USB bandwidth so...

Страница 24: ...t it in the audio setup However if the Duo is not being recognized by the system then you will be told that no Duo is attached Check your USB connections and make sure that the Duo is powered up Probl...

Страница 25: ...o you on your drivers CD ROM There you will find FAQs Tips Tricks and How To Guides to walk you through installing your product as well as configuring it with some of today s most popular software app...

Страница 26: ...that a cellular signal can be clearly reached where you are calling from Sit back try to relax and then dial Our top notch technical support team will be ready to help you fix your problems Thank you...

Страница 27: ...requires repair because of user misuse or regular wear it will assess a fair repair or replacement fee The customer will have the option to pay this fee and have the unit repaired and returned or not...

Отзывы: