


2
ProjectMix I/O Quick Start Guide
English
Connecting Your Equipment to the ProjectMix I/O
<
The ProjectMix I/O has multiple audio outputs which can serve a
number of purposes. However, the analog Outs 1 & 2 will always serve
as your default left and right outputs. Please connect Outs 1 & 2 to the
left and right channels, respectively, of your speakers, mixer, or other
monitoring system.
<
You may also connect a pair of headphones to one of the headphone
jacks on the front of the unit allowing for monitoring or pre-listening in
private.
<
The eight 1/4” line level inputs on the back of the ProjectMix I/O
accept line-level signals, such as those from keyboards, mixers, and CD
players. The XLR connectors above the line inputs are for use with
microphones. Use the Mic/Line selector switch to activate either the
1/4” or the XLR input for the individual input channels. In addition to
this, you can use the instrument input on the front to record to channel
one from sources like electric guitars or basses. To enable the front
panel instrument input, set the MIC/LINE selector switch for channel 1
to LINE (down position) and then activate the Instrument input selector
switch (down position).
For more detailed information and an explanation of all available inputs and outputs,
including digital formats, please refer to the ProjectMix I/O User Guide located on the
FireWire Driver CD.
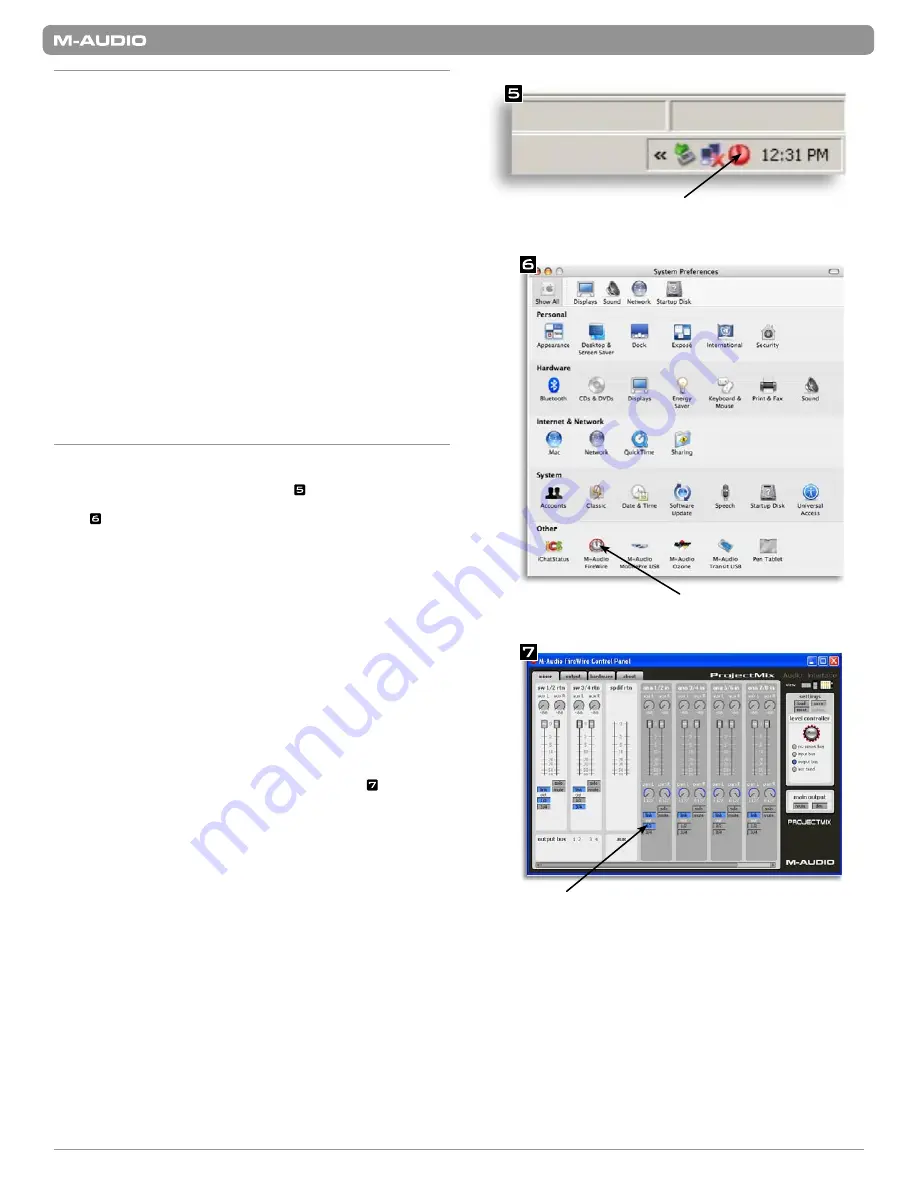
Using the FireWire Control Panel
On a PC, you can access the ProjectMix I/O Control Panel by double-clicking the
M-Audio icon in your computer’s system tray ( ). For Mac OS X users, the
Control Panel can be launched from the icon found in the System Preferences
panel ( ).
The default settings for the ProjectMix I/O Control Panel will ensure that normal
audio playback is routed to the analog Outs 1 & 2 of the ProjectMix I/O and
to the first headphone output. The Control Panel will allow you to change the
output routings when necessary, as well as set the function of the assignable level
controller (by default, the level controller will adjust the output volume) and select
digital sync options. For standard use, there will be no need to change the default
settings.
When it’s time to record an external source, such as a vocal, guitar track, or
keyboard part, you will want to monitor your input. Monitoring will allow you to
hear the signal being fed into the inputs while blending it with the output signals
coming from the computer. This way, you can hear your new parts live as you’re
recording them in. Most recording applications will handle the input monitoring for
you automatically, but if they don’t, you also have the option of enabling monitoring
manually from the Control Panel. The mixer tab of the Control Panel features input
columns, such as Analog Inputs 1&2 (ana 1/2 in). These columns have output bus
buttons located below them. If you plug a keyboard into Ins 1 & 2, you can hear the
keyboard by pressing the 1/2 button in the ana 1/2 in column ( ). This button
routes the incoming audio to Outs 1 & 2 so you can hear it. The input signal is also
still being routed to the input channels of your software so they may be discretely
recorded.
For a full account of all Control Panel routings and functions, refer to the User Guide for
your product located on the FireWire Driver CD.
Double-click here to launch the
FireWire Control Panel
Click here to launch the
FireWire Control Panel
Click this button to send the incoming
audio to Outputs 1 & 2
Содержание ProjectMix I/O
Страница 1: ...Quick Start Guide English...


