


7
Central Functions
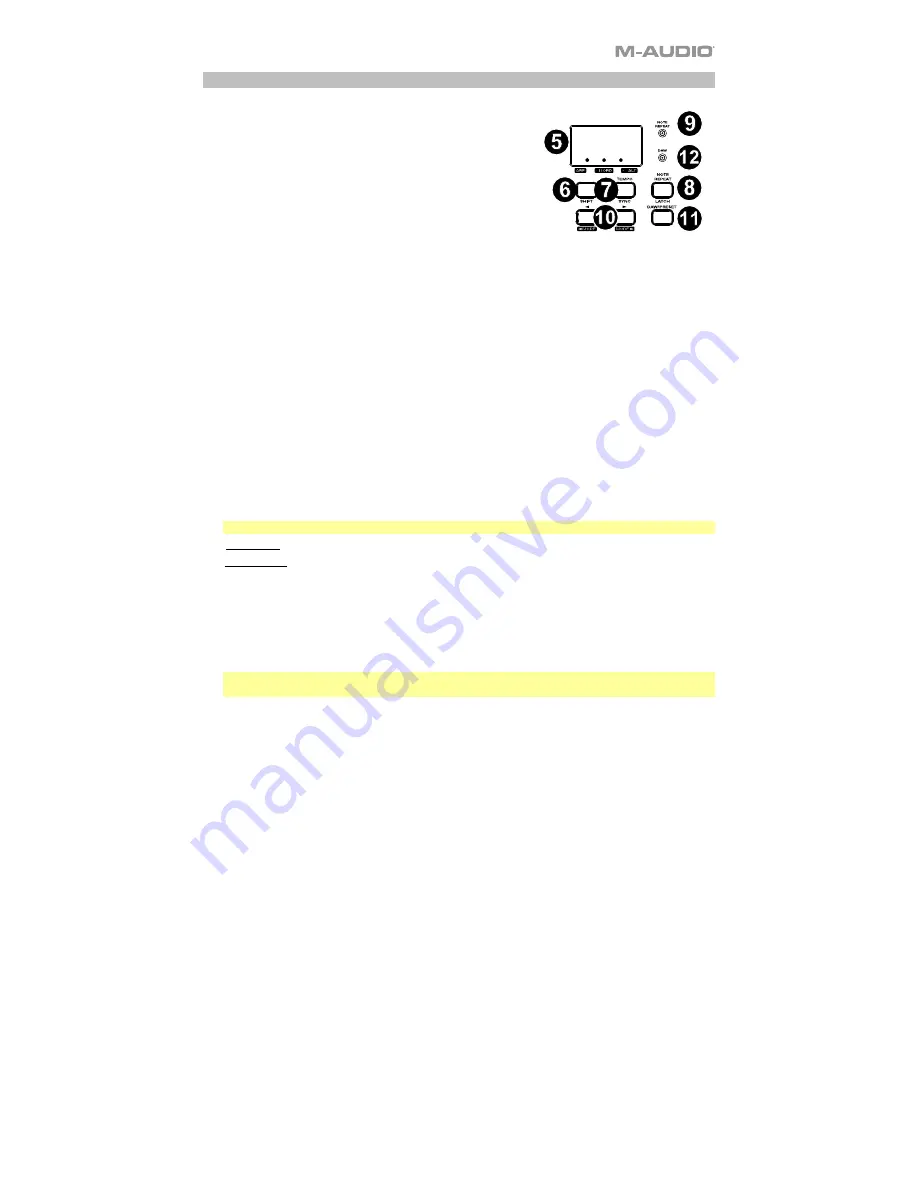
5.
Display:
The
Oxygen 49 features a 3-digit LED display
providing visual information regarding current operation,
programing, and controller status.
The 3 dot LEDs on the Display correspond to one of the 4
available modes that is active: ARP, ARP Latch, Smart Chord,
and Smart Scale.
•
ARP:
LED is lit when ARP mode is active. LED flashes
when ARP Latch mode is active.
•
CHORD:
LED is lit when Smart Chord mode is active.
•
SCALE:
LED is lit when Smart Scale mode is active.
6.
SHIFT:
Hold the
SHIFT
button while moving or pressing controls or buttons on the keyboard to access
their secondary functions.
7.
TEMPO:
Tap this button to set Oxygen 49’s tempo. Press and hold this button and use the
<
and
>
buttons to make incremental changes to the tempo.
SYNC:
Press and hold
SHIFT
and the
TEMPO
button to access the
SYNC
feature, allowing the
keyboard
to be synced to your DAWs Time Clock messages (Tempo).
The tempo setting affects the keyboard’s arpeggiator and note repeat functions.
8.
NOTE REPEAT:
Press this button to activate the note repeat function for the
Pads
.
LATCH:
To latch the note repeat function, hold
SHIFT
and then press this button.
While
Note Repeat
is active hold
SHIFT
and press the
Time Division
keys to change the current
Time
Division
setting of the
Arpeggiator
and pad
Note Repeat
.
9.
NOTE REPEAT (LED):
This LED will be lit solid when Note Repeat is active.
10.
<
,
>:
The
<
and
>
buttons will select presets when in Preset mode.
< MODE, MODE >:
When
SHIFT
is held and one of these buttons is pressed, the active mode will
change (ARP, ARP Latch, Smart Chord, or Smart Scale).
To turn on or off the currently active mode, press the
<
and
>
buttons simultaneously. For example, if
Smart Scale is active, pressing the
<
and
>
buttons simultaneously
will deactivate Smart Scale mode
and return the keybed to its normal functionality.
Note:
Depending on what mode the keyboard is currently in the buttons’ functionality will change.
DAW Mode: In DAW mode,
<
and
>
will scroll through track banks.
Preset Mode: In Preset Mode, the
<
and
>
buttons will scroll through presets. In Edit Mode, they will
cycle through the currently selected editable control.
11.
DAW / PRESET:
When this button is pressed, it will activate the keyboard’s Preset or DAW functionality
on the faders, knobs, button, and pads.
When DAW mode is active, controls (Faders, Fader buttons, < and >, pads, and knobs) will send
Mackie, Mackie/HUI, or MIDI CC messages, depending on which DAW is selected.
When Preset mode is active, Preset select will latch on for you to use the
<
and
>
buttons to select from
a list of Virtual Instrument presets.
IMPORTANT:
To change what DAW is currently selected, press and hold the
SHIFT
button and the
DAW/PRESET
button.
•
NC1: Mackie 1: Will send standard Mackie messages. Mackie control is typically used for DAWs
like Cubase, Studio One, Logic, and Reaper.
•
NC2: Mackie 2. Will send standard Mackie messages, but with higher resolution for the pan
pots. If your DAW's pan isn't able to do a full sweep of the pan pot, use Mackie 2. Mackie
control is typically used for DAWs like Cubase, Studio One, Logic, and Reaper.
•
M|h: Mackie/HUI will send standard Mackie/HUI messages for DAWs like Pro Tools.
•
N1: MIDI 1 will send 1 set of standard MIDI messages for use with Ableton.
•
N2: MIDI 2 will send 1 set of standard MIDI messages for use with MPC Beats, and Reason.
12.
DAW (LED):
This LED will be lit solid when DAW mode is active.
126


