background image

The default setting for Encoded audio signal emphasis is Not indicated. It depends
on your digital audio data if there is a need for encoding an emphasis information.
The  Channel mode may also be set automatically by clicking on Auto mode.
Overriding this is possible by clicking on either Not indicated,  Two channels or
Stereophonic.
Auxiliary sample bits determine the number of bits your audio samples have. If you
want to set this information manually, you must first choose the Maximum audio
word length 
(20 or 24 bits). This setting determines if the auxiliary data bits are used
for audio or not. Then you can choose the exact number of bits by clicking on the
appropriate checkbox.

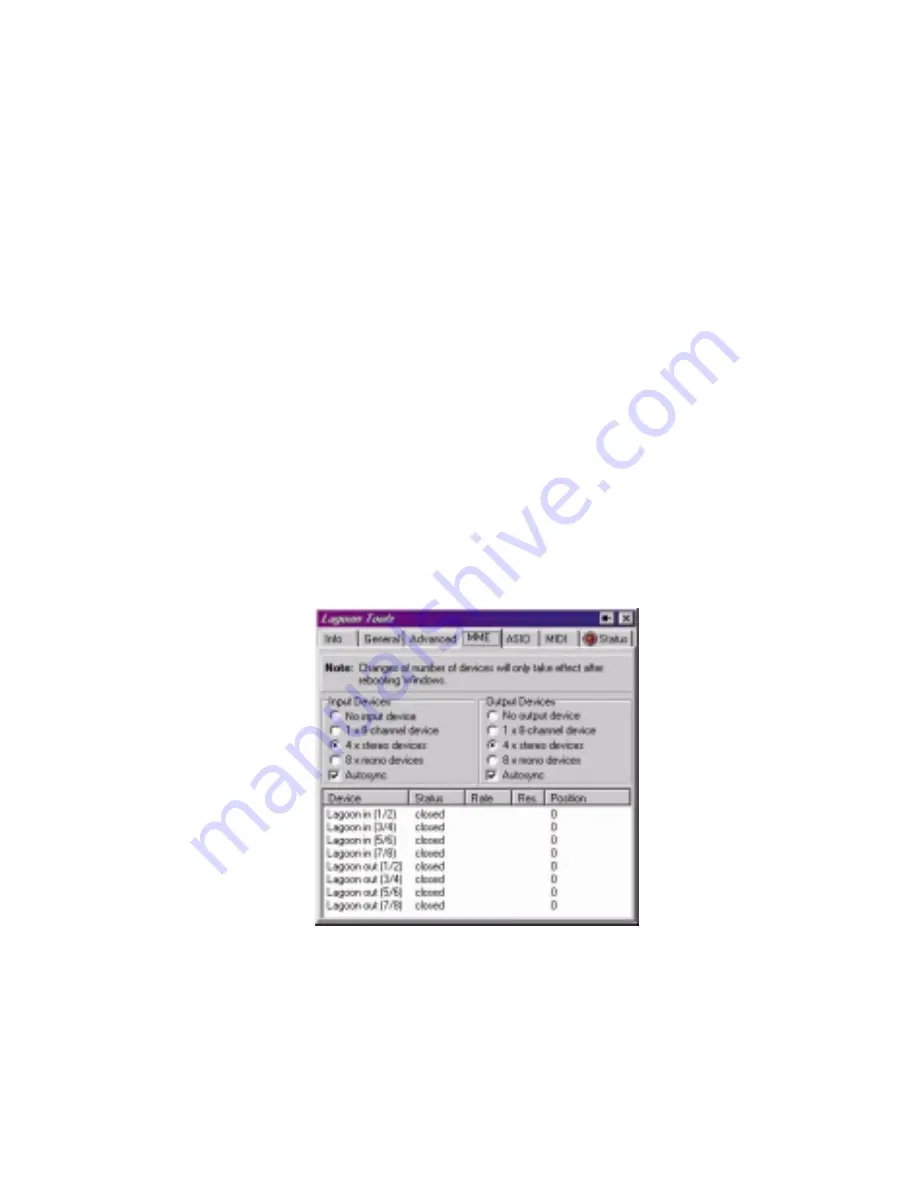
MME Page

The  MME page is needed to tell Windows how to handle the individual audio
channels. You can deactivate input or output channels by clicking on No input device
or No output device. If activation is desired, the eight input and output channels of
the LAGOON card can be interpreted as a single 8 channel device, 4 stereo devices
or 8 mono devices. Remember that changing the number of devices will only take
effect after rebooting Windows.
The MME LAGOON driver provides a special function to synchronize multiple
devices. If you check the Autosync box, synchronization will be performed. This is
the default setting. If you experience synchronization problems (this can happen if
two different applications are using the MME LAGOON driver), try to uncheck the
Autosync box.

There are four states an MME device may enter: Closed,  Blocked,  Paused and
Playing. If an MME device is not in use it is Closed. If there is an ASIO driver
opened all MME devices are Blocked, since opening the ASIO driver and the MME
driver at the same time is not allowed. Paused MME devices are not actually
playing. Playing indicates that an MME device is in use by an application. In that
case Position counts up with every sample transferred by the driver.
Rate and Res provides information about the sample rate and the bit resolution an
MME device is working with.

17

Содержание Lagoon

Страница 1: ...LAGOON LAGOON MANUAL TM...

Страница 2: ...ver Installation 8 Software Installation 8 Verifying Lagoon Tools Applet Software Installation 9 Setting Up Your Digital Studio 9 Using LAGOON with Application Software 11 The LAGOON Tools Applet 12 I...

Страница 3: ...t off and on the user is encouraged to try to correct the interference by one or more of the following measures 1 reorient or relocate the receiving antenna 2 increase the separation between the equip...

Страница 4: ...bined with 768 kBytes of fast EDO DRAM a variety of audio effects may be run on this system with simultaneous digital I O operation Features Low profile PCI card requires PCI BIOS version 2 1 Operates...

Страница 5: ...g your LAGOON will help us to give you the best possible service and support The Lagoon Card 1 ADAT Sync Input MIDI I O This 9 pin DB female connector will accept the synchronization output of an ADAT...

Страница 6: ...e LAGOON PCI Digital Audio Card needs an Interrupt Request line or IRQ basically a line of communication between the LAGOON and the microprocessor to function properly It is best to check for IRQ avai...

Страница 7: ...uter in order to dissipate any static electricity charge your body may have accumulated 6 Remove the plastic terminators that are plugged into the optical jacks of the LAGOON card This is only possibl...

Страница 8: ...gress report screen 6 The Wizard reports that Windows has finished installing the software Click Finish Your Lagoon is ready for action After completion of the driver installation Windows may require...

Страница 9: ...ly installed with no conflicts as is the WINMAN 4x4 S If you do not see your M Audio Lagoon in your Device Manager in this fashion please jump ahead to the Troubleshooting section of this manual Softw...

Страница 10: ...on Tools setup the Lagoon Tools Applet will appear on your desktop Refer to section 5 The Lagoon Tools Applet for more information on its use with your Lagoon card If you ve chosen to install the virt...

Страница 11: ...2 channel digital signal b If your source is 8 channel optical this may be an ADAT optical output the 8 channel optical buss outs of a digital mixer or the 8 channel optical output of an A D converte...

Страница 12: ...e possible Lagoon audio input devices are Lagoon in 1 2 Lagoon in 3 4 Lagoon in 5 6 Lagoon in 7 8 The Lagoon input devices allow recording a stereo S PDIF or 8 channel ADAT stream directly from the op...

Страница 13: ...LTIMEDIA SETTINGS Windows may be set up to use the Lagoon as its default audio device allowing system sounds to be sent out the Lagoon This also enables you to use the Lagoon with the sound applets in...

Страница 14: ...the LAGOON Tools window The right one is as usual for closing the LAGOON Tools The left one has a special function If you click on it the LAGOON Tools window will always stay on top of your desktop T...

Страница 15: ...also work without T2S using Sharp based devices Warning Always set the correct format at the output Choosing a wrong format e g sending an S PDIF signal to an ADAT device may result in noise signals...

Страница 16: ...nced page is suitable for experienced users and concerns the S PDIF output only Normally S PDIF equipment connected to the LAGOONs optical output works fine without changing the default settings Howev...

Страница 17: ...you must choose 48 kHz By clicking on Auto mode the LAGOON Tools will automatically choose the correct settings for you Wrong settings may lead to data formats that can not be accepted by other device...

Страница 18: ...and output channels of the LAGOON card can be interpreted as a single 8 channel device 4 stereo devices or 8 mono devices Remember that changing the number of devices will only take effect after rebo...

Страница 19: ...It is up to you to find out the best settings for your system If you are not experienced in optimizing your system use the default Buffer size Remember that changes will only take effect after rebooti...

Страница 20: ...onization is possible now Since ADAT recorders do not accept MIDI data coming from an application the Output device will be ignored in this mode Hint For proper MIDI timing always make sure the LAGOON...

Страница 21: ...ights are turned off This way you will be informed about every error which occurs during record or playback Remember Input errors are only relevant if you are using the LAGOON card for recording Input...

Страница 22: ...a lot of transmission errors are detected this will lead to a No lock error The incoming signal is erroneous Perhaps you played back a recording that contained a cut e g from a DAT tape At the positio...

Страница 23: ...g from ADAT to S PDIF Optical input and optical output do not have the same sample rate i e your external device is not synchronized to the LAGOON e g there is a CD Player connected to the optical inp...

Страница 24: ...rded Perhaps your PC was unable or too busy to process MIDI data fast enough Error Possible Reasons and Remarks 1 The version number of the driver and the version number of the LAGOON Tools are differ...

Страница 25: ...le rate should be the same as the one you are feeding in into the optical input of your LAGOON card If you chose ADAT Sync In the sample rate at the output will match the word clock frequency from the...

Страница 26: ...e 3 Check MME Input device settings in the LAGOON Tools MME page Maybe No input device is selected 4 Check your application software input configuration Maybe the LAGOON card is not selected as input...

Страница 27: ...ustomer will have the option to pay this fee and have the unit repaired and returned or not pay this fee and have the unit returned unrepaired The remedy for breach of this limited warranty shall not...

Страница 28: ...http www midiman net MIDIMAN U K Unit 22 Harrogate Business Park Freemans Way Harrogate N Yorks HG3 1DH England Sales Information 01423 886692 Sales Information email midimanuk compuserve com Technic...

Отзывы: