FinishLynx MVP Package Quick Start Guide - For Vision Cameras
4
b.
Right-click the
Local Area Connection
associated
with your system, and select
Properties
. The Local
Area Connection dialog appears.
c.
Click the
Advanced
tab.
d.
Make sure the box
under Internet Connection
Firewall
is
unchecked
.
e.
Click
Ok
and then exit the Network Connections
screen.
Restart your computer
.
Step 5:
Configure the network for Windows 7
& 8
(if applicable)
Note: Sections 1 and 2 should be completed on both
FinishLynx and Meet Management computer.
1.
Go to the Windows
Control Panel
. On the top right is
View By
with a drop down arrow. Click the drop down
arrow and choose Small or Large Icons.
2.
Find and double click on
Network and Sharing Center
.
They are listed alphabetically by icon name.
3.
This will open the
Network and Sharing Center
. On the
left is a blue section titled Control Panel Home.
4.
Click on the
Change Adapter Settings
icon.
5.
A new window will open displaying your network
connections. Right click on the
Wireless Network
Connection
and select
Disable
from the list of items.
This is only necessary for the FinishLynx Capture
computer.
6.
Right click on the
Local Area Connection
and select
Properties
from the list of items. A new window will
appear with a list of connection items. Click to select
Internet Protocol Version 4 (TCP/IPv4)
and click the
Properties
button.
7.
A Properties window will appear and is typically set to
Obtain an IP address automatically
. Click to select the
radio button for
Use the following IP address
. In the box
for IP address, enter 192.168.0.5 for FinishLynx and hit
Tab
key to auto fill in Subnet mask 255.255.255.0
8.
Click OK and navigate back to the Control Panel. In the
control panel click on the Windows Firewall icon. Under
Control Panel Home, on the left, click on
Turn Windows
Firewall on or off
.
9.
Turn off both Home and Public Firewalls (Domain for
Windows Pro).
Step 6:
Set up the primary camera and tripod
Setup the tripod in line with the finish line, preferably on the
infield and approximately
10 feet back
.
Note
: Minimum
recommended camera distance from track is 8 feet (at this
distance you may not be able to see the feet of the athlete in
Lane 1 – being able to see the feet is not a requirement for
accurate timing on the Torso of the athlete). If you need to be
closer than this you may have to use the optional 6mm lens
supplied with your MVP package.
1.
Extend the tripod legs so the geared head is
approximately 7 ft high.
2.
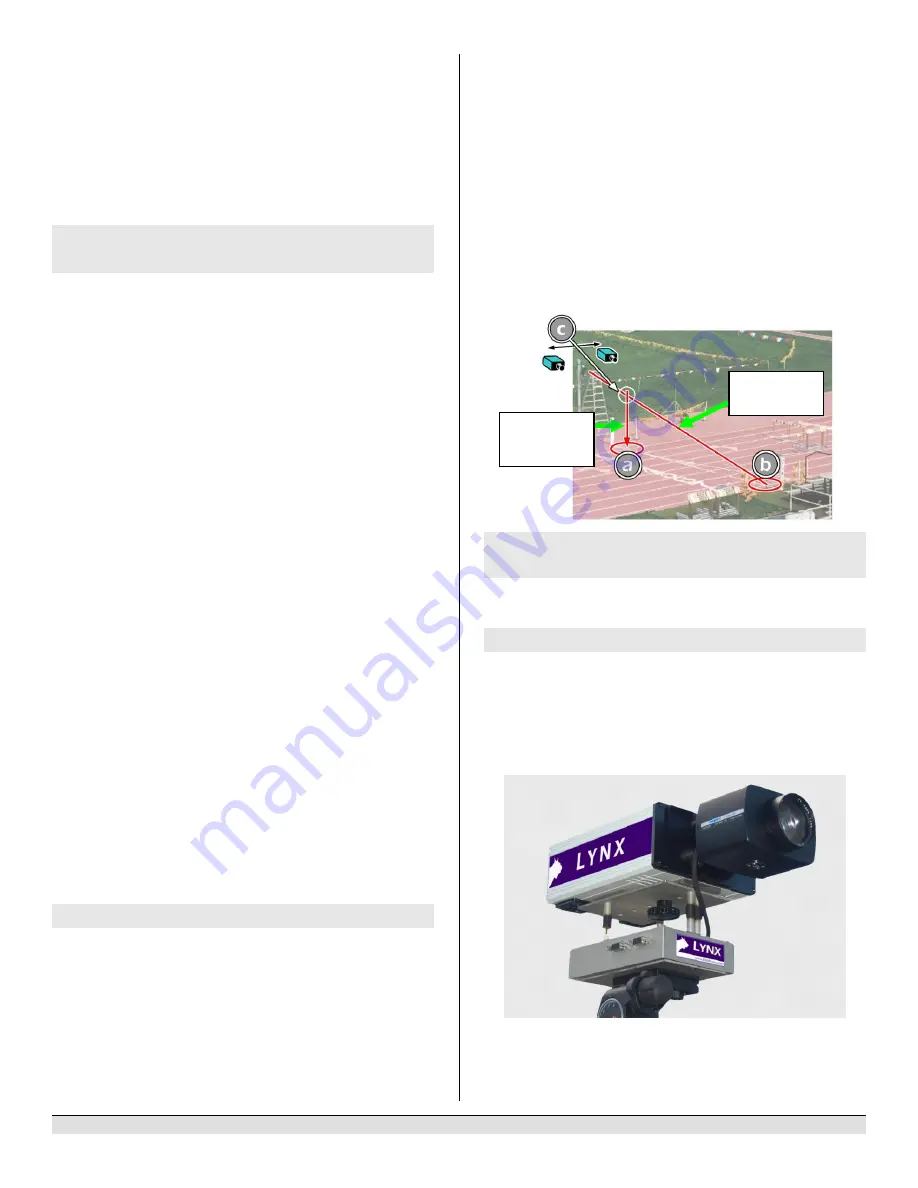
On the near side of the finish line, hold a plumb bob so
that it is suspended directly above the middle of the
finish line. This is the
plumb line
, shown as
a
in the image
below.
3.
Tie string to the screw on the top of the tripod head.
Have your assistant take the other end of the string to
the far side of the finish line and hold the string taught.
This is the
sight line
, shown as
b
in the image below.
4.
Move the tripod to the left or right until the plumb line
and sight line touch at position
C
in the image below. The
tripod is now in the plane of the finish line.
Step 7:
Set up the Reverse
Angle
Camera and
Tripod
1.
Repeat instructions above given for Primary Camera on
the opposite side of the track
Step 8:
Attach the cameras
to
the tripods
Note: Primary camera is marked TIMING ENABLED on
camera ID plate on base of camera.
1.
Secure the remote positioner to the camera bottom by
turning the black handled thumbscrew. Make sure the
FinishLynx label faces in the same direction as the
camera lens will face.
Note: Cables omitted for clarity and actual lens may vary from model shown
2.
Connect the cable that comes with the remote positioner
to the port on the positioner and the port on the back of
the camera labeled
Remote.
sight line
plumb
line


