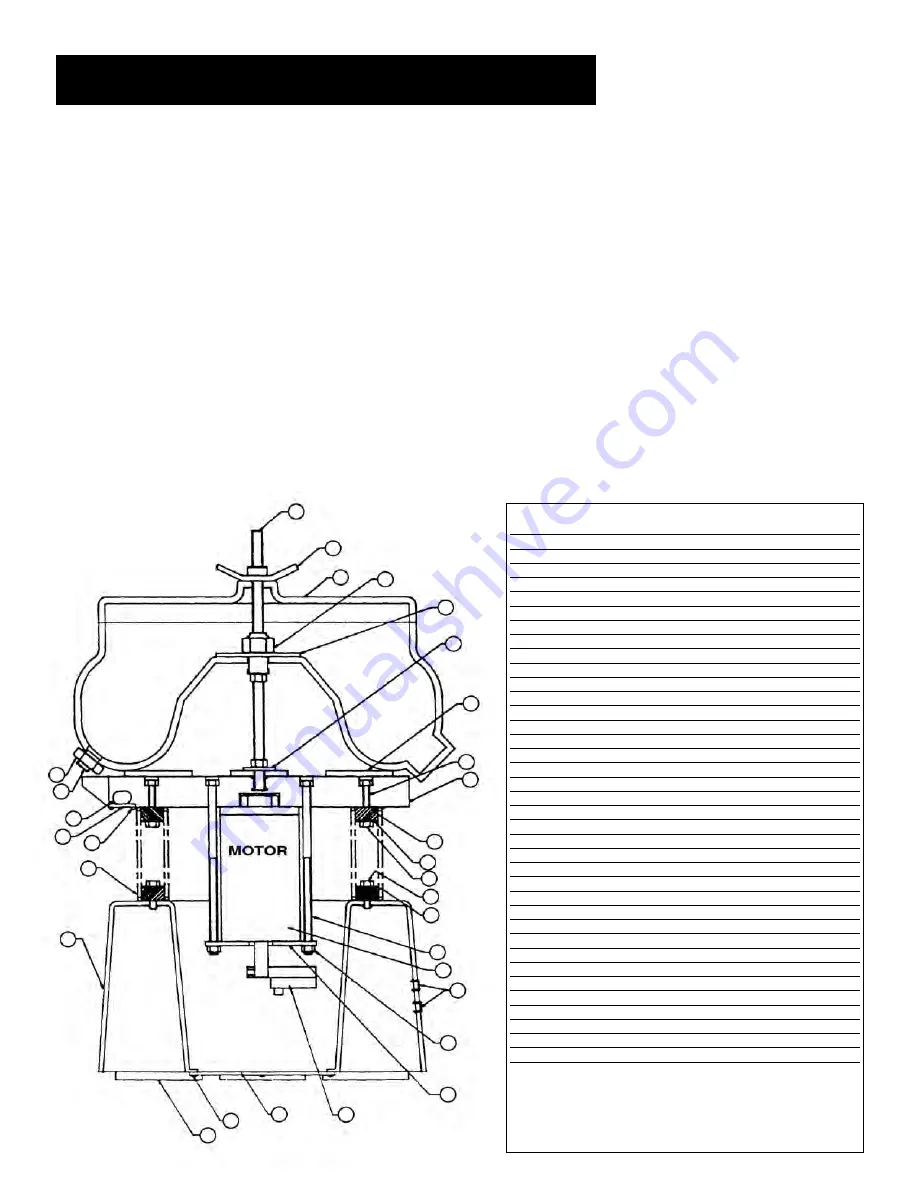
AV-40, AV-40SS, AV-75
SHAFT ASSEMBLY INSTALLATION:
Screw the 1/2-13 nut approximately 1-1 1/2" from the end of the shaft. Place the 9/16" flat washer onto the bottom of the shaft so
that it is against the 1/2-13 nut. insert the shalt, preferably with thread-locking liquid (such as Loctite®) into the threaded center of
the motor plate. Tighten 7 to 9 turns FINGER TIGHT. Excessive tightening will cause motor damage. When bottomed out, unscrew 1-
1/4 full turns. run a 1/2-13 nut down, and tighten against the motor plate.
BOWL ASSEMBLY:
Screw both 1/2-13 hex nuts and brass stud toward the motor plate, approximately one-half the distance of the shaft. Place the bowl
in position on the motor plate. Adjust the brass stud until the amount showing above the bowl is equal to the height of the bowl
washer and the 1-8 hex nut combined. Remove the bowl and use the 1/2-13 nut as a jam nut for the brass stud. Make sure the brass
stud does not move. Install the bowl, bowl washer, and 1-8 hex nut and tighten securely.
NOTE ON THE A V-JOSS (Steel Shot):
The AV-40SS bowl has a special spout and plug to allow the steel shot to drain from the bowl when needed. To drain the bowl of steel
shot, turn the T-handle on the plug counterclockwise until it is loose and then remove. Drain the steel shot as desired. Wipe clean the
interior of the spout and the rubber ridges on the drain plug prior to resealing it. Loosen the plug into the drain spout and turn the T -
handle clockwise until you feel resistance. The plug is now sealed again and the tumbler is ready to run.
ITEM
PART NO.
DESCRIPTION
QTY
1
07967
Shaft Assembly AV-40
1
1
07965
Shaft Assembly AV-75
1
2
07943
Cover Wing/Perm Nut Assembly
1
3*
23032
Bowl with Cover AV-40
1
3**
23046
Bowl with Cover AV-75
1
4
03376
Nut 1” -8 Hex Full Zc
1
5
07925
Bowl Holddown Plate
1
6
03249
Washer 9/16 Flat
1
7
07779
Rubber Pad
5
7a
07796
Top Pad Cut (Not Shown)
1
8
03299
Hex Head Screw 5/16 - 18 x 1 1/2
6
9
07773
Motor Plate
1
11
07942
Spring Grommet
12
12
03243
Washer 5/16 USS STD
12
13
03349
Nut 5/16-18 Hex Zc
6
14
03284
Hex Head Screw5/16-18 x 1 1/4
6
15
03243
Washer 5/16 USS STD
6
16
03480
Carriage Bolt 3/8-16 x 8” Long
4
17***
30255
Motor 40/75 110V
1
17***
30293
Motor 40/75 230V
1
18
03325
Jack Nut Molly #10-24
4
19
03388
Nut 3/8-16 Locking
4
20
07772
Motor Bar
1
21
07972
Counterweight Assy
1
22
07784
Bottom Cover
1
23
03440
Screw #8 x 3/8 Typ A Pan
3
24
07882
Rubber Feet
3
25****
07782
Base Model 40
1
25****
07783
Base Model 75
1
26
07941
Compression Spring
6
27
03462
Screw #10-32x3/8 Pan Zc
3
28
07781
Strap for Capacitor
1
29
03928
Capacitor 115V R
1
29
03927
Capacitor 230V R
1
30
07909
Strainer Fitting
1
31
03374
Nut 3/4-16 Jam Zc
1
32
07936
Drain Tube 3/8 LD x 30” S/A
1
*Includes 30,31,32 (Not Shown)
**Includes 30,31,32 (Not Shown)
***Includes 7,7a,9,11,12,13,16,17,19,20,28,29
****Includes 11,14,15,18,22,23,24,25
1
2
3
4
5
6
7
8
9
11
12
13
14
16
17
18
19
20
21
22
23
24
25
26
27
28
29
30
31
15


