background image

5. 

Communication Software Guideline 

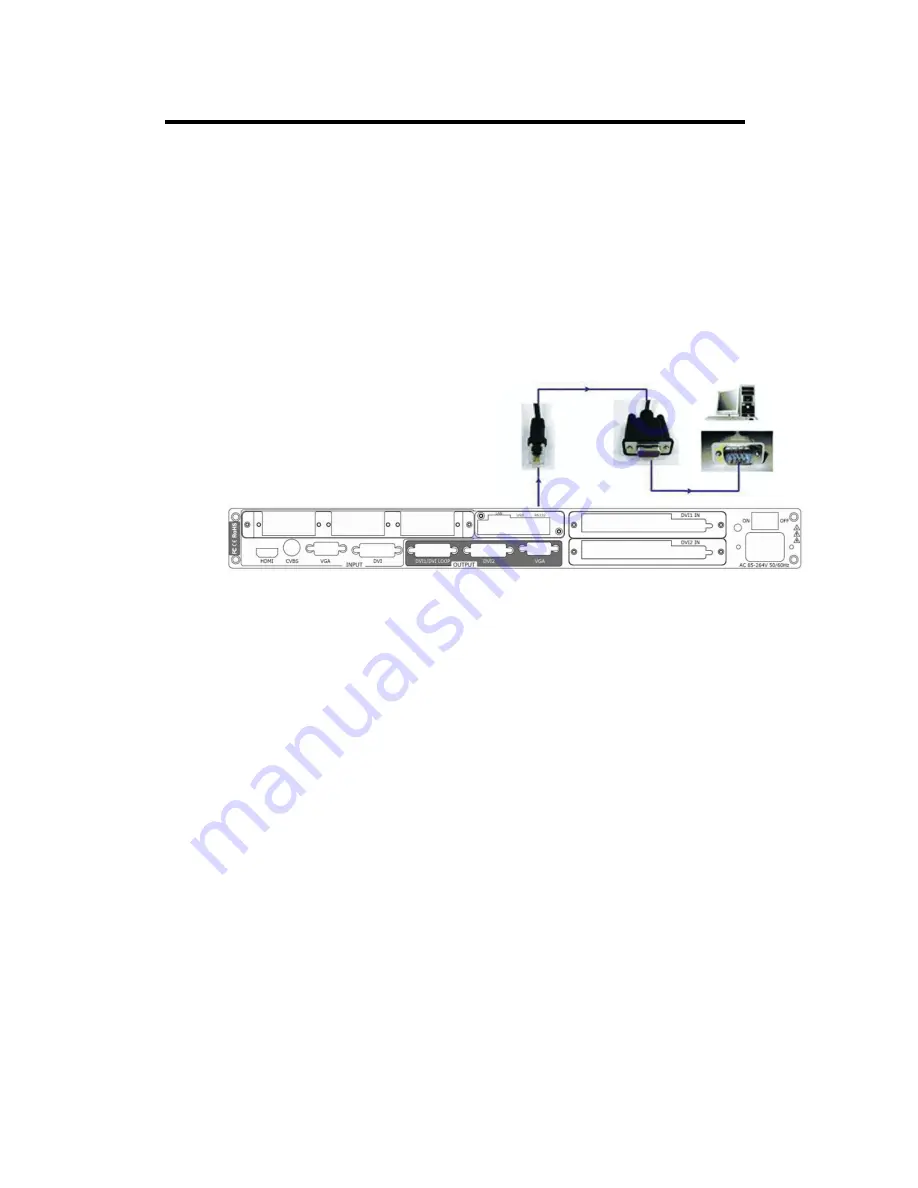
How to Connect Windows Control Program by RS232 Interface 


How to Connect Window Control Program 

by RS232 Interface


Firstly, install the control software in your PC. 


Take out the RS 232 cable as following

RS-232, with 9-pin on one end

, 


RJ 11 on the other side

. Connect one side of the RJ11 download line to 

the  RS232  on  the  video  processor  VENUS  X1,  and  the  other  side  to  be 

connected to the serial port on the PC. 


There is no any serial port on your PC, you will need another Serial to USB 

adapter. Connect one end of the RJ11 download line to the RS232 on the 

video processor. Connect the end of USB-side to the PC; Ensure the cable 

connection is good. Turn on the Video Processor VENUS X1. 

Right  click  the  [My  Computer]  on  the  home  screen  of  control  PC.  Enter 


[Attribute], Find [Hardware] Option, as following. 

Содержание LXLS11002

Страница 1: ...LXLS11002 2 LAYER SWITCHER AND SCALER USER MANUAL...

Страница 2: ...Luxibel Please read the manual thoroughly before bringing this device into service If the device was damaged in transit don t install or use it and contact your dealer Use this device with original a...

Страница 3: ...ding the Product This product is grounded through the grounding conductor of the power cord To avoid electrical shock plug the power cord into a properly wired receptacle before connecting to the prod...

Страница 4: ...observed could result in injury or death of personnel Note Highlights an essential operating procedure condition or statement CAUTION The exclamation point within an equilateral triangle is intended t...

Страница 5: ...o Processor User Manual Format Time ECO Description Principal V1 0 2015 05 18 0000 Release Vira V1 1 2015 08 06 0001 1 Update the front and back panel 2 Update the menu tree 3 Update the windows contr...

Страница 6: ...roduction This chapter is designed to introduce you to the VENUS X1 User Manual Areas to be covered are Chapter Structure How to Use This Manual Terms and Definitions System Overview Application Quest...

Страница 7: ...pter 2 Hardware Orientation Chapter 3 Hardware Installation Chapter 4 Menu Orientation Chapter 5 Communication Software Guideline Chapter 6 System Setup and Operations Chapter 7 Common Questions and S...

Страница 8: ...ex tool to perform comprehensive searches as required Table of Contents and Index Use the Table of Contents bookmarks to navigate a desired topic Click any item to instantly jump to that section of th...

Страница 9: ...ithout the video elements It includes the vertical sync horizontal sync and the chroma burst information Blackburst is used to synchronize video equipment to align the video output One signal is norma...

Страница 10: ...a practical contrast ratio of 30 1 to 50 1 DVI Digital Visual Interface The digital video connectivity standard that was developed by DDWG Digital Display Work Group This connection standard offers tw...

Страница 11: ...hieves 10 1 compression with little perceptible loss in image quality Produces blocking artifacts MPEG Motion image Expect Group A standard committee under the auspices of the International Standards...

Страница 12: ...a serial control standard with a set number of conductors data rate word length and type of connector to be used The standard specifies component connection standards with regard to the computer inter...

Страница 13: ...f the Internet Computers and devices with direct access to the Internet are provided with a copy of the TCP IP program to allow them to send and receive information in an understandable form USB Unive...

Страница 14: ...xel by line resolution of 640 480 with a color palette of 16 bits and 256 000 colors YCrCb Used to describe the color space for interlaced component video YPbPr Used to describe the color space for pr...

Страница 15: ...iple cascade mapping different user configurations and controlling key in and out and other advanced functions for high end show VENUS X1 supports EDID editing for VGA DVI HDMI input ports and read ED...

Страница 16: ...ion Application Questions RGBlink offers solutions to demanding technical problems Any application questions or required further information please contact with our Customer Support Engineers Refer to...

Страница 17: ...2 Hardware Orientation In This Chapter This chapter provides detailed information about the VENUS X1 hardware The following topics are discussed VENUS X1 Back Panel VENUS X1 Front Panel...

Страница 18: ...erface 15 DVI Output DVI I 8 17 Sending card interface 16 VGA Output DB15 9 Switch 18 Power IEC 3 port 10 HDMI Input HDMI A CONT Interface 4 Dial Switch If the two dial switches are upwards the device...

Страница 19: ...from players cameras etc supported resolution 480i and 576i via BNC Supported standards include PAL NTSC and SECAM 12 VGA Input VGA input input the video signal from HD player and computer etc Compat...

Страница 20: ...and Module 2 support all these inputs and Module 3 only supports digital input SDI optional module includes 1 3G SDI input and 1 SDI loop out VGA optional module includes 1 VGA input DB15port DVI opt...

Страница 21: ...r the device with HDMI input CVBS Input C Optional Module Input standard video signal from players cameras etc USB Input U Optional Module Can access the USB device or mobile hard disk with USB storag...

Страница 22: ...th sides of the back panel the purpose are as follows 1 Protect the interfaces it avoids the interface damage that may caused if the back panel hits the ground 2 Tie the input and output cables to avo...

Страница 23: ...on the front panel will show RGBlink and go into its self verification before it load last setting config and send processed image to the target monitor System default DVI input User can operate VENU...

Страница 24: ...here is no input or the DVI signal is invalid SV 1 39 The software version is 1 39 SN 0042 The serial number is 0042 Recall Save 1 Single device Unlock state Full size display Single image Fade in fad...

Страница 25: ...on output will be switched to this channel CVBS input selection button push the button its LED light turns on output will be switched to this channel VGA and YPbPr input selection button push the butt...

Страница 26: ...e this button as FREEZE push the button its LED light turns on and freeze the image Push the button again its LED light is off and output the video image If define this button as TEST PATTERN push the...

Страница 27: ...n the image is screen size display push the button again the image will full size display When connect USB signal it reused the move previous button push the button to play the previous USB video file...

Страница 28: ...signal it reused the move next button push the button to play the next USB video file Save button Push the button to enter SAVE mode turn the knob or push the number button which light up to save VENU...

Страница 29: ...ill lock the panel and push MENU for 5 seconds to unlock Push the MENU and SCALE button for 3 seconds can switch the language Scale function button For image size adjustment push the button to enter t...

Страница 30: ...S X1 User Manual 39 3 Hardware Installation In This Chapter This chapter provides comprehensive installation instruction for VENUS X1 hardware Following is the mechanic info of VENUS X1 for your refer...

Страница 31: ...r damage If you find any damage notify the shipping carrier immediately for all claims adjustments As you open the box compare its contents against the packing slip If you find any shortages contact y...

Страница 32: ...unctions that are available and descriptions of each menu tree in block diagram format The following topics are discussed MENU INPUT OUTPUT PICTURE PIP SPLIT TRANSITION SCALE SAVE SETUP SYSTEM LANGUAG...

Страница 33: ...Orientation MENU MENU Push the MENU to menu items menu as shown Turn the knob to select menu items before the menu means it s in selected state Push the knob to enter corresponding setting or view th...

Страница 34: ...sh the MENU button OLED display menu push the knob to select INPUT show menus as follows INPUT DETAIL Show the current input source and input format ZOOM It can adjust the image zoom size and position...

Страница 35: ...VGA input signal sub menu as follows AUTO ADJUST Auto adjust VGA input signal H POS V POS CLOCK PHASE auto adjust to display in full screen image Note Comments customers to use this operation in adjus...

Страница 36: ...I2 FOLLOW CUSTOM EXT_VGA RGBVGA OUT_VGA FOLLOW CUSTOM EXT_DVI RGBDVI RGBHDMI OUT_DVI1 OUT_DVI2 FOLLOW CUSTOM VGA SIGNAL TYPE Program VGA button is VGA signal or YPbPr signal USB CONTROL Sub menu as fo...

Страница 37: ...ial display project or LED screen application would like to require special resolution settings to meet the requirement Details please refer to the instructions in the manual How to Choose and Custom...

Страница 38: ...l phase setting V POS Vertical phase setting When the signal source of the screen appear black side can use this function to shift the black out of the screen RESET If image quality distorts by improp...

Страница 39: ...their actual situation this function mainly suitable for these professional operator who knows how to set the image quality correctly Others are not comments to do these operations If image distorted...

Страница 40: ...ise it is the graphic background pixel It should combined with AND OR conditions when judging BELOW In image 2 if the pixel value is lower than the setting value then the image is the graphic content...

Страница 41: ...P L T PBP L R PBP T B SELECT Can choose to set the size or position of IMAGE A or IMAGE B individually Note User can also select image A or image B by function reuse key SPLIT 6 SWAP IMAGE It can set...

Страница 42: ...AL SPLIT For normal split user should enable the split function that is turn the knob and set the SPLIT as ON push the knob to confirm System default OFF User can set the normal split in the sub menus...

Страница 43: ...or OFF ON Force deinterlace OFF No deinterlace IMAGE ENHANCE Image enhancement function used for image edge sharpening color reduction and image scaling MODE Special effects switching mode DISSOLVE F...

Страница 44: ...ans the image disappearing Arrows represents the direction of the image move that is the image that arrow point is compressed or stretched to the direction that arrow indicates until disappear or full...

Страница 45: ...ity distorts by improper operation it can be recover by reset For details please refer to the instructions in the manual How to Set up the Size and Position of the Single Image Note User can also push...

Страница 46: ...ct SYSTEM show menus as follows SN Show the serial number of the device VERSION Show the COM version firmware version mainboard version EXT mainboard version EXT INPUT1 version and EXT INPUT2 version...

Страница 47: ...is button as FREEZE TEST PATTERN and BRIGHT If define this button as FREEZE push the button its LED light turns on and freeze the image Push the button again its LED light is off and output the video...

Страница 48: ...D LUMINANCE Set the OLED luminance the adjustment range is 1 15 LANGUAGE Through this option user can choose Chinese or English according to their needs to operate the interface more quickly FACTORY R...

Страница 49: ...the MENU SPECIAL EFFECTS SWITCHING Push the MENU button two times and enter the effect switch function menu effect menu shown as follows DEINTERLACE Force Deinterlace function can choose ON or OFF ON...

Страница 50: ...UARE IN WIPE SOUARE OUT WIPE TOP LIEFT IN WIPE TOP LIEFT OUT WIPE TOP RIGHT IN WIPE TOP RIGHT OUT WIPE BOTTOM LEFT IN WIPE BOTTOM LEFT OUT WIPE BOTTOM RIGHT IN WIPE BOTTOM LEFT OUT WIPE LEFT IN WIPE L...

Страница 51: ...tch time setting Turn the knob to choose the time and push the knob to confirm The switching time ranges from 0 to3S ALPHA It can set the image transparency the regulating range is among 0 to 16 SAVE...

Страница 52: ...ED module information For details please refer to the instructions in the manual How to Load the Saved Parameter PIP FUNCTION Push the PIP DSK button the button led light turn on and enter the PIP fun...

Страница 53: ...tion can choose ON or OFF System default OFF HORIZONTAL SPLIT Horizontal fixed split choose it and push the number button to set the total horizontal screen number VERTICAL SPLIT Vertical fixed split...

Страница 54: ...in the manual How to Set up the SPLIT SCALE FUNCTION Push the SCALE button the button led light turns on and enter the SCALE function menus User can adjust the following items by the knob or umber but...

Страница 55: ...tion about the control communication software The following topics are discussed Software Installation Software Operation How to Connect Windows Control Program by RS232 Interface How to Connect Windo...

Страница 56: ...igured with user friendly communication software support drag and drop operation for edit and display Also it can be customized with schedule function Double click to install English version default f...

Страница 57: ...5 Communication Software Guideline Software Installation User can select Change to choose the VENUS X1 install software...

Страница 58: ...5 Communication Software Guideline Software Installation Click Next to go on Click Next to go on...

Страница 59: ...5 Communication Software Guideline Software Installation Click Next to go on Click Finish and ready to run VENUS X1 console...

Страница 60: ...product default equip with the RS 232 line DB9F line and RJ11 6 B4C line to connect VENUS X1 to the windows control program For more detailed information please refer to How to Connect Windows Control...

Страница 61: ...192 168 0 100 and the remote port must be 1000 After setting above click the icon to connect with the net work If successful connect the icon becomes status on the left button showing Use File Toolba...

Страница 62: ...5 Communication Software Guideline Software Operation Communication Toolbar Open COM Close COM Set COM Device Toolbar Synchronization Save to flash Load form flash...

Страница 63: ...5 Communication Software Guideline Software Operation Factory setup Schedule Toolbar Customize schedule Execute schedule Execute tasks according to schedule...

Страница 64: ...election Note Same as MENU OUTPUT STANDARD Display Mode Toolbar Choose to work in one window or two window Layout Toolbar In single channel mode the dialog is in grey and it is in limited use And in d...

Страница 65: ...ns current selected interface When user select two window mode click the input interface on the left to choose the channel signal The green box means current select channel 2 Screen Parameter Toolbar...

Страница 66: ...splay mode and gamma There are three modes black live video and freeze frame It outputs black signal when choose black and the video plays in live mode and stop playing in freeze mode Generally it is...

Страница 67: ...Y Images Display Toolbar User can customize the image position and size by dragging the image in this area This process is sync to the parameters in image toolbars User Mode Toolbar Users can recall t...

Страница 68: ...mber Control Synchronization Read the current parameters of VENUS X1 Device IP Users can set equipment IP mask and gateway usually used in one computer control or remote control several computers It t...

Страница 69: ...ine Software Operation Output Adjust Choose the output port and set the output mode data range bit depth and DE EDID Manage Choose the EDID date source and input port VENUS X1 supports the EDID manage...

Страница 70: ...UT_DVI1 OUT_DVI2 FOLLOW CUSTOM EXT_HDMI RGBDVI RGBHDMI OUT_DVI1 OUT_DVI2 FOLLOW CUSTOM EXT_VGA RGBVGA OUT_VGA FOLLOW CUSTOM EXT_DVI RGBDVI RGBHDMI OUT_DVI1 OUT_DVI2 FOLLOW CUSTOM Audio User can enable...

Страница 71: ...he split mode and set Equ Split or UnEqu Split according to actual need Hot Backup User can enable or disable the hot backup function Choose ON to set the backup signal for BACKUP_1 to BACKUP_5 It wil...

Страница 72: ...h the language by Language option Admin Advance Debug User should input the password in the Admin Password dialog for advance debug Note Advance is only done by engineer If need please connect us for...

Страница 73: ...e RJ11 download line to the RS232 on the video processor VENUS X1 and the other side to be connected to the serial port on the PC There is no any serial port on your PC you will need another Serial to...

Страница 74: ...l Program by RS232 Interface Click Device Manager on the left check the COM number as following COM1 is offered Remember the COM you are using and then run the control software find Communication opti...

Страница 75: ...VENUS X1 Boud Rate to be 115200 Click Confirm after setting Click open serial check if COM icon is on the bottom right corner when there is the prompt green showing on the software it means the commun...

Страница 76: ...USB Interface Install the driver Connect the USB cable to the PC and the video processor Turn on the VENUS X1 for the first time to use USB the PC will remind finding the new hardware and ask to insta...

Страница 77: ...ication Software Control Guide How to Connect Window Control Program by USB Interface When the installation finish can go to check the installed COM port inside the device management as following imag...

Страница 78: ...e How to Connect Window Control Program by USB Interface Install the console software and run after install shows the interface of the console as following Select the COM as installed just now and set...

Страница 79: ...ol Program by USB Interface Press to start communication when there is green point in the right down corner showing on the software it means the communication is ok and you can use the software to con...

Страница 80: ...Connect VENUS X1 and computer with cable the connection diagram is as follow Power on VENUS X1 and start the network function specific steps as below The first step push MENU button login MENU SYSTEM...

Страница 81: ...168 0 132 The fourth step the two IP address are in the same band i e 192 168 0 XXX the fourth section numbers XXX will not repeat previous If so the communication connection can be built by line CAT...

Страница 82: ...nd with that of computer 192 168 0 XXX The fifth step Open windows control software click ico Interface display as below Select Enternet Input equipment IP address click OK Click to open the serial po...

Страница 83: ...g How to Set up the PIP How to Set up the SPLIT How to Set the Size and Position of the Single Image How to Choose and Custom Output Resolution How to Realize the Screen Size Setting How to Zoom the I...

Страница 84: ...8 Power IEC 3 port 10 HDMI Input HDMI A 14 15 DVI output use for connecting the sending card of LED screen and support output formats as following 800 600 60 1024 768 60 1024 768 75 1280 720 50 1280 7...

Страница 85: ...ith DVI input 10 HDMI Input HDMI A Port Input the image signal from computer 11 CVBS Input BNC Port Can receive standard video signal from players cameras etc Input supported resolution 480i and 576i...

Страница 86: ...mless switching other source such as VGA push the VGA button OLED module show as follows SOURCE SELECT VGA DVI button light turns off after pushing VGA button VGA button light will be on if the VGA si...

Страница 87: ...OW OFF ALPHA 0 LAYOUT Can choose PIP layouts the corresponding results are as follows PIP L T PBP L R PBP T B SWAP WINDOW It can set PIP to swap exchange when choose ON it can exchange IMAGE A and IMA...

Страница 88: ...ow as follows FIXED SPLIT NORMAL SPLIT FIXED SPLIT Menus are as follows SPLIT OFF HORIZONTAL SPLIT 1 VERTICAL SPLIT 1 SPLIT INDEX 1 SPLIT Split function can choose ON or OFF System default OFF HORIZON...

Страница 89: ...TAL LED screen Horizontal total size V TOTAL LED screen Vertical total size H POS This device display image Horizontal size V POS This device display image Vertical size H SIZE This device display ima...

Страница 90: ...e OLED module show as follows H SIZE 1920 V SIZE 1080 H V SIZE 0 H POS 0 H POS 0 RESET User can adjust the following items by the knob or number buttons H SIZE Width setting V SIZE Height setting H V...

Страница 91: ...ution setting Push the MENU button to enter the menu items turn the knob and choose OUTPUT push the knob to confirm turn the knob to choose CUSTOMIZED push the knob to confirm CUSTOMIZED 1920 1080 60...

Страница 92: ...the settings For example input refresh rate 60 CUSTOMIZED 1536 1536 60 After input all the values push knob to enable VENUS X1 to output this resolution VENUS X1 will take 5 10 seconds to enable this...

Страница 93: ...is application 1440x900 is an example Push the MENU button to go into the main menu turn the knob and choose OUTPUT push the knob to confirm turn the knob to choose SCREEN PARAMETERS push the knob and...

Страница 94: ...and the image will be zoom in to the top direction from its bottom V DOWN Zoom in vertical and the image will be zoom in to the down direction from its top V UP DOWN Zoom in vertical but in both top a...

Страница 95: ...put 3 Push the MENU button turn the knob choose PICTURE push the knob to confirm turn the knob and choose TEXT OVERLAY push the knob to confirm IMAGE QUALITY TEXT OVERLAY Then enter into TEXT OVERLAY...

Страница 96: ...thout black edges If there are black edges around VGA image choose ZOOM option in INPUT to adjust 6 Set the text overlay mode choose PRESET option in TEXT OVERLAY push the knob to enter into the PRESE...

Страница 97: ...BLACK user can define this button as FREEZE TEST PATTERN and BRIGHT the operations are as follows 1 Push the MENU button to enter to the menu items turn the knob and choose SYSTEM SYSTEM LANGUAGE ENG...

Страница 98: ...ght is off and output the video image VIDEO IMAGE 2 If choose TEST PATTERN push the button its LED light turns on the output will be switched to test pattern TEST PATTERN 35 AUTO SWITCH OFF There are...

Страница 99: ...ight turns on user can adjust the brightness contrast saturation sharpness color red color green color blue and gamma If image quality distorts by improper operation it can be recover by reset BRIGHTN...

Страница 100: ...mage Besides SCALE user can define this button as TAKE the operations are as follows 1 Push the MENU button to enter to the menu items turn the knob and choose SYSTEM SYSTEM LANGUAGE ENG FACTORY RESET...

Страница 101: ...efine SCALE KEY as TAKE the SCALE button will light up choose the signal that need to take first the signal button you have selected will flash and the main menu will show the TAKE source you have sel...

Страница 102: ...Use Black Out Black out descriptions Black signal realizes one key touch to a black screen VENUS X1 provides black effect processing for output with cut black effect Operation is as below Push the BLA...

Страница 103: ...eless function is available but only realize cable remote control No limitation for router s model and brand such as VPN router model Netcore 255 or 266 Volans VE 760W or 982W One VENUS X1 processor a...

Страница 104: ...nt is 192 168 1 1 then user need to change router s default gateway or change processor s IP both methods are available but we suggest to change processor s IP Method one Change processor s IP Push th...

Страница 105: ...Remote Control Settings Go to router setting part and find out LAN port setting change the default value 192 168 1 1 to be 192 168 0 1 Save the setting and restart the router then user can directly c...

Страница 106: ...flashes will be overwrite 2 Turn the knob and choose the position that will save push the knob to confirm 3 The figure 1 2 3 4 5 6 7 8 9 0 down of the buttons means SAVE1 10 user can push any button...

Страница 107: ...s are as follows 1 Push the LOAD 6 button the button light is on and enable the LOAD function RECALL SAVE SAVE 1 Button on is ready for recall Button flashes means just recall 2 Turn the knob and choo...

Страница 108: ...ollowing topics are provided Input Jitter for I System of HDMI DVI Quick Split Operation There is Flash Point when Output to the LED Screen APP Software cannot Properly Connected in Mobile Phone or Ta...

Страница 109: ...e EXT_HDMI input DVI Quick Split Operation The split function of VENUS X1 is only available for DVI port standard and HDMI loop out port of EXT_9 It Needs Signal Distributor if Split by DVI Port If sp...

Страница 110: ...hree groups of the parameters There is Flash Point when Output to the LED Screen Change the DVI Cable There is flash point on LED display when input sending card This is because the DVI cable quality...

Страница 111: ...lease check if the IP of wireless router is inconsistent with this IP the IP will conflict if consistent and unable to search the device and normal connection Please change the device IP address and m...

Страница 112: ...e knob to confirm Turn the knob to adjust the H POS and V POS Software Upgrade Failed Can t Open the Device Check if connect to the USB port and then check if recognize to the port if so please restar...

Страница 113: ...puts 1 Connector Standard DVI I socket Supported Resolution SMPTE 625 25 50 PAL 525 29 97 59 94 NTSC 1080P50 59 94 60 1080i50 59 94 60 720p50 59 94 60 VESA 800 600 60Hz 1024 768 60Hz 1280 768 60Hz 128...

Страница 114: ...1280 72 0 29 97 1280 720 30 1920 1080 23 98 1920 1080 24 1920 1080 25 1920 1080 29 97 1920 1080 30 VESA 800 600 60 1024 768 60 1024 768 75 1280 720 60 1280 720 50 1280 768 60 1280 800 60 1280 1024 60...

Страница 115: ...50m at 1 485Gb s 480m at 270Mb s SDI Loop Out Number of Loop Out 3 Connector Standard BNC Socket Data Rate 2 97Gb s 2 97 1 001Gb s 1 485Gb s 1 485 1 001Gb s and 270Mb s Supported Standard SMPTE 425M 3...

Страница 116: ...puts 3 Connector Standard DVI I socket Supported Resolution SMPTE 625 25 50 PAL 525 29 97 59 94 NTSC 1080P50 59 94 60 1080i50 59 94 60 720p50 59 94 60 VESA 800 600 60Hz 1024 768 60Hz 1280 768 60Hz 128...

Страница 117: ...bps 24bit Audio Output Number of Outputs 1 Connector Card faucet Standard 1 4 Socket Audio standard 48Kbps 24bit Function Input channel configuration Support each input channel signal programming conf...

Страница 118: ...anty related repairs include parts and labor but do not include faults resulting from user negligence special modification lighting strikes abuse drop crush and or other unusual damages The customer s...

Страница 119: ...nterface of VENUS X1 to the computer with a USB cable 2 Plug in the power cord and make sure the device is in normal operation 3 Open the windows control program 4 Click the icon to set the serial por...

Страница 120: ...Load the program 6 It will pop up the following box if load successfully or user need to re download 7 Reboot the device and check the run state and version information...

Страница 121: ...all or replace the optional module according to actual need specific steps are as follows Install the Optional Module 1 Unscrew the 2 captive screws in input modules block and pull out the input modul...

Страница 122: ...e 3 Push the input modules into the device along the slide rail and screw the captive screws then install the input blocks as shown in figure 4 If install the SDI input module please screw the SDI int...

Страница 123: ...s as shown in figure Replace the Optional Module 1 Unscrew the captive screws and pull out the input modules that will replace as shown in figure Captive Screw 2 Unscrew the fixed screws of input modu...

Страница 124: ...Fixed screw of input module 3 Take out the input modules that will replace as shown in figure 4 Install the input module that user need as shown in figure...

Страница 125: ...ix the input modules on the plate with screws as shown in figure Fixed screw of input module 6 Push the input modules into the device along the slide rail and screw the captive screws as shown in figu...

Страница 126: ...Captive Screw 7 Lock the input block as shown in figure...

Страница 127: ...shocks falls dust dirt humidity and by the article as well as its contents e g data loss compensation for loss of profits consumable goods parts or accessories that are subject to an aging process du...

Отзывы: