background image

INSTRUCTION | P16

Operation

INSTRUCTION | P17

Operation

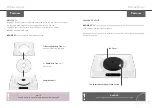
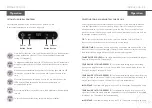
SETTING THE DIGITAL CONTROLS

Once trays are loaded with food and have been stacked, its time
to set the temperature and time for the drying cycle.

Power 

Button

SET 

Button

Add 

Button

Subtract

Button

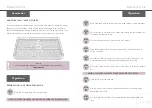
To adjust the temperature press the SET Button once, the LED temperature 
display will start to flash, use the Add and Subtract buttons to increase or 
decrease.

S T E P 

2

When desired temperature is set, press the SET button again and the LED 
time display will start to flash. Use the Add and Subtract buttons to set 
time.

S T E P 

3

When the time has been selected do not touch any other buttons, the 
LED display will stop flashing and the time and temperature will 
automatically be saved.

S T E P 

4

When the digital timer counts down fully, the dehydrator will automatically 
turn off.

S T E P 

5

To turn off the dehydrator at any time press the Power Button.

S T E P 

6

Press the Power Button once; this will automatically turn on the Dehydrator 
with the default time setting of 10 hours and the default temperature 
setting of 50 degrees C. 

S T E P 

1

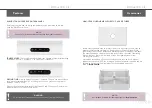
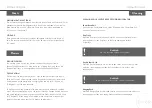
SELECTING FOOD & LOADING TRAY FOR DRYING

Select high quality produce that is ripe and full of flavour for the best results. Wash all 
fruits and vegetables to remove any debris, dust or insects. Cut away any bruised or 
damaged sections.  Lay food pieces evenly onto the trays. Do not overlap the food 
pieces as this may inhibit drying. As each tray is loaded, stack them one by one onto the 
Power Base Unit ready for drying.  

TIP: 

To get the best result be sure to slice your food between 5mm and 10mm in 

thickness. Any thicker than this and the food may not dry evenly. 

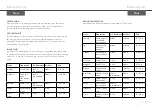
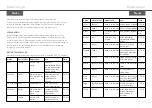
DRYING TIME: 

Drying times will vary, depending on the type and amount of food, the 

thickness of the slices, the percentage of water in the food and the weather when using 
the Dehydrator. See pages 23 through to 28 for approx. drying times.

TEMPERATURE CONTROL:

 The Luvele Breeze Dehydrator has a temperature range of 

between 25 degrees C & 75 degrees C. 

TEMP RANGE 25 TO 30 DEGREES C:

 This temperature setting range is for making 

biltong and drying flower etc.. over a 2-3 day period. The maximum drying time on the 
25 and 30 degrees C setting is 72 hours. 

TEMP RANGE 35 TO 45 DEGREES C:

 This temperature setting range is ideal for drying 

foods that need to remain raw. This lower temperature will dehydrate foods slower, so it 
may be necessary to slice food thinner when using these temperatures. 

IMPORTANT: 

The maximum drying time on the 35 to 45 degrees C settings is 24 hours. 

TEMP RANGE 50 TO 75 DEGREES C

: This temperature range is for produce with a 

high water content like meats, fruits and vegetables etc. It is recommended to dehydrate 
all meats on the 75 degrees C temperature setting.

IMPORTANT:

 The maximum drying time on the 50 to 75 degrees C settings is 24 hours. 

Содержание Breeze Food Dehydrator

Страница 1: ...LUVELE BREEZE FOOD DEHYDRATOR com au Instruction Booklet LBFD500AUS...

Страница 2: ...aged appliance incl Mains cable Operate appliance only through a professionally installed socket supplying the correct voltage and do not use extension cables Never remove main cable with wet hands or...

Страница 3: ...r than 8 years old and supervised Keep the appliance and its cord out of reach of children less than 8 years Check the power supply cord for damage from time to time If the power supply cord is damage...

Страница 4: ...tures NOTE Remove both drip trays after each use and clean thoroughly Features FAN COVER VENTS IMPORTANT The Fan Cover Vents can be opened and closed The closed position is used when cleaning of the P...

Страница 5: ...between 25 and 75 degrees C with 5 degree C increments On the low temperature settings of 25 and 30 degrees C the digital timer can be set for a drying period of up to 72 hours For temperatures betwee...

Страница 6: ...ther to create a hollow structure BPA FREE TRAY HOLDER BPA FREE HANGING RACK Place the Hanging Rack on top of the Tray Holder stack then use the supplied Stainless Steel Hooks to hang items for drying...

Страница 7: ...rature range of between 35 and 75 degrees C a maximum drying time of 24 hours only should be set WARNING Do not operate at a temperature above 30 degrees C for more that 24 hours NON STICK SILICONE ME...

Страница 8: ...er S T E P 2 NOTE THE TRAY HOLDERS CANNOT BE WASHED IN A DISHWASHER Do not put the Power Base Unit in water Wipe down the Power Base Unit with a damp soapy cloth only S T E P 3 Set the Power Base Unit...

Страница 9: ...r damaged sections Lay food pieces evenly onto the trays Do not overlap the food pieces as this may inhibit drying As each tray is loaded stack them one by one onto the Power Base Unit ready for dryin...

Страница 10: ...g strips for drying If any excess liquid remains on the meat from basting remove with paper towel When hanging your strips of meat be sure to separate your strips evenly throughout the dehydrator usin...

Страница 11: ...flavours do not mix STORAGE The storage area should be cool dry and dark The darker and cooler the storage area the longer the dried foods will last The ideal storage temperature for dehydrat ed food...

Страница 12: ...a temperature of 75 degrees C Fruits Preparation Pre Treatment Dry Test Time Apples Core Slice Soak in pre treatment Pliable 8 12 Hrs Apricots Cut in half stone slice in quar ters Soak in pre treatmen...

Страница 13: ...for 4 5 minutes Brittle 8 10 Hrs Beans Cut into lengths Steam blanch until translucent Brittle 6 8 Hrs Beetroot Remove skin and slice Cook until tender Brittle 12 14 Hrs Broccoli Soak in salt water f...

Страница 14: ...read cheese vegetables and cookies 3 5 Hrs Chili Peppers Pods Rinse and dice Mild onion flavor use in moist recipes 2 3 Hrs Coriander Seeds Clip entire plant dip in boiling water Sausage pickling spic...

Страница 15: ...at 75 degrees C until flowers are brittle To make potpourri use a handful of flowers blossoms and petals and combine with 3 4 drops of perfumed oil e g tea rose or lavender Arrange flowers blossoms a...

Страница 16: ...t to make any warranty claim as simple as possible for you All you need to do is contact us at support luvele com au and provide us information about the problem you are having with your item Firstly...

Страница 17: ...LUVELE BREEZE FOOD DEHYDRATOR INSTRUCTION BOOKLET USER GUIDE Notes...

Отзывы: