Maintenance
Diaphragm replacement
33
© Lutz-Jesco GmbH 2018
Subject to technical changes.
181112
BA-10407-02-V08
Motor-driven diaphragm dosing pump
MEMDOS LB
Operating instructions
12.3 Tighten up dosing head bolts
NOTE
Machine damage caused by leaking oil
If you tighten the screws too much, this can lead to the dosing head
being damaged. However, not tightening the screws enough leads to
the diaphragm being leaky and correct functioning being affected.
ð
Tighten up the screws to a suitable torque, in accordance with the
following table.
The torque needed for each MEMDOS LB type or the diaphragm size:
MEMDOS LB
Diaphragm rupture
diameter
Torque
(
±
10%)
4 - 20
52 mm
2 Nm
4-HP - 20-HP
52 mm
3 Nm
35 - 60
64 mm
3 Nm
80 - 160
90 mm
6 Nm
210 - 260
120 mm
6 Nm
310 - 400
150 mm
10 Nm
510 - 1010
185 mm
12 Nm
Table 28: Dosing head bolt torque
12.4 Diaphragm replacement
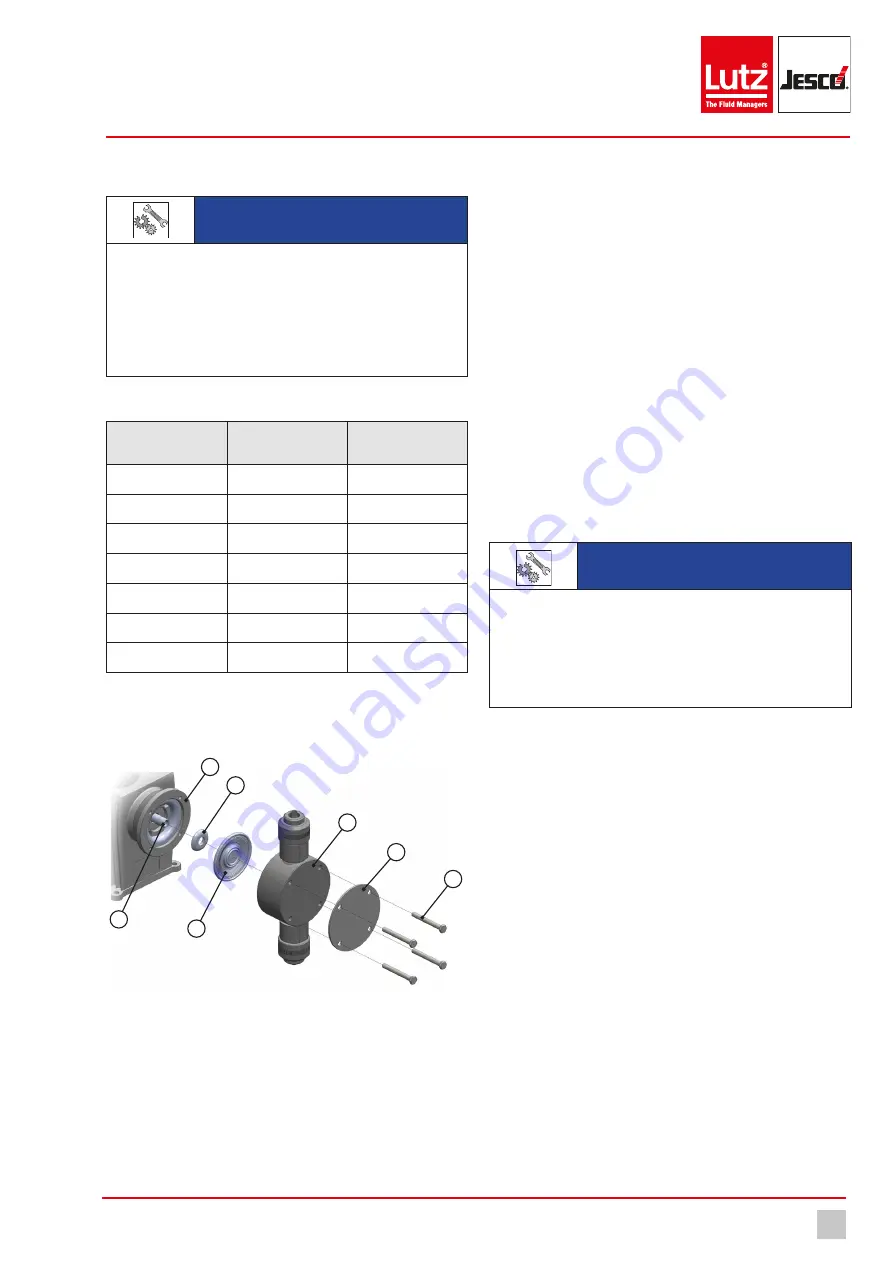
Fig. 16: Diaphragm replacement
12.4.1 Preparation
Precondition for action:
ü
You have depressurised the hydraulic sections of the plant.
ü
You have rinsed the dosing pump using a safe medium (e.g. water).
Perform the following working steps:
1.
Remove the dosing head screw (7) with a suitable tool. Support the
dosing head whilst doing so and if necessary, the pressure plate (6),
so that these parts do not fall.
2.
Remove the dosing head and any pressure plate.
12.4.2 Remove the old diaphragm
Perform the following working steps:
1.
Confirm the clockwise stroke length adjustment in the direction 0%.
When activating the motor, the adjustment can be activated more
easily. Should the drive not be connected to the network, the motor
can be turned by hand on the fan wheel with a dismantled fan cowl.
2.
Holding the diaphragm (4) on its edge, pull it from the diaphragm
flange and turn it out in an anti-clockwise fashion. If it is difficult to
move, use pincers on the diaphragm edge. Threads which are diffi-
cult to move can be hit lightly on the face of the diaphragm centre in
order to loosen the connection.
ü
Diaphragm removed.
12.4.3 Install a new diaphragm
NOTE
Damage to the dosing head/diaphragm leaks
If you tighten the screws too much, this can lead to the dosing head
being damaged. However, not tightening the screws enough leads to
the diaphragm being leaky and correct functioning being affected.
ð
Tighten the screws to a torque of 180 Ncm.
Precondition for action:
ü
Diaphragm rod (1), diaphragm flange (2) and any necessary support
plate (3) were cleaned thoroughly and checked for damage and wear.
Any remaining medium residue or surface damage could cause
premature wear to the diaphragm.
ü
The diaphragm (4) thread was lightly greased (e.g. Molycote
Longterm W2).
Perform the following working steps:
1.
Push the support plate (3) onto the membrane threaded supports
with the curved side facing the threaded pin of the diaphragm.
2.
Screw the diaphragm (4) together with the support plate clockwise
until it is securely fitted in the membrane rod.
3.
Before screwing on the dosing head, it is first necessary to approach
a neutral position in the rear end position of the diaphragm.
4.
With the MEMDOS LB, turn the stroke adjustment in an anti-clock-
wise direction in the direction 100%. The membrane enters the dia-
phragm flange.
5.
Place the dosing head (5) and the pressure plate (6) in front of the di-
aphragm flange. Watch for the weight of the dosing head during large
pumping operations; especially with the stainless steel version.
Where necessary, support the dosing head at the correct height.
6.
Lead the fastening screws through the drill holes in the dosing head
and tighten them cross-wise e.g. top left – bottom right – top right –
bottom left.
ü
Diaphragm change finished.
1
2
3
4
5
6
7


