background image

Application Note #428

17

Lutron Technical Support Center

1.800.523.9466

®

Information Display Sequence 

(continued)

4.   The next time the status LEDs flash consecutively, they are showing the column type of column.

•   A short pause will occur, then the status LEDs will flash consecutively for the fifth time 


(24 seconds after entering information display mode), for “m” amount of times.

•  Count the “m” number of flashes.
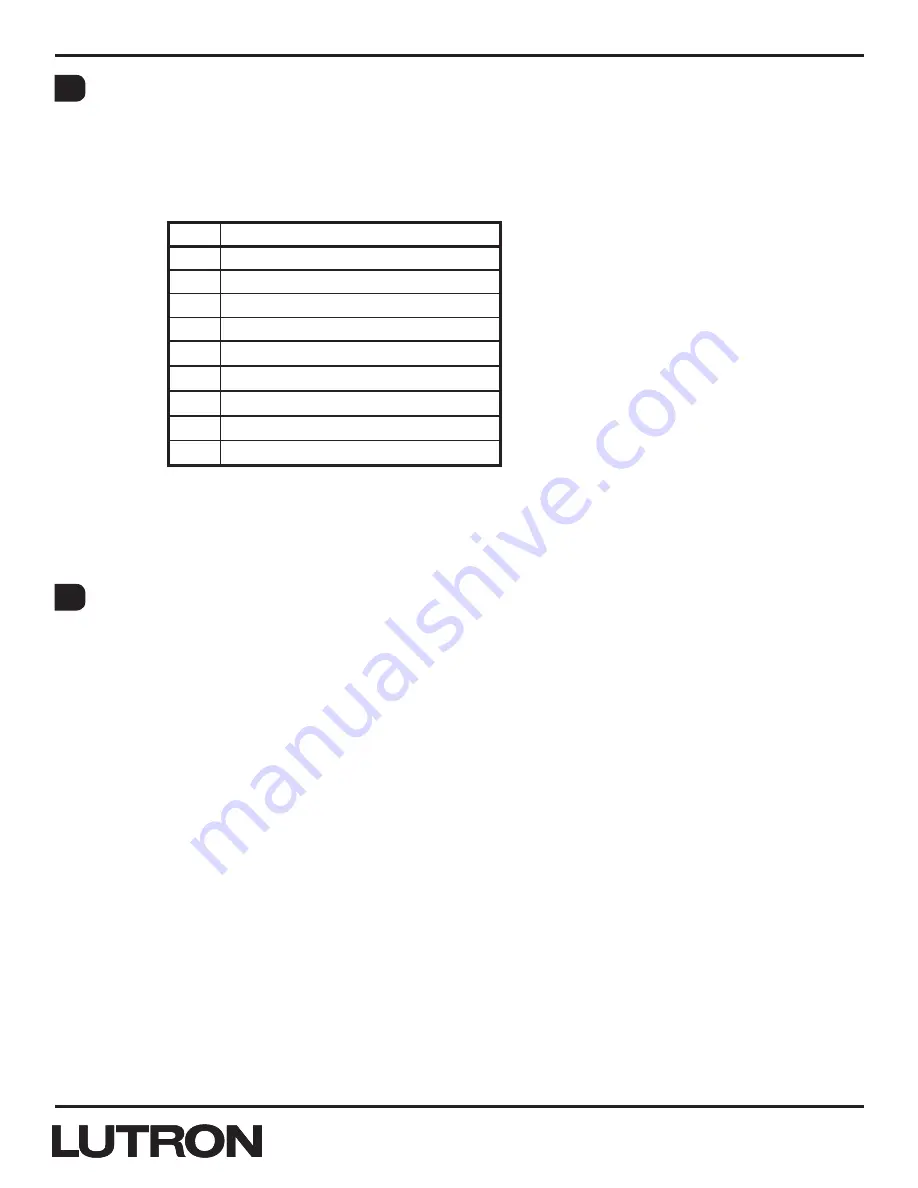
•   The “m” amount of consecutive flashes represents the following:

“m”

Column Type

1

Scene with OFF

2

Scene

3

Zone Toggle

4

Partition

5

Shade

6

Shade Toggle

7

Shade Group

8

2B Special Functions

9

Fine Tune

•   Once the user has reached this step, the wallstation has given the user the number 

representing the type of the selected column.

5.   Once the column has sequenced through the code revision, hardware type, and column type, all 

status LEDs and backlight LEDs will return to their appropriate settings in Normal Mode.

Shade Toggle Type Programming

Programming a Shade Toggle Type Column:

1.   Enter the column into programming mode by holding the “top” and “bottom” buttons of the 


shade toggle type column together for 5 seconds (if it’s a 1B column, hold the single button for 
10 seconds). 

2.  Tap the button that you wish to program. Its LED will blink rapidly. 
3.   Each time you tap this same button, the next shade/drapery will be selected. Each time you 

double tap it, the previous shade/drapery will be selected. 

4.   To assign the currently selected shade/drapery, tap the “Lower” button. To unassign the currently 

selected shade/drapery, tap the “raise” button. 

5.   Once all shades/draperies are assigned to that button, tap the next button and repeat the 

process. repeat for all buttons in the column.

6.   Once programming is complete, hold the “top” and “bottom” buttons for 5 seconds to return to 

Normal Mode (if it’s a 1B column, hold the single button for 10 seconds). 


J


K

Содержание seeTouch QS

Страница 1: ...utton its backlight LED or its status LED CCI Remapping and Scene Banking 7 Allows the user to change the button on the wallstation to which the two CCIs are mapped For Scene columns also has the option of changing the recalled scenes of the column when the CCI is closed versus when the CCI is open This is known as Scene Banking Ex A Scene 1 3 column can become a Scene 4 6 column when CCI1 is clos...

Страница 2: ... Ex Any type of IR remote with 5 buttons pointed at a 5 button Zone Toggle wallstation would perform the same actions that the wallstation buttons perform when the buttons on the IR remote are pressed Programming Lockout 15 Prevents accidental reprogramming when wallstations are mounted in public spaces by locking the wallstation out of all programming modes including Programming Mode Shade Associ...

Страница 3: ...ould 1 Snap off the faceplate of the wallstation 2 Remove the screws and the faceplate adapter if present 3 Gently pry off the button kit This should allow access to all buttons status LEDs and backlight LEDs Button Kit Adapter Faceplate North American style wallbox European style wallbox Wallbox Mounting Screws 2 Adapter Screws 4 Faceplate Control Adapter Button Kit 2 Remove screws and faceplate ...

Страница 4: ...cklight LEDs of that column will be solid on You may now release the held buttons To Exit APM Simultaneously hold the top and bottom button of the column for 3 seconds if it is a 1B column hold the single button for 10 seconds Once the hold time elapses all status LEDs and backlight LEDs will return to their appropriate settings in Normal Mode Note APM will timeout after 10 minutes and will return...

Страница 5: ...tion will return to Normal Mode To create more than one column on a wallstation Up to four separate and independently functioning columns on a wallstation can be created by using the same steps above but with unused buttons Wallstation columns cannot overlap Each column created can be programmed with its own column type be associated to different areas or devices etc as if it were its own individu...

Страница 6: ...il you enter ACM again Each press of a button will cycle that button through the following possible states Feedback in Advanced Configuration Mode Resulting State in Normal Mode State Backlight LED Feedback Status LED Feedback Button Backlight LED Status LED 1 ON ON Enabled Enabled Enabled 2 ON OFF Enabled Enabled Disabled 3 OFF ON Enabled Disabled Enabled 4 OFF OFF Enabled Disabled Disabled 5 OFF...

Страница 7: ...tton 3 backlight ON Bottom Lower Button Right Lower Button Button 4 backlight ON Bottom Raise Button Right Raise Button Note At any time you can exit CCI assignment mode back to APM by holding any button of the APM column along with any Raise button for 3 seconds When remapping CCIs the CCI actions are programmed in the following order 1 CCI1 closed action indicated by status LEDs of that column e...

Страница 8: ... CCI1 is closed and back to a Scene 1 3 column when CCI1 is open The wallstation will automatically move on to programming the next CCI action 5 Unassign a scene bank from the selected CCI action Simultaneously hold the top and bottom buttons of a scene column that has been programmed to bank for 3 seconds The wallstation will automatically move on to programming the next CCI action Note The walls...

Страница 9: ...s every 8 seconds Zone Toggle column type 4 blips every 8 seconds Partition column type 5 blips every 8 seconds Shade column type not an option for 1B column 6 blips every 8 seconds Shade Toggle column type 7 blips every 8 seconds Shade Group column type not an option for 1B column 8 blips every 8 seconds Panic Sequence or Timeclock column type 2B columns only 9 blips every 8 seconds Fine Tune col...

Страница 10: ...n with this column type set to start at Scene 3 would recall Scenes 3 4 5 6 and 7 respectively Zone Toggle Type Zone toggle buttons toggle a zone or group of zones between programmable preset values each zone can be programmed to a different value and OFF all zones are OFF Each button in a Zone Toggle column can be individually programmed to different loads Partition Type Allows the user to assign...

Страница 11: ...e serve as programmable preset buttons for LutronR SivoiaR QS shades draperies or stop buttons for third party AC shades Shade Group Type A shade group column can only exist on a multi column wallstation where one of the other columns is a shade column The shade group column will make the shade column appear to operate as multiple independent wallstations one independent wallstation per group The ...

Страница 12: ...blips every 8 seconds Sequence Scenes 5 16 3 blips every 8 seconds Sequence Scenes 1 4 4 blips every 8 seconds Timeclock Disable Each tap of any Raise button will progress forward through the different options and each tap of any Lower button will progress backwards through the different options To automatically save the chosen subtype Exit the sub mode by holding any button of that column for 3 s...

Страница 13: ... LEDs and backlight LEDs will return to their appropriate settings in Normal Mode Raise and Lower Button Remapping 1 Enter APM 2 Simultaneously press and hold the raise and lower buttons that you wish to assign to the column in APM for 3 seconds 3 Once hold time elapses status LEDs of that column will flash slowly for 3 additional seconds indicating that the Raise and lower buttons have been assig...

Страница 14: ...llowing options A Enable button mapping mode Press and hold the favorite button of the IR remote for 3 seconds Once hold time elapses status LEDs of that column will flash slowly for 3 additional seconds indicating that the column has switched to button mapping mode then return to APM B Enable pass through mode Press and hold the first button top button of the IR remote for 3 seconds Once hold tim...

Страница 15: ...l Mode Note Each time the user attempts to enter a programming mode after locking out of programming mode all status LEDs will light in a sequential flash of status LEDs from the bottom to top of the wallstation indicating that all programming is locked out To disable programming lockout mode 1 Simultaneously press and hold raise lower and any button of the column in APM for the 30 seconds 2 Once ...

Страница 16: ...ion display mode y amount of times Count the y number of flashes A short pause will occur then the status LEDs will flash consecutively for the third time 12 seconds after entering information display mode z amount of times Count the z number of flashes Once the user has reached this step the wallstation has shown the full number x y z representing the code revision of the wallstation 3 The next t...

Страница 17: ... all status LEDs and backlight LEDs will return to their appropriate settings in Normal Mode Shade Toggle Type Programming Programming a Shade Toggle Type Column 1 Enter the column into programming mode by holding the top and bottom buttons of the shade toggle type column together for 5 seconds if it s a 1B column hold the single button for 10 seconds 2 Tap the button that you wish to program Its ...

Страница 18: ...66 FAX 65 6220 4333 Technical Support 800 120 4491 lutronsea lutron com Asia Technical Hotlines Northern China 10 800 712 1536 Southern China 10 800 120 1536 Hong Kong 800 901 849 Indonesia 001 803 011 3994 Japan 81 3 5575 8411 Macau 0800 401 Taiwan 00 801 137 737 Thailand 001 800 120 665853 Other Countries 65 6220 4666 L Restoring Factory Defaults To restore factory defaults to a wallstation use ...

Отзывы: