background image

11

GB

O R I G I N A L   I N S T R U C T I O N S

rotated in the socket so that the contacts on both sides are in the plane of the 

fi

 xing slot (VI). Then remove the 

fl

 uorescent lamp 

and install a new one by sliding it into the socket and turning it. 

Caution! The surface of the 

fl

 uorescent lamp should not be touched with bare 

fi

 ngers. The replacement must be done in gloves.

The used 

fl

 uorescent lamp should be handed over to an electrical waste treatment plant in accordance with local regulations. 

Remote control

The remote control has buttons which are described and operate in the same manner as the control panel buttons. Batteries must 

be installed in the remote control for proper operation, paying attention to the correct polarity of the batteries. 

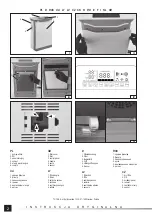
Control panel 

The control panel allows you to control the operation of the appliance. The panel is equipped with touch buttons and indicator 

lights informing about the appliance settings.  

The “ON/OFF” button is used to turn the appliance on and o

 . When the appliance is switched o

 , only the switch is illuminated. 

When the appliance is on, all buttons and selected indicator lights are illuminated.

The “Air speed” button is used to set the fan speed. Higher speed increases operation capacity, but also causes more noise.

The “Timer” button is used to set the operating time. The next press of a button increases the operation time which is presented 

on the display. Flashing button illumination indicates that the timer is set, which will switch o

  the appliance after the pre-set time. 

The button’s constant illumination indicates uninterrupted operation. 

The “Automation” button - starts and stops the automatic mode where the appliance automatically selects the operating parame-

ters. The activation of this mode is indicated by 

fl

 ashing button illumination.

The “Sleep mode” button - starts and stops the night mode, where the appliance switches o

  the control panel in addition to illumi-

nating the “Sleep mode” button. This mode should be set for the night when the appliance is to operate in the same room where 

people are sleeping. Pressing the button will cause its illumination to 

fl

 ash, and after a few seconds the appliance will automatically 

turn the control panel illumination o

  and leave only this button illuminated. You can exit the night mode by pressing any button 

and then pressing the “Sleep mode” button again to stop the illumination from 

fl

 ashing. The 

fl

 ashing of the “Sleep mode” button 

illumination means that the appliance will automatically switch to night mode after a few seconds. 

The “Anion” button starts or stops the air ioniser. When the ioniser is activated, oxygen anions are produced in the appliance, 

which can have a positive e

 ect on your well-being. When the air ionisation is activated, the button illumination will 

fl

 ash. 

The “Germicidal lamp” button activates or deactivates the UV emitting 

fl

 uorescent lamp. When the 

fl

 uorescent lamp is activated, 

the button illumination will 

fl

 ash. 

The “Child lock” button activates the control panel lock, which does not allow any of the buttons to be pressed. The lock is deac-

tivated by touching and holding this button for a few seconds. 

The “Replace 

fi

 lter” button - 

fl

 ashing of this button’s illumination means that the 

fi

 lters must be replaced. After replacing the 

fi

 lters, 

press the button to stop the illumination from 

fl

 ashing. 

The “Child lock” indicator light - informs about the lock status of the control panel. If the open padlock symbol is illuminated this 

means that the lock is not active, and when the closed padlock symbol is illuminated this means the control panel is locked. 

The “Temperature” indicator light shows the air temperature in the room where the appliance operates. 

The “Humidity” indicator light shows the relative humidity of the room where the appliance operates.

The “Intelligent air puri

fi

 er” indicator light shows the amount of PM2.5 particles in the air in 

μ

g/m

3

 and also shows the air quality 

using the illumination colour. Green - good quality, orange - medium quality, red - bad quality. The air quality is also indicated by 

the illumination colour of the lamp at the front of the appliance. 

An indicator light with a fan symbol shows the current fan speed.

MAINTENANCE, TRANSPORT AND STORAGE

Warning! 

All maintenance works and transport must be carried out with the appliance’s electric power supply disconnected. Pull 

the plug out of the power supply socket.

Clean the appliance from outside with a slightly damp cloth and then wipe dry with a dry cloth. Clean the inlet and outlet vents 

with a paintbrush or soft bristle brush. The 

fi

 lters do not require cleaning, dirty 

fi

 lters should be replaced with new ones. The 

fi

 lters 

cannot be regenerated or cleaned.

If the water tank is installed in the appliance, it must be emptied. In addition to the removable tank, there is a 

fi

 xed tank in the 

appliance, which must be emptied by pulling water from it using a pump (not included). Water should be removed from the tanks 

not less frequently than every three days. Do not keep the water in the tank due to the possibility of growth of microorganisms. 

Before re

fi

 lling, clean the tank with clean water. Remove any scale, sediments or 

fi

 lm which has accumulated on the walls or inside 

the tank. Then wipe the tank dry. Pour one tablespoonful of citric acid into the tank and 100 ml of warm water with the temperature 

not exceeding 70

O

C. Mix the acid and leave the solution in the tank for 5 minutes. Then empty the tank, rinse with clean water 

and leave it open until completely dry.  

Never use solvents, acids, or alcohol for cleaning. Clean the base and the lid with a soft, damp cloth. Never immerse the appliance 

in water or any other liquid. 

Transport the appliance by gripping the handles. Transport in operating position. If transported over longer distances, transport 

Содержание 66932

Страница 1: ...GB D RUS UA LT LV CZ SK H RO E F I NL GR OCZYSZCZACZ POWIETRZA AIR PURIFIER LUFTREINIGER ORO VALYTUVAS GAISA ATT R T JS ISTI VZDUCHU ISTI KA VZDUCHU L GTISZT T PURIFICATOR DE AER PURIFICADOR DE AIRE...

Страница 2: ...ilter 3 control panel 4 handle 5 vents 6 sensor GB 1 Filterabdeckung 2 Filter 3 Bedienfeld 4 Gri 5 L ftungs nungen 6 Sensor D 1 2 3 4 5 6 RUS 1 2 3 4 5 6 UA 1 filtro dangtis 2 filtras 3 valdymo skydas...

Страница 3: ...szy stopnie wykorzystania zasob w naturalnych Niekontrolowane uwalnianie sk adnik w niebezpiecznych zawartych w sprz cie elektrycznym i elektronicznym mo e stanowi zagro e nie dla zdrowia ludzkiego or...

Страница 4: ...pamente electrice i electronice inclusiv baterii i acumulatori nu pot fi eliminate mpreun cu alte tipuri de de euri De eurile de echipamente trebuie colectate i predate separat la un punct de colectar...

Страница 5: ...a Nie stawia niczego na urz dzeniu oraz nie umieszcza dnychprzedmiot wnadurz dzeniem Niestawa iniesiada naurz dzeniu Zaleca si urz dzenie ustawi bezpo rednio na pod o u Je eli jednak zostanie umieszc...

Страница 6: ...z urz dzeniem lub zamienniki wskazane przez producenta Konserwacj urz dzenia nale y przeprowadza zgodnie ze wskaz wkami instrukcji Nie stosowa do czyszczenia produktu agresywnych substancji rozpuszcza...

Страница 7: ...ogramowanym czasie Sta e pod wietlenie przycisku oznacza nieprzerwan prac urz dzenia Przycisk Automation uruchamia i wy cza tryb automatyczny gdzie urz dzenie samoczynnie dobiera parametry pracy Uruch...

Страница 8: ...ej wody o temperaturze nie przekraczaj cej 70 O C Rozmie sza kwasek i roztw r pozostawi w zbiorniku na 5 minut Nast pnie opr ni zbiornik wyp uka czyst wod i pozostawi otwarty do ca kowitego wyschni c...

Страница 9: ...ced on other objects it should not be placed too close to the edge to pre vent it from falling It is forbidden to drill any holes in the appliance as well as to make any other modifications of the app...

Страница 10: ...Unpack the appliance by removing all packaging components The covers can be secured during transport with adhesive tape which must be removed The filters can be factory packed in plastic bags Before...

Страница 11: ...sh The Germicidal lamp button activates or deactivates the UV emitting fluorescent lamp When the fluorescent lamp is activated the button illumination will flash The Child lock button activates the co...

Страница 12: ...during storage Caution During long term storage the filters wear out although at a lower rate than during use For long term storage it is rec ommended to pack the filters in airtight plastic bags Remo...

Страница 13: ...e an denen das Ger t direktem Sonnenlicht oder Hitze ausgesetzt ist Stellen Sie keine Gegenst nde auf oder ber dem Ger t Stehen oder sitzen Sie nicht auf dem Ger t Es wird empfohlen das Ger t direkt a...

Страница 14: ...Gegenst nde in die L ftungs nungen des Ger ts ein Verwenden Sie nur die mit dem Ger t gelieferten Originalfilter oder vom Hersteller zugelassene Ersatzfilter Die Wartung des Ger ts soll nach den Hinw...

Страница 15: ...altfl che Timer dient zur Einstellung der Betriebszeit des Ger tes Bei n chster Bet tigung wird die Betriebszeit erh ht Was auf dem Display angezeigt wird Blinkende Tastenhintergrundbeleuchtung bedeut...

Страница 16: ...t sauberem Wasser Entfernen Sie alle Steinablagerungen oder Filme die sich an den W nden oder im Inneren des Tanks angesammelt haben Dann wischen Sie den Tank trocken Sch tteln Sie einen Essl el der Z...

Страница 17: ...17 RUS 20 30...

Страница 18: ...18 RUS CO 8 8 8...

Страница 19: ...19 RUS II III V UV C 8000 11 VI ON OFF Air speed Timer Automation Sleep mode Sleep mode Sleep mode Sleep mode Anion Germicidal lamp Child rock Replace filter...

Страница 20: ...20 RUS Childrock Temperature Humidity Intelligent air purifier PM2 5 3 100 70 O C 5 66932 220 240 50 60 65 II 3 420 2 50 70 6 7 LwP 70...

Страница 21: ...21 UA 20 30...

Страница 22: ...22 UA 8 8 8 II III...

Страница 23: ...A V UV C 8000 11 VI ON OFF Air speed Timer Automation Sleep mod Sleep Sleep mode Sleep mode Anion Germicidal lamp Child rock Replace filter Childrock Temperature Humidity Intelligent air purifier PM2...

Страница 24: ...24 UA 100 70 O C 5 66932 220 240 50 60 65 II 3 420 2 50 70 6 7 LwP dB A 70...

Страница 25: ...a to kad jis nenukrist Draud iama gr in ti renginyje skyles taip pat atlikti produkto instrukcijoje nenurodytus renginio pakeitimus Prie perne ant rengin atjunkite maitinimo kabel nuo maitinimo lizdo...

Страница 26: ...nginio pavir ius pagal instrukcijas pateiktas skyriuje renginio prie i ra Filtr montavimas sp jimas Prie nuimant filtr dangt reikia sitikinti kad renginys atjungtas nuo srov s altinio Maitinimo kabeli...

Страница 27: ...te mygtuk kad jo foninis ap vietimas nustot mirks ti Indikatorius Childrock rodo valdymo skydo u rakto b sen vie iantis atviros spynos simbolis rei kia kad n ra u rakto o u darytas spynos simbolis rei...

Страница 28: ...as Matavimo vienetas Vert Katalogo numeris 66932 Nominali tampa V 220 240 Nominalus da nis Hz 50 60 Nominali galia W 65 Izoliacijos laipsnis II Maksimalus kiet med iag valymo efektyvumas m3 val 420 Da...

Страница 29: ...ce nenokristu Ier c nedr kst urbt nek dus caurumus k ar veikt nek das ier ces modifik cijas kas nav aprakst tas instrukcij Pirms ier ces p rvieto anas atsl dziet baro anas kabe a kontaktdak u no konta...

Страница 30: ...Sagatavo ana darb bai Iz emiet ier ci no iepakojuma un no emiet visus iepakojuma elementus V ki var b t aizsarg ti uz transport anas laiku ar pa l m jo o lenti kura j no em Filtri var b t s kotn ji i...

Страница 31: ...ta pieskaroties ai pogai un turot to da as sekundes Poga Replace filter s pogas apgaismojuma puls ana noz m nepiecie am bu nomain t filtrus P c filtru nomai as nospie diet pogu lai t s apgaismojums p...

Страница 32: ...uz ilgsto s uzglab anas laiku Pirms lieto anas s k anas no emiet maisi us no filtriem TEHNISKIE DATI Parametrs M rvien ba V rt ba Kataloga numurs 66932 Nomin lais spriegums V 220 240 Nomin l frekvence...

Страница 33: ...li bl zko okraje aby nespadlo Je zak z no vrtat v za zen jak koli otvory stejn jako prov d t jak koli jin pravy za zen kter nejsou pops ny v n vodu P ed p em st n m za zen odpojte z str ku nap jec ho...

Страница 34: ...k P ed pou it m vyjm te filtry ze s k a nainstalujte je ve spr vn m po ad a spr vn m zp sobem do za zen Vn j povrchy za zen ist te podle pokyn uveden ch v sti dr ba za zen Mont filtr Upozorn n P ed s...

Страница 35: ...aby jeho podsv cen p estalo blikat Kontrolka Childrock sugnalizuje stav blok dy ovl dac ho panelu Podsv cen symbolu otev en ho z mku znamen odblokova n za zen podsv cen symbolu zav en ho z mku znamen...

Страница 36: ...jednotka Hodnota Katalogov slo 66932 Jmenovit nap t V 220 240 Jmenovit frekvence Hz 50 60 Jmenovit v kon W 65 Stupe izolace II Maxim ln efektivita i t n z pevn ch l tek m3 h 420 Pracovn plocha m2 50 7...

Страница 37: ...ch v ktor ch je vysta ven na p sobenie priameho slne n ho iarenia alebo tepla Na zariaden ni nekla te ani neumiest ujte nad zariaden m iadne predmety Nest pajte ani nesadajte na zariadenie Odpor ame a...

Страница 38: ...tky rozp adl ierav l tky alkohol benz n alebo drsn pr pravky Zariadenie m u pou va deti vo veku od 8 rokov ak s pod n le it m dozorom alebo ak boli n le ite pou en o sp sobe pou vania zariadenia bezp...

Страница 39: ...n v tej istej miest nosti v ktorej niekto sp Ke stla te tla idlo podsvietenie tla idla za ne blika a zariadenie po nieko k ch sekund ch samo inne vypne ovl dac panel a zostane podsvieten iba toto tla...

Страница 40: ...ariadenie nepon rajte do vody ani do in ch kvapal n Zariadenie pren ajte iba dr iac za r ky Prepravujte iba v pracovnej polohe Pri preprave na v ie vzdialenosti zariadenie prepravujte vo vhodnom obale...

Страница 41: ...n a k sz l kre Aj nlott a k sz l ket k zvetlen l a padl ra helyezni Ha azonban m s t rgyra helyezi ne helyezze peremhez k zel hogy ne eshessen le Tilos a term kben b rmilyen lyukat f rni valamint az...

Страница 42: ...elm ltak 8 vesek s fel gyelik ket A k sz l ket s a h l zati k bel t tartsa olyan helyen ahol 8 vn l fiatalabb gyermekek nem f rhetnek hozz A K SZ L K HASZN LATA El k sz t s Vegye ki a k sz l ket a cso...

Страница 43: ...l t sra a k sz l kben melyek pozit van befoly solhatj k a k z rzetet A leveg ioniz ci j nak bekapcsol s t a gomb villog sa jelzi A Germicidal lamp gomb az UV sugarakat kibocs t l mp t kapcsolja ki s b...

Страница 44: ...lyezzen a k sz l kre t rol s k zben Figyelem Huzamosabb t rol s eset n a sz r k elhaszn l dnak azonban kisebb m rt kben mint haszn lat k zben Aj nlott a sz r ket j l lez rt zacsk kba csomagolni huzamo...

Страница 45: ...s a eza i apara tul direct pe pardoseal Cu toate aceasta n cazul n care aparatul este a ezat peste alte obiecte nu trebuie a ezat prea aproape de margini pentru a preveni c derea sa Este inter zis s...

Страница 46: ...strui i pentru utilizarea aparatului ntr un mod sigur i dac n eleg riscurile implicate Cur area i ntre inerea nu pot fi efectuate de copii dec t dac sunt n v rst de 8 ani sau peste i sunt supraveghea...

Страница 47: ...prinderea sa intermitent i dup c teva secunde aparatul va stinge automat iluminarea panoului de comand i va l sa aprins doar acest buton Pute i ie i din modul de noapte ap s nd orice buton i apoi ap s...

Страница 48: ...ine i aparatul de m ner c nd l transporta i Transporta i aparatul n pozi ia de func ionare n cazul transportului pe distan e lungi transporta i aparatul ntr un ambalaj care asigur protec ie mpotriva d...

Страница 49: ...bre el mismo No se coloque ni se siente en el aparato Se recomienda colocar la unidad directamente en el suelo Sin embargo si se coloca sobre otros objetos no debe estar demasiado cerca del borde para...

Страница 50: ...olina o abrasivos para la limpieza del producto El aparato puede ser utilizado por ni os de 8 a os o mayores si se les supervisa o se les instruye para quelousendeformaseguraysiemprequecomprendanlosri...

Страница 51: ...elecciona autom ticamente los par metros de funcio namiento La activaci n de este modo se indica mediante la luz de fondo intermitente del bot n El bot n Sleep mode inicia y detiene el modo nocturno e...

Страница 52: ...nte 5 minutos Luego vac e el dep sito enjuague con agua limpia y d jelo abierto hasta que est completamente seco Nunca utilice disolventes cidos o alcohol para la limpieza Limpie la base y la tapa con...

Страница 53: ...un objet sur l appareil Ne pas rester debout ou assis sur l appareil Il est recommand de placer l appareil directement sur le sol Toutefois s il est plac surd autresobjets ilnedoitpas treplac troppr s...

Страница 54: ...doit tre e ectu conform ment aux ins tructions Ne pas utiliser de substances agressives de solvants de corrosifs d alcool d es sence ou d abrasif pour le nettoyage du produit L appareil peut tre utili...

Страница 55: ...ini Le r tro clairage constant du bouton indique un fonctionnement ininterrompu Le bouton Automation d marre et arr te le mode automatique dans lequel l appareil s lectionne automatiquement les para m...

Страница 56: ...assant pas 70 C M langer l acide et laisser la solution dans le bac pendant 5 minutes Vider ensuite le bac eau le rincer l eau claire et le laisser ouvert jusqu ce qu il soit compl tement sec Ne jamai...

Страница 57: ...la sull apparecchio e non collocare alcun oggetto al di sopra dell apparecchio Non sostare e non stare seduti sull apparecchio Si raccomanda di posizio nare l apparecchio direttamente sul pavimento Tu...

Страница 58: ...La manutenzione dell apparecchio deve essere eseguita secondo le istruzioni Per la pulizia del prodotto non utilizzare sostanze aggressive solventi prodotti corrosivi alcool benzina o abrasivi L appar...

Страница 59: ...ecchio dopo un tempo prestabilito La retroilluminazione costante del pulsante indica un funzio namento ininterrotto dell apparecchio Il pulsante Automation attiva e disattiva la modalit automatica in...

Страница 60: ...d una temperatura non superiore a 70 O C Mescolare l acido e lasciare la soluzione nel serbatoio per 5 minuti Quindi svuotare il serbatoio sciacquarlo con acqua pulita e lasciarlo aperto fino alla sua...

Страница 61: ...geen voorwerpen boven het apparaat Ga niet op het apparaat staan of zitten Het wordt aanbevolen om het apparaat direct op de ondergrond te plaatsen Als hij echter op andere voorwerpen wordt geplaatst...

Страница 62: ...paraat moet worden uitgevoerd in overeenstemming met de instructies Gebruik voor het schoonmaken geen oplosmiddelen bijtende middelen ben zinealcohol of schurende middelen Het apparaat mag door kinder...

Страница 63: ...slapen Als u op de knop drukt gaat de achtergrondverlichting knipperen en na enkele seconden dooft het apparaat automatisch het bedieningspaneel en laat het alleen deze knop branden U kunt wakker word...

Страница 64: ...ddelen zuren of alcohol voor het onderhoud Reinig de voet en het deksel met een zachte vochtige doek Het toestel niet onderdompelen in water of een andere vloeistof Transporteer het apparaat door het...

Страница 65: ...65 GR 20 cm 30cm...

Страница 66: ...66 GR CO 8 8 8 II...

Страница 67: ...67 GR III V UV UV UV C 8 000 11 VI ON OFF Air speed Timer Automation Sleep mode Sleep mode Sleep mode Sleep mode Anion Germicidal lamp UV Child rock Replace filter...

Страница 68: ...68 GR Childrock Temperature Humidity Intelligent air purifier PM2 5 g m3 100 ml 70 C 5 66932 V 220 240 Hz 50 60 W 65 II m3 h 420 m2 50 70 kg 6 7 LwP dB A 70...

Отзывы: