5
image is sharp and clear. Once the clear image is obtained,
you no longer need to adjust the Oculars Focusing Rings, just
rotate the Distance Focusing Rings to adjust the distance to the
object you are viewing.
ADJUSTING DISTANCE BETWEEN EYEPIECES:
After you turn the power on
and after you adjust the
focusing to the best possible
image, make notice of the
image and see if it appears as
one single complete display. If
it does, then there is no need
to adjust the distance
between the eyepieces. If the
image appears as if parts of the display are covered, then you
need to either pull apart the eyepieces or push them in
together until the image appears as one complete display.
IMAGE GAIN / DISPLAY BRIGHTNESS CONTROL:
Your thermal binoculars come with Manual Gain Control
allowing you to adjust the image to the best possible resolution
even when atmospheric conditions change rapidly, especially
during high humidity and/or rapid temperature changes.
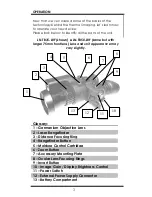
To adjust the Image Gain, rotate the switch (10) either
clockwise or counterclockwise while viewing the image –
you will see word GAIN and either positive or negative
number appear in the upper right corner of the image
display. There are 10 negative and 10 positive image gain
levels and a Zero level. Lowering the Image Gain will allow
for better facial and shape recognition. Increasing the
Image Gain will allow for better recognition of surroundings,
such as houses/buildings, trees and bushes and so on,
allowing you to better see the surroundings and to better
orient in the terrain.
To adjust the Display Brightness level press the switch
momentarily and letters BRGT will appear in the same upper
right corner – you can now rotate the same switch and
Display Brightness will change. There are 31 levels of display
brightness. Please note that switch will return to the default
GAIN mode if no action is taken within 2 seconds after
pressing the switch.


