lumishore EOS Mini Скачать руководство пользователя страница 3


www.Lumishore.com 


For external installations or where water may access the unit it is recommended that an 
appropriate marine sealant be used between the back of the Controller and the surface.


1.2


EOS MINI / EOS MINI WIFI ELECTRICAL INSTALLATION


The  controller  uses  a  proprietary  form  of  DMX  to  communicate  between  the  lights  and  controller.  Whilst  Lumishore  lights  can  be 
controlled by any DMX controller, the EOS controller can only be used to control Lumishore product. The Color Controller is plugged into 
the first Lumi-Hub in the series. The installation is terminated using a DMX Terminator plugged into the last Lumi-Hub in the series - refer 
to the SMX 92 – SMX 152 installation manuals for further information.  


The  EOS  controller  is  for  12/24volt  DC  operation. 

Under  no  circumstances  should  the  Controller  be  connected  directly  to 

Mains AC voltage.


Always use a suitable fuse or circuit breaker to protect the complete system. 

 Connecting the 3 pin data cables 


Using the supplied DMX cable connect one end to the 3 pin pig tail connector on the back of the controller. Connect the other 
end to the “data in” port of the Lumi-Hub.     


If  using  more  Use  a  DMX  extension  cable  to  link  the  next  Lumi-Hub.  Do  not  cut  or  extend  the  DMX  link  cable. 

Pre-molded 

Extension  cables  are  available  in  1  meter,  5  meter  and  15  meter  lengths  as  required.  Multiple  extensions  cables  can  be 
combined together if a further distance is required.


Plug the supplied DMX terminator into the last Lumi-Hub. 

Always ensure the DMX Terminator is used and securely in place, without the terminator 
environmental  noise  and  interference  can  cause  faults  in  the  communication.  For  full 
electrical installation guide please refer to the SMX 92 / SMX 152 installation manual. 


COMBI CABLE: - POWER CONNECTION / SOUND TO LIGHT / 3

rd

 PARTY DMX CONTROLLER 

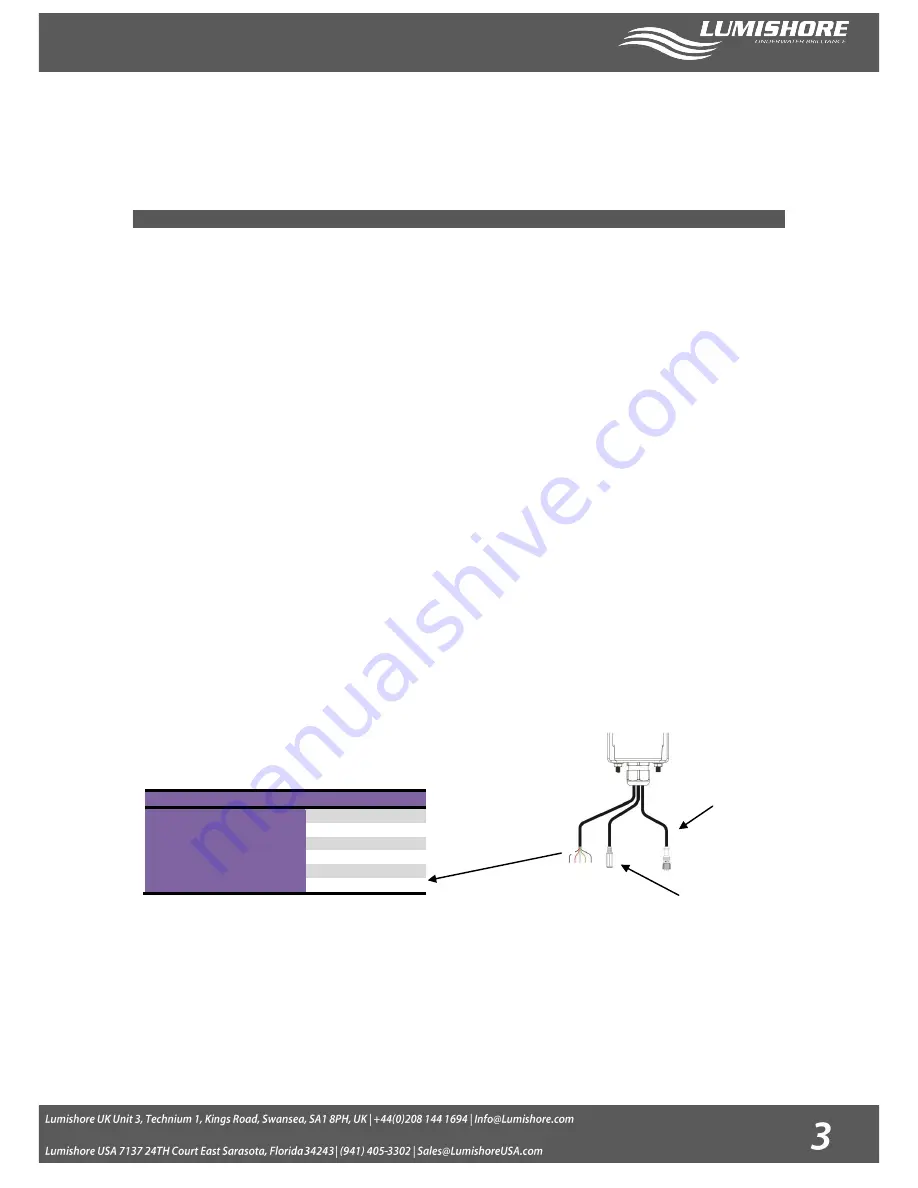
The EOS Controller is provided with a universal 3 way Combi-Cable. The Combi-Cable 
provides connection for power, sound to light and a 3

rd

 party DMX controller. 


POWER CONNECTION 


Power to the controller is fed via the Red and Black wires. Care should be taken to ensure the correct voltage and correct polarity. 


Red +V (10 to 30volt DC) 


Black –V (Ground) 


Max Current Draw @12Volts = 300mA 


Cable Colour Key 

Function 

Red 

Controller Power V+ 

Black 

Controller Power  V- 

External (3rd party) DMX Input 


Green 

DMX + 

Blue 

DMX - 

White 

DMX Ground 

Power / External 
DMX connections 

3 Way Data Out 
Connector  

Sound to Light 
3.5mm Stereo Jack  

Содержание EOS Mini

Страница 1: ...r also incorporates fish attraction modes with variable strobe rates to enhance your fishing trip or sea life observation requirements Color cycles and color sweeps bring dynamic moving light scenes to the boat The EOS Mini WiFi controller has built in WiFi This allows you to control your lights from your iPhone or iPad using the Lumishore App which mimics the controller on you mobile device For t...

Страница 2: ... size 60mm diameter and ensure there is enough clearance behind the mounting panel for the controller to fit into 123mm clearance required NB Extreme care should be taken to cut the hole to the correct size Always cut a smaller hole than necessary and file outwards until it is the correct size 2 Feed the Colour Controller through the hole and then using the clamp provided lock in place Place the n...

Страница 3: ...ta in port of the Lumi Hub If using more Use a DMX extension cable to link the next Lumi Hub Do not cut or extend the DMX link cable Pre molded Extension cables are available in 1 meter 5 meter and 15 meter lengths as required Multiple extensions cables can be combined together if a further distance is required Plug the supplied DMX terminator into the last Lumi Hub Always ensure the DMX Terminato...

Страница 4: ...erview and Basic Operation The EOS controller interface is very easy to use use the arrow keys to navigate around menus use the bottom middle button to select the function desired Pressing the back button at any point will return to the previous mode or screen Power Standby Button Press once to turn the Controller ON Note The lights will not turn on until a mode is selected Press again to turn con...

Страница 5: ...ct order and color change in the correct sequence Setting up the lights with their correct position ensures modes such as Color Sweep function correctly Set up is very straightforward and will only take a short amount of time Once setup is complete the system will memorise the light positions so this process only needs to be carried out once To set up the lights use the following steps and the exa...

Страница 6: ... matches the number of lights installed Press the select button to continue The first light detected will then start to flash a color sequence of Blue Green Red Note The position of the light is not yet assigned so it may be at any installation point on the vessel Use the up down buttons to adjust the position of the light to the desired number Use the right button to move to the next light Step 6...

Страница 7: ...ll change become highlighted to indicate that this mode is currently active 4 2 Color Cycle Mode All Lights cycle through the selected color modes Spectrum Full Color Spectrum Ice blues Whites Blues and Greens Sunset Reds and Ambers Miami Blues and Reds Press the select button to start the cycle use the up and down arrows to adjust the speed of cycle 4 3 Color Sweep Mode Individual lights will swe...

Страница 8: ...g the select button once changes are complete The Controller will remember this color for future use 4 6 WIFI Mode Find the WiFi screen on the main menu and press the select button The WiFi will take a few seconds to activate and connect A box will appear around the WiFi when the system is active Using wifi mode allows you to control your lights using an iPhone or iPad via the Lumishore App or by ...

Страница 9: ...he controller splits the audio input into low mid and high frequencies The color for these frequency bands can be selected and changed For best effect choose a different color for each frequency band Press the select button to activate the Sound to Light mode Hold down the select button for 2 seconds to enter the adjust settings menu which allows you to change the colour bands and back ground colo...

Страница 10: ...DMX this is the network name that will appear on your mobile device The default Key is 12345678 We recommend that both be changed during set up to keep your lighting network secure The SSID and password key will be required to configure the wireless network within an iPhone or iPad device To configure the iPhone iPad refer to the next section 5 3 Display Settings The screen colours can be changed ...

Страница 11: ...ded return to home page and select WIFI mode The internal wifi will be activated Note exiting this mode will turn the Wifi off again and the controller will not be found by the iPhone Next using your iPhone search for local wifi networks Select the SSID name for the controller and enter the password Step 4 Step 5 Step 6 Tap the blue I symbol to show more settings Tap on DHCP IP address The IP addr...

Страница 12: ...m has been connected to a music source it will also enable remote control of the Lumishore in built sound to light entertainment system for that perfect party experience The Lumishore App gives you control of your Lumishore EOS Color change system wherever you are on your boat from the dock and even in your tender EOS App Operates with EOS mini WiFi Compatible with iPhone iPad iPod touch requires ...

Страница 13: ...of two years starting from the date of original purchase Misuse abuse improper installation neglect improper shipping damage caused by disasters such as fire flood and lightning installation by unqualified personnel unauthorized repair or modification will void this warranty For the avoidance of confusion and doubt non compliance with all installation maintenance and operating instructions in this...

Отзывы: