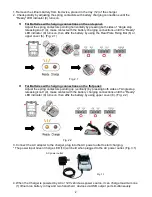
LuminAir LC-11 Скачать руководство пользователя страница 3


5. 

Some lithium batteries (Sony, JVC, Panasonic, etc…) come with “security charging terminal” 

marked with letter 

“C”, DO NOT contact these terminals with spring contactors during charging to 

avoid irrevocable damage. (Fig. 6.1) 


Note: To void damaging batteries 

with “security charging terminal”, DO NOT connect the 

charger with the adapter before (Lithium) battery polarities are detected and Ready 
LED (9) is lit. 


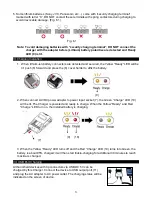
VI. Charging Indication                                                                                                                                             


1.  When lithium-ion battery connectors are detected and secured, the Yellow 

“Ready” LED will be 

lit; push (6) forward and press the (8) cover holder to affix the battery. 


2. When connect AC/DC power adapter to power input socket (7), the Green 

“Charge” LED (10) 

  will be lit. The Charger is powered and ready to charge. When the Yellow 

“Ready” and Red 

“Charge” LED turn on, the installed battery is charging.   


3. When the Yellow 

“Ready” LED turns off and the Red “Charge” LED (10) turns into Green, the 

battery is about 95% charged; it will then start trickle-charging for additional 30 minutes to reach 
maximum charged.   


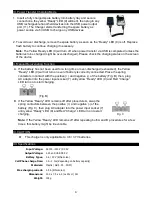
VII. USB Port Charging   


All hand-held devices with tip connectors via USB DC 5V can be 
charged by this Charger. Connect the device to USB output port (11) 
and plug the AC adapter to AC power outlet. The charging status will be 
indicated on the screen of device. 


(9) 

(7)   


(9)      (10)


Fig. 6.1 

Содержание LC-11

Страница 1: ...or long time 6 LED charging indicators 7 Charge second battery via USB port simultaneously 8 Built in safety protections Over Voltage Short Circuit and over time II Contents Charger main unit AC Adapter III Important Safety Tips 1 SAVE THIS INSTRUCTION for future operation and safety purposes 2 Try to void use of extension cord unless absolutely necessary 3 To reduce the risk of electric shock unp...

Страница 2: ...pper cover 8 Fig 2 1 For Batteries with charging connections on the flat panel Adjust the spring contactors pointing up vertically by pressing both sides of Angle stop releasing knob 4 make contact with the battery charging connections until the Ready LED indicator 9 turns on then affix the battery by using upper cover 8 Fig 2 2 3 Connect the AC adapter to the charger plug into the AC power outlet...

Страница 3: ...ss the 8 cover holder to affix the battery 2 When connect AC DC power adapter to power input socket 7 the Green Charge LED 10 will be lit The Charger is powered and ready to charge When the Yellow Ready and Red Charge LED turn on the installed battery is charging 3 When the Yellow Ready LED turns off and the Red Charge LED 10 turns into Green the battery is about 95 charged it will then start tric...

Страница 4: ...turn on even if battery is correctly connected Place the spring contactors in contact with the positive and negative of the battery Fig B then plug AC adapter into the power input socket 7 until yellow Ready LED 9 and Red Charge LED turn on to start charging Fig B B If the Yellow Ready LED remains off after procedure A swap the spring contactors between the positive and negative of the battery Fig...

Отзывы: