Annex B
Annex C
Annex A
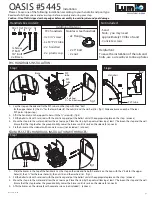
Sand
Balast
STAINLESS STEEL INSTALLATION WITH FLANGES:
Step 1
Step 2
fig.2
1- Fill the ballast unit with sand and seal with the plastic cap.
(annex a)
2- Move the step into the water and allow the air to escape . Put the
ballast unit at the appropriate place on the step. Place the step by
the pool wall leaving at least 1” between the step and the wall.
Ensure that the step touches the ground solidly.
3- Mark the holes location. (fig.2)
NOTE :
If the holes do not align, make
the appropriate hole using a 3/8 inch metal drill bit.
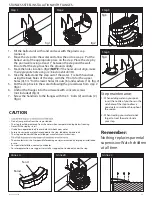
4- Take the ballast and the step out of the water. Fix both handrails,
using the back holes of the step, with the 3” bolts for the upper
holes (4), 3 ½” for the lower holes (4), nuts (8) and washers (16). (fig. 2)
5- Put the step back in the water following the procedures from step 2
(fig.3)
6- Anchor the flanges into the sidewalk with concrete screws
(not included) (fig. 4)
7- Screw the handrails to the flanges with the 3`` bolts (2) and nuts (2).
(fig.4)
Step 3
fig.1
fig.3
Step 5
fig.4
Nothing replaces parental
supervision-Watch children
at all time.
Remember:
1- When adding water in your pool,
insert the nozzle of your hose in the
side holes of the step to allow a
good water circulation throughout
the season.
2- When treating your water do not
forget to treat the water inside
your step.
Step maintenance:
CAUTION
:: Do not jump or dive from the step or ladder.
:: The step should be removed from the water when temperature drop below freezing.
:: Never lift the step by its rail.
:: Use battery-operated tools to avoid electric shock near water
:: Ensure no corrosive materials are added to the step, ladder or hardware kit
:: The step and ladder shall be installed per manufacturer’s instructions.
:: The manufacturer is not responsible for damage or injuries caused by improper installation
or use.
:: For special installation, contact your dealer.
:: For more protection, we suggest to install a step pad (not included) under the step.
p.2
Rev. 2011-01-06


