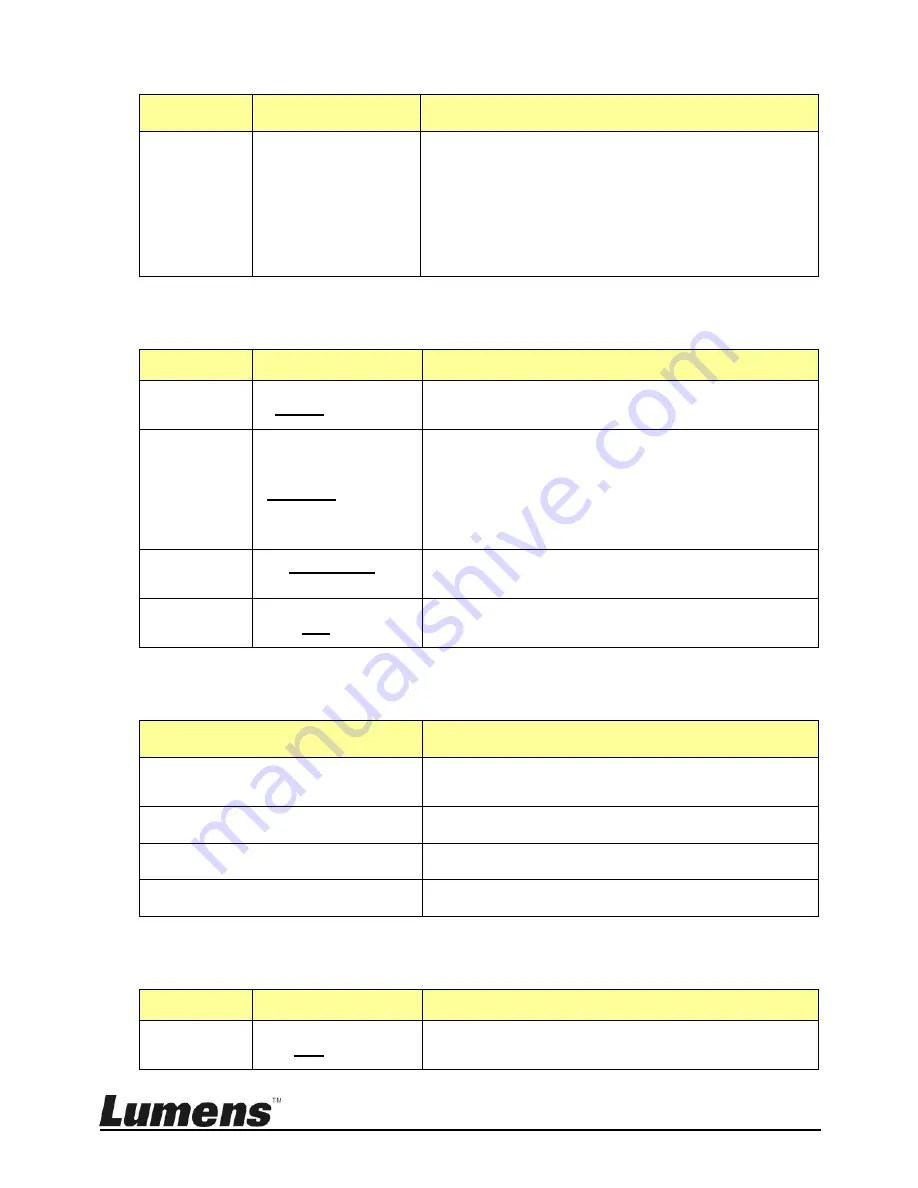
Lumens VS-KB30 Скачать руководство пользователя страница 13


English  - 

12


FACTORY DEFAULT 


GPI I/O 

Item 

Settings 

Description 

Setting 

Input

 / Output 

Set the control signal direction of GPI I/O 
interface as Input or Output 

Tally Mode 

Normal

 / On Air 

Display the Tally input indicator that 
corresponds to the camera number having 
the Tally input as ON. When the setting is 
Normal, the camera is selected as the target 
camera automatically 

Command 

Sel 

Standard

 / 

Expand 

Set the camera number to be standard or 
binary processing 

Camera 

Link 

On

 / Off 

Enable or disable Tally indicator control 


PASSWORD SETTING 

Item 

Description 

Old Password 

Key in the current password   
(initial password is 0000) 

New Password 

Key in a new password 

Confirm 

Enter the new password again 

Save 

Preset Save 


JOYSTICK ZOOM 

Item 

Settings 

Description 

JOKSTICK 
ZOOM 

ON

 / OFF 

Specify whether to enable the joystick 
ZOOM function 

Item 

Settings 

Description 

FACTORY 

DEFAULT 

Yes / No 

Execute the factory reset on the keyboard 
LCD menu functions 
After the reset is completed, 

“Succeed”

 will 

be displayed 

 When executing the factory reset, do not move 

the PTZ joystick and the ZOOM in/out button


Содержание VS-KB30

Страница 1: ...VS KB30 Keyboard Controller User Manual English Important To download the latest version of Quick Start Guide multilingual user manual software or driver etc please visit Lumens http www MyLumens com ...

Страница 2: ... 3 Keyboard setting 11 Chapter 4 Camera Connection Description 14 4 1 Port Pin Definition 14 4 2 How to Connect RS 232 14 4 3 How to Connect RS 422 15 4 4 How to Connect IP 15 Chapter 5 Camera Setting Description 16 5 1 Power on VS KB30 16 5 2 Instruction on RS 232 Setting 16 5 3 Instruction on RS 422 Setting 17 5 4 Instruction on IP Setting 17 Chapter 6 Descriptions of Major Functions 19 6 1 Call...

Страница 3: ...h 2 6 4 Set the PELCO D Or ONVIF IP Camera OSD Menu via Keyboard 21 6 5 RS422 Set A Set B Switching 22 Chapter 7 Troubleshooting 23 Supplier s Declaration of Conformity 47 CFR 2 1077 Compliance Information 24 ...

Страница 4: ... product Lumens Digital Optics Inc hereby reserves the right to make changes to product specifications without prior notice The information in this file is subject to change without prior notice To fully explain or describe how this product should be used this manual may refer to names of other products or companies without any intention of infringement Disclaimer of warranties Lumens Digital Opti...

Страница 5: ...e plug 6 Never allow liquid of any kind to spill into the product 7 Except as specifically instructed in this User Manual do not attempt to operate this product by yourself Opening or removing covers may expose you to dangerous voltages and other hazards Refer all servicing to licensed service personnel 8 Unplug the HD Camera during thunderstorms or if it is not going to be used for an extended pe...

Страница 6: ...e limits are designed to provide reasonable protection against harmful interference in a residential installation This digital apparatus does not exceed the Class B limits for radio noise emissions from digital apparatus as set out in the interference causing equipment standard entitled Digital Apparatus ICES 003 of Industry Canada Cet appareil numerique respecte les limites de bruits radioelectri...

Страница 7: ...sington safety lock Use the safety lock to lock the keyboard for anti theft purpose 5 Tally indicator light port Tally indicator control interface 6 RS232 port Connect the RS232 adapter cable 7 IP port Connect the RJ45 network cable 8 RS422 B port Connect the RS422 adapter cable that can control up to 7 units of RS422 camera Set B 9 RS422 A port Connect the RS422 adapter cable that can control up ...

Страница 8: ... EXPOSURE Auto Aperture PRI Shutter PRI 4 IP SETTING BUTTON Search or add the camera IP setting 5 LCD SCREEN Display control and setting information of the keyboard 6 RESET Clear the camera preset position number key RESET press and hold for 3 seconds 7 SETUP Set the keyboard menu initial password is 0000 8 PRESET Store the camera preset position number key PRESET press and hold for 3 seconds 9 P ...

Страница 9: ...us switch When the setting is automatic focus the AUTO indicator will turn on 18 ONE PUSH WB One push white balance 19 ASSIGN KEY Set up the shortcut key to quickly control the camera 20 ZOOM SEESAW Control ZOOM in out 21 BLC Enable disable background light compensation in the camera 22 MENU Call the camera OSD menu 23 LETTER AND NUMBER KEYBOARD CALL a camera call a preset position key in the came...

Страница 10: ...amera name currently in use 3 IP address Current IP address of the camera 4 Communication status of the connected device If OK is displayed communication with the current device has been established If NO is displayed there is no connection with the current device 5 Network connection indication status If is displayed the network is connected successfully If is not displayed the network is not con...

Страница 11: ...n be set at most Title The camera can be named using letters on the keyboard Protocol VISCA PELCO D PELCO P ONVIF VISCAIP Select a control protocol to be used for connecting the camera VISCA PELCO D PELCO P advanced setting Item Settings Description Baud Rate 2400 4800 9600 19200 38400 When selecting VISCA PELCO D PELCO P as the control protocol the Baud rate transmission speed must be specified P...

Страница 12: ...ult IP is 192 168 0 100 Subnet Mask 255 255 255 0 For a static IP specify the subnet mask in this field Gateway 192 168 0 1 For a static IP specify the gateway in this field BUTTON LIGHT Item Settings Description Level 1 2 3 Set background brightness of the keyboard buttons ASSIGNED KEY Item Settings Description F1 F6 Camera 1 6 Home P T Reset Power Mute Picture Freeze Picture Flip Picture LR_Reve...

Страница 13: ...binary processing Camera Link On Off Enable or disable Tally indicator control PASSWORD SETTING Item Description Old Password Key in the current password initial password is 0000 New Password Key in a new password Confirm Enter the new password again Save Preset Save JOYSTICK ZOOM Item Settings Description JOKSTICK ZOOM ON OFF Specify whether to enable the joystick ZOOM function Item Settings Desc...

Страница 14: ...English 13 MODEL INFO Item Description Display the IP address that controls the keyboard and FW version ...

Страница 15: ...nect the RJ 45 to RS232 adapter cable to the RS232 port of VS KB30 2 Please refer to the RJ 45 to RS232 adapter cable and camera Mini Din RS232 pin definitions to complete the cable connection Remark Please make sure that SYSTEM SWITCH DIP1 and DIP3 on the bottom of Lumens camera are set as OFF RS232 baud rate 9600 Note VC AC07 is optional and can be connected via network cable RJ45 to RS 232 RS42...

Страница 16: ... pin definitions to complete the cable connection Remark Please make sure that SYSTEM SWITCH DIP1 and DIP3 on the bottom of Lumens camera are set as ON and OFF respectively RS422 baud rate 9600 4 4 How to Connect IP 1 Use network cables to connect VS KB30 and IP camera to the router RJ45 to RS 232 RS422 Adapter Cable First Camera Second Camera Seventh Camera Camera Cat5 network cable Cat5 network ...

Страница 17: ...E power supply Use Ethernet cables to connect POE switch and IP port of VS KB30 and press the POWER button Note RJ45 ports of RS232 and RS422 do not support POE Please do not connect with POE powered network cables 5 2 Instruction on RS 232 Setting Press SETUP and select CAMERA SETTING Set CAMID and Title After protocol is set as VISCA press P T SPEED to access the advanced setting POE Switch Netw...

Страница 18: ...P Setting 5 4 1 Set VS KB30 IP address Press SETUP and select KEYBOARD SETTING IP CONFIGURATION Type Select STATIC or DHCP IP Address If select STATIC use P T SPEED to choose the location input IP address via numbers on the keyboard Last press ZOOM SPEED to save and exit 5 4 2 Add Cameras 1 Automatic Search Press SERTCH Select VISCA IP or ONVIF IP VISCA IP Search available VISCA over IP cameras on...

Страница 19: ...press EXIT to exit 2 Manual Add Press SETUP and select CAMERA SETTING Set CAMID and Title Protocol Select VISCA IP or ONVIF IP and set the camera IP address If the setting is ONVIF the user name password and port information needs to be input again If connecting Lumens VC A50P the account password and port information is as follows User name admin Password 9999 Port 8080 If connecting to other bra...

Страница 20: ...ll the camera 1 Key in the camera number to be called via keyboard 2 Press the CAM button 6 1 2 Call the IP camera via device list 1 Press the INQUIRY button 2 Select the IP camera protocol 3 Use the ZOOM SPEED button to select the camera to be controlled 4 Select CALL and press the P T SPEED button to confirm ...

Страница 21: ...er the desired preset position number then press and hold the PRESET button for 3 seconds to save 6 2 2 Call the preset position 1 Key in the desired preset position number via keyboard 2 Press CALL button 6 2 3 Cancel the preset position 1 Key in the preset position number to be deleted 2 Press RESET button Press CALL Press 3 seconds ...

Страница 22: ...e camera OSD menu via PTZ joystick Move the joystick up and down Switch the menu items Tune the parameter values Move the joystick to the right Enter Move the joystick to the left Exit 6 4 Set the PELCO D Or ONVIF IP Camera OSD Menu via Keyboard 1 Use the numeric keyboard to key in 95 CALL button Press RESET ...

Страница 23: ...English 22 6 5 RS422 Set A Set B Switching 1 Press the A or B buttons to switch between RS422 sets buttons of the set in use will be lit ...

Страница 24: ...port of the POE switch 2 VS KB30 camera cannot be controlled 1 Please confirm the port pin connection is correct RS 232 422 2 Please confirm whether the camera system switch DIP 1 ad DIP 3 are set correctly 3 Please confirm whether the MENU button on the keyboard is pressed down by mistake causing the camera OSD menu to open and the camera unable to be controlled 3 Cannot use the keyboard buttons ...

Страница 25: ...formation Supplier Lumens Integration Inc 4116 Clipper Court Fremont CA 94538 United States e mail support mylumens com FCC Compliance Statement This device complies with Part 15 of the FCC Rules Operation is subject to the following two conditions 1 This device may not cause harmful interference and 2 this device must accept any interference received including interference that may cause undesire...

Отзывы: