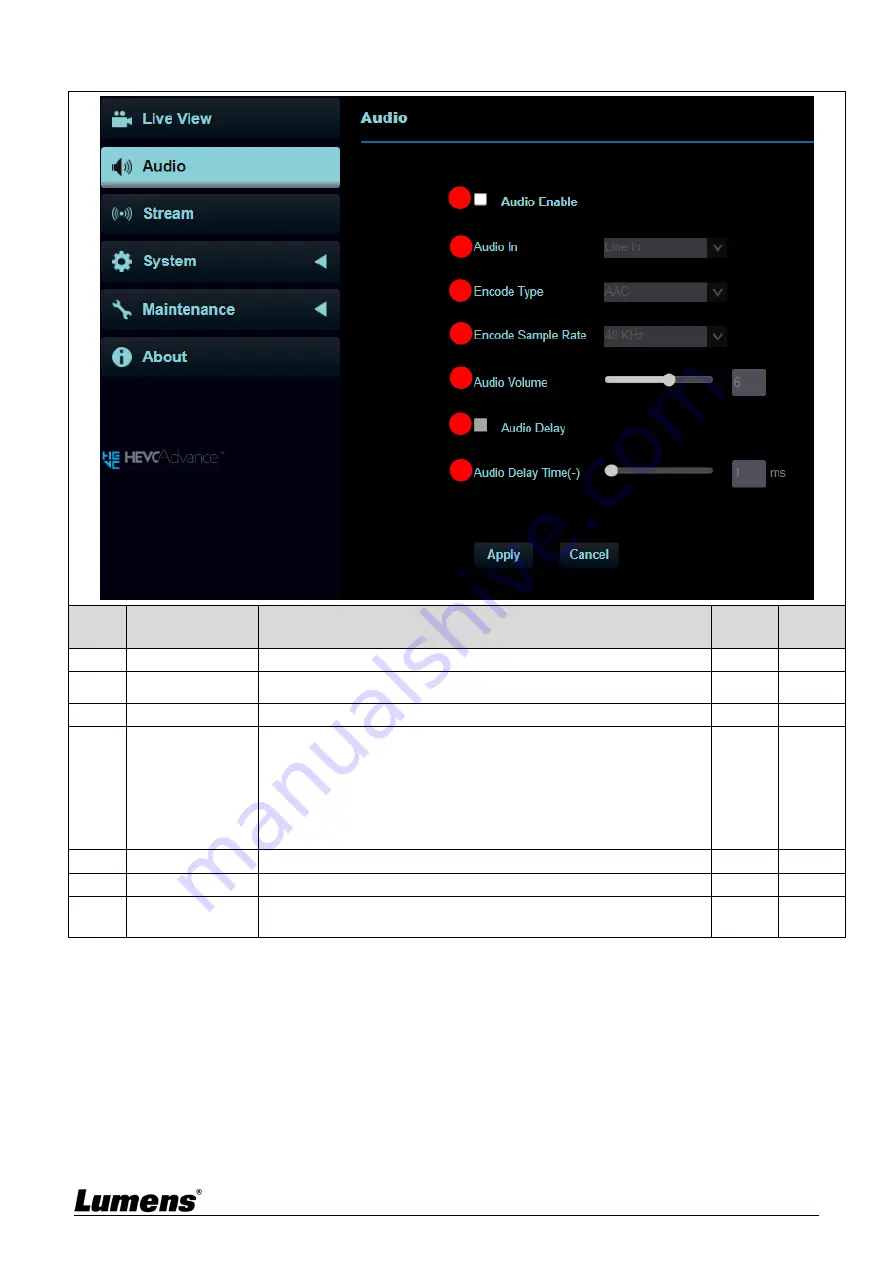
Lumens VC-A71P-HN Скачать руководство пользователя страница 27


27 

5.2.3 Audio 


No 

Item 

Function Descriptions 

NDI|HX 

OFF 

NDI|HX 

ON 

Audio Enable 

Enable/disable audio 

Audio In 

Set MIC In/Line In 

Encode Type 

AAC / G.711 


Encode Sample 
Rate 

Set Encode sample rate


48 KHz (AAC) 


44.1 KHz (AAC) 


16 KHz (AAC) 


16 KHz (G.711) 


8 KHz (G.711) 


Audio Volume 

Adjust Audio Volume 

Audio Delay 

Turn on/off audio delay 


Audio Delay 
Time 

Set the audio delay time (-1 ~ -500 ms) 


Содержание VC-A71P-HN

Страница 1: ...ideo Camera 4K PTZ Video Camera Version VCBK100 User Manual English To download the latest versions of the Quick Start Guide multilingual user manual software driver etc please visit Lumens https www MyLumens com support ...

Страница 2: ...reparation before installation 8 3 3 Instruction for installation 8 3 4 Connecting devices 13 Chapter 4 Remote Control and Setting Menu 16 4 1 Functions of remote control 16 4 2 Setting Menu 17 Chapter 5 Network Function Settings Description 21 5 1 Connecting Camera to Network 21 5 2 Web Page Function Description 24 Chapter 6 DIP Switch Setting 41 6 1 DIP SWITCH 41 Chapter 7 Troubleshooting 42 Cha...

Страница 3: ...ackage Contents Camera Instruction for Installation Remote Control AC Power Cord Power Adapter RS 422 Connector Appearance may vary depending on county region Metal Plate A Metal Plate B M3 Screws Silver x8 Black x2 ...

Страница 4: ...ion 2 1 1 Front View NO Item Function Descriptions 1 Tally Lamp Displaying the Tally Lamp status of the camera 2 Camera lens 30x HD camera lens 3 Power Standby LED indicator Displaying the status of the camera please refer to 2 2 Description of LED indicator 2 3 ...

Страница 5: ...I 2 0 output HDMI 2 0 output Audio output supported 9 3G SDI output 3G SDI output Audio output supported 10 12G SDI output 12G SDI output Audio output supported 11 DC 12V power connector AC power supply connecting port 12 RS 232 output RS 232 output port at most 7 cameras can be connected in a serial connection 13 RS 232 input RS 232 input port at most 7 cameras can be connected in a serial connec...

Страница 6: ... When using the metal plates of accessories remove 4 pieces of rotatable food pads on the bottom by rotating counterclockwise and then install the mental plates 2 2Description of LED indicator Status Power Standby Startup in progress initialization Green light Orange light In use Green light No indicator In standby mode No indicator Orange light 2 3Tally Lamp Function Description The Tally lamp fu...

Страница 7: ...3 1 1 Camera Front View and Side View Length x Width x Height 232 x 188 x 189 mm Weight 3 0 Kg without mental plates 3 1 1 1 Camera Bottom View The camera can be mounted on a 1 4 20 UNC PTZ tripod deck by using the lock holes on the bottom for the tripod 189 ...

Страница 8: ...he following requirements 3 2 3 1 Confirm the position for the object to be captured 3 2 3 2 Confirm whether the camera is set at a proper distance from other light sources 3 3Instruction for installation 3 3 1 Install the camera on the desk 3 3 1 1 Precautions for installation Please install the machine on a flat desk Do not grab the camera head by hand when handling the device Do not rotate the ...

Страница 9: ...9 3 3 2 2 Metal Plate size diagram Metal plate A machine side Metal plate A machine side Metal plate A locking screw ...

Страница 10: ...10 Metal plate B ceiling side Metal plate B ceiling side M3 threaded hole M3 threaded hole Metal plate B locking screw Metal plate B locking bolt M3 threaded hole ...

Страница 11: ...t is to be installed on the ceiling please use the hanger that has obtained UL security approval to prevent the machine from falling down 4 Please check whether the camera is installed securely on a regular basis 5 Please clean the cooling fan located at the bottom to ensure the good heat dissipation effect of the machine on a regular basis 3 3 2 4 Installation steps 1 Remove the 4 foot pads on th...

Страница 12: ... use the hanger that has obtained UL security approval 2 Please reserve the hole for the connecting wires of the camera 4 Combine the metal plate A and the metal plate B 1 Push the metal plate A up to the ceiling and then to the right to latch the metal plate B 2 And then secure with 2 M3 silver screws and 1 M3 black screw black screw ...

Страница 13: ...the ceiling loosen the three screws that fix the metal plates A and B and push to the left to remove the machine 3 Then remove the screws on the hanger and the machine 3 4Connecting devices 3 4 1 RS 232 Connection With RS 232 in out at most 7 Lumens cameras can be connected RS 232 pins definition instructions ...

Страница 14: ...14 3 4 2 RS 422 Connection With RS 422 at most 7 Lumens cameras can be connected Note When RS 422 connection is being used do not use RS 232 connection RS 422 pins definition instructions ...

Страница 15: ... pull out in the direction shown by the arrow in the figure below 2 Peel off a section of copper wire AWG Nos 28 to 18 and insert it into the connector hole then use flat screw driver to fix it 3 Insert the wired RS 422 connector back to the camera Now the connection is completed ...

Страница 16: ...e the lens 5 Home Enter Go back to the main page Execute 6 Zoom Fast Adjust image size Slow Fine tune image size 7 Focus Auto Auto focus Manual Enable Manual Focus Far Near Adjust the focal length in Manual 8 Picture Switch image effect OFF Neg B W 9 L R Direction Set L R Direction Normal 10 Camera select Choose camera ID 1 3 11 Back Light Turn on off back light compensation 12 Pan Tilt Reset Clea...

Страница 17: ... set the shutter Manual Iris F1 6 C F18 Off Manually set the iris Gain Limit 9 45 dB Max limit value of electron gain Iris Limit F2 2 F11 Max limit value of iris WDR Off 1 2 White Balance Mode 1 Auto 2 Indoor 3 Outdoor 4 One Push WB 5 ATW 6 Manual 7 Sodium Lamp 8 3000K 9 4300K 10 5000K 11 6500K 12 8000K Select the color temperature mode 1 4000k 7000k 2 3200k 3 5800k 4 1700k 10000k 5 1700k 10000k 6...

Страница 18: ...trolling with the Presets Remark Refer to the Preset speed setting for this feature The speed may be adjusted automatically due to the difference of PTZ moving range D Effect Mirror OFF Mirror Flip Mirror Flip Set the mode at which the image is mirror or flipped Auto Focus AF Sensitivity Low Mid High For AF triggering speed the higher the speed is the faster AF is triggered AF Frame Center Area Al...

Страница 19: ...when NDI HX function setting is off Audio Delay Time ms 1 500ms Set audio delay time Remark Supported when NDI HX function setting is off Encode Type AAC G 711 Set audio encode type Remark Supported when NDI HX function setting is off Encode Sample Rate 1 48 KHz AAC 2 44 1 KHz AAC 3 16 KHz AAC 4 16 KHz G 711 5 8 KHz G 711 Set the encode type and sample rate Remark Supported when NDI HX function se...

Страница 20: ...ted Freeze will be released after Preset is completed Control Port RS 232 RS 422 Choose whether the control interface used is RS 232 or RS 422 Protocol VISCA Pelco D Baud Rate 9600 38400 Choose the transmission speed of the control signal VISCA Address 0 7 The Protocol set to VISCA allows the camera ID address to be assigned Select 0 for automation PELCO D Address 1 255 The Protocol set to Pelco D...

Страница 21: ...P address of the computer should be changed so that it is on the same network segment as the camera E g The factory preset default IP address of the camera is 192 168 100 100 The computer IP address must be set with the same network segment such as 192 168 100 101 so that the computer can be connected correctly with the camera Change network settings Switch or router Network cable Network cable Ca...

Страница 22: ...re Please download from the Lumens official website Search Camera Press automatically search for the device button to locate the Camera Click camera in the list and start operation after connecting to network Note When using automatic search the camera and computer must be in the same network segment e g 192 168 4 X 5 1 4 Using RTSP Player to View the Images Remark To support this function please ...

Страница 23: ...address port hevc RTSP Sub1 Sub2 Streaming rtsp Username Password VC IP address port h264 To enable password authentication function please refer to 5 2 4 Stream Example Open the VLC software click Open Network Streaming and enter the URL rtsp 192 168 100 100 8554 hevc 5 1 5 Using NDI Studio Monitor to View the Images Remark To support this function please turn on NDI HX Please refer to 5 2 5 Stre...

Страница 24: ...out the preview image v 4 Preset setting Select the number first and then select SAVE or LOAD v v 5 Pan Tilt setting Adjust the Pan Tilt position of the camera screen v v 6 AF MF Switch to Auto Focus Manual Focus Focus can be adjusted in Manual Focus v v 7 Zoom Zoom In Zoom Out ratio v v 8 Camera Setting Please refer to 5 2 2 Camera Setting for relevant settings v v 9 Language Supporting English T...

Страница 25: ...ingle color temperature execution adjustment adjustable only under the One Push WB Manual Red Blue Manually adjust blue red color temperature 3 Focus AF Sensitivity Set automatic focus sensitivity AF Frame Set automatic focus range Zoom Tracking The focus mode during lens zooming can be set in Manual PTZ Assist Check whether auto focus is enabled if there is any changes of PTZ can be set in Manual...

Страница 26: ...mark Refer to the Preset speed setting for this feature The speed may be adjusted automatically due to the difference of PTZ moving range 6 Picture Picture Effect Set picture effect Off Neg Black and White Image Mode The user may customize his her desired image mode Image Mode Load Adjustable when the Image mode is set to Custom After selected the corresponding Image mode parameters will be read a...

Страница 27: ...udio In Set MIC In Line In v v 3 Encode Type AAC G 711 v 4 Encode Sample Rate Set Encode sample rate 48 KHz AAC 44 1 KHz AAC 16 KHz AAC 16 KHz G 711 8 KHz G 711 v 5 Audio Volume Adjust Audio Volume v v 6 Audio Delay Turn on off audio delay v 7 Audio Delay Time Set the audio delay time 1 500 ms v 1 2 3 4 5 6 7 ...

Страница 28: ...umber of users online watching the image simultaneously is more than 4 Enable Disable Username Password Authentication RTSP connection format can be found in 5 1 4 Using RTSP Player to View the Images The username password is the same as the web login password of the camera please refer to 5 2 12 Settings User to add modify account information Stream 1 2 3 Please refer to 5 2 4 1 Streaming Paramet...

Страница 29: ...tream 1 2 Please refer to 5 2 4 1 Streaming Parameter Setting for streaming parameters RTMP RTMPS Copy the RTMP web address provided by the RTMP service platform and paste it to the RTMP connection address to publish the camera images on the RTMP service platform Remark To upload to YouTube for live streaming please refer to 5 2 3 Audio Stream 2 Please refer to 5 2 4 1 Streaming Parameter Setting ...

Страница 30: ... is 120 microseconds Stream1 2 Please refer to 5 2 4 1 Streaming Parameter Setting for streaming parameters 5 2 4 1 Streaming parameter setting Function Stream 1 Stream 2 Stream 3 Encode Format H 265 H 264 Resolution 4K 1080p 720p 1080i 640x360 Frame Rate Setting according to the supported resolution Bit Rate kbps Range 2 000 20 000 2 000 20 000 512 5 000 Factory Default 15 000 7 500 1 000 Rate Co...

Страница 31: ...discover this machine Remark The name can contain commas to distinguish different groups Example default 123 abc means this machine belongs to three groups at the same time default 123 abc 3 NDI HX NDI HX Off HX2 HX3 can be set on VC A71PN Off Support RTSP RTMP RTMPS MPEG TS SRT and ONVIF can find devices but cannot be used with NDI Tool HX2 HX2 is supported HX3 HX3 is supported Remark HX3 only su...

Страница 32: ... Monitor can discover this machine If a group is assigned but this group is not added into Access Manager Studio Monitor cannot discover this machine If a group is assigned and this group is added into Access Manager Studio Monitor can discover this machine Remark The name can contain commas to distinguish different groups Example default 123 abc means this machine belongs to three groups at the s...

Страница 33: ...Modifying this field will modify the Onvif device name synchronously 2 Location Modify the location of the camera such as Room 1 Camera location is limited to 1 11 characters Please mix uppercase and lowercase letters or numbers for characters Special symbols such as and space cannot be used Remark Modifying this field will modify the Onvif device location synchronously 3 Apply After the setting h...

Страница 34: ...I format Select YUV422 YUV420 RGB Remark 3840x2160 59 94 50 resolutions are applicable to YUV420 4 Color Space Set the standard for color space Standard Profile REC 709 BT 2020 5 UVC This can be set when Settings System Settings Output Source is set as HDMI UVC Encode Format 3840 x 2160 29 97 25 fps H 264 Less than 1080p inclusive H 264 MJPEG Resolution It is shown based on Settings System Setting...

Страница 35: ...TPS port The default Port value is 81 4 Tracking Data Output When enabled PTZ position information can be reported when the camera moves 1 Serial Output Please set the protocol to VISCA and the baud rate to 38400 2 IP output Set the destination IP address and port 3 The port numbers should be 1024 1935 8555 8556 8557 cannot be used Remark When Tracking Data Output is enabled the camera performance...

Страница 36: ...02 1x protocol and configure settings when enabled Remark The router must support 802 1x protocol to enable this feature 5 2 11 Settings Date Time Function Descriptions Display date and time of the current camera PC You may set the synchronization method and modify date and time ...

Страница 37: ...ase mix uppercase and lowercase letters or numbers for characters Special symbols or the underlined cannot be used Authentication Mode Set the new account management permissions User Type Admin Operator Viewer View images V V V Settings V V X Account management V X X Remark When Factory Reset is executed it will clear the user s data ...

Страница 38: ... CMMD Mode Set whether the indicator light is linked with RS232 command General Not linked The indicator light switch and mode shall be set separately When the indicator light is on and the default mode is off additional command is required to set the indicator light mode Setting the indicator light mode when the indicator light is off will not trigger the indicator light Link When the indicator l...

Страница 39: ...m Settings Save setup parameters and users can download and upload camera setup parameters 4 Event Logs If the camera encounters errors an error code log will be established Remark When an error code appears please try to click to make sure whether the issue has occurred repetitively 5 2 15 Maintenance Reboot No Item Function Descriptions 1 Reboot Reboot immediately 2 Disable Disable the reboot se...

Страница 40: ...40 5 2 16 About Function Descriptions Display the firmware version serial number running time and other related information of the camera For technical support please scan the QRcode at the bottom right ...

Страница 41: ...emote control please make sure the settings of IR SELECT and the Camera Select of the remote control are consistent ID Setting 1 2 3 ID Output Resolution Frame Rate Note 0 3840x2160p 59 94 Remark For 3G SDI 1080P output will be automatically adjusted Remark USB only supports resolutions lower than 3840 x 2160p 29 97 1 50 2 29 97 3 25 4 1920x1080p 59 94 5 50 6 29 97 7 25 8 1280x720p 59 94 9 50 A Re...

Страница 42: ...etwork for the Internet usage 5 The ONVIF software cannot find the machine 1 Please make sure that Setting Video Camera Location on the web page uses only English letters or numbers The ONVIF software cannot find the machine if you use special characters and space 2 Either NDI or ONVIF can be used Please go to the Setting Video NDI HX on the web page to check if it is Off 6 Tally lamp is not worki...

Страница 43: ...a dry cloth Do not use alcohol or volatile solvents for cleaning 5 Batteries for products or accessories with batteries 5 1 When replacing batteries please only use similar or the same type of batteries 5 2 When disposing of batteries or products please adhere to the relevant instructions in your country or region for disposing of batteries or products Precautions This symbol indicates that this e...

Страница 44: ...ation Supplier Lumens Integration Inc 4116 Clipper Court Fremont CA 94538 United States e mail support mylumens com FCC Compliance Statement This device complies with Part 15 of the FCC Rules Operation is subject to the following two conditions 1 This device may not cause harmful interference and 2 this device must accept any interference received including interference that may cause undesired op...

Страница 45: ...purchasing this product In order to keep improving the product the information in this file is subject to change without prior notice To fully explain or describe how this product should be used this manual may refer to names of other products or companies without any intention of infringement Disclaimer of warranties Lumens Digital Optics Inc is neither responsible for any possible technological ...

Отзывы: