background image

      06 

OPERATING

 INSTRUCTIONS

TOOL SET UP

WARNING!

To prevent SERIOUS Injury from accidental 
operation:
Make  sure  that  the  Trigger is in the off posion  
and unplug the tool from its electrical outlet 
before performing any procedure in 

this sec

ti

on.

1)

Secure the Dust Bag to the tool.

2)

Before  use,   make   sure  that  the

Sanding  Belt  is on-center.  To check this,
plug in the sander and  hold  the Belt
clear  while  carefully  turning  on the
tool.
If the  Belt moves  to  one  side  or   the
other   during  use,  turn   the tracking

Knob un l it stays on-center.

WORKPIECE AND WORK AREA SET UP

1)

Designate a work area that is clean and well-lit.


The work area must not allow  access  by  children


or  pets  to prevent distrac


on and injury.

2)

Route the power cord along a  safe  route  to


reach the  work  area   without  crea

ti

ng   a


tripping  hazard  or exposing the power cord to


possible damage. The  power cord must reach the


work area with enough  extra  length to allow free


movement while working.

3)

Secure loose workpieces using a vise or clamps


(not included) to prevent movement while


working.

4)

There must not be objects, such as u

ti

lity lines,


nearby that will present a hazard while working.

GENERAL OPERATING INSTRUCTIONS

1)

Make sure that the Trigger is not engaged,


then plug in the tool.

2)

To start the tool, squeeze the Trigger; release


the Trigger to stop. For con

ti

nuous opera

ti

on


squeeze the Trigger and push the Trigger Lock to


lock the tool on

3)

To   turn  the  tool  off  with  Trigger  Lock


engaged, squeeze the Trigger once and then


release.

4)

Adjust the sander speed  to  suit  different


working material. Turn the Speed Control Knob


to 

a higher number for a f aster  speed  or  to  a


lower  number   for  a  slower speed.  Determine


the  op

ti

mum  speed  by  tes

ti

ng  on a scrap piece


of material.

5)

When sanding, use both hands to hold the


tool and sand along the grain for best results.

6)

Hold the tool lightly on the workpiece and


allow the tool to do the work. Do not push down


on the Belt Sander or move it along the surface


too fast.

7)

To prevent accidents, turn off the tool and


unplug it a

fter

  use.  Clean, then   store   the   tool


indoors   out  of children’s reach.

EBS100VS

Содержание EBS100VS

Страница 1: ...EBS100VS 4 Belt Sander EBS100VS SAFETY AND OPERATING MANUAL ORIGINAL INSTRUCTIONS...

Страница 2: ...u with all information necessary for using the product safely and to ensure its long service life Closely observe all safety information in these instructions General Power Tool Safety Warnings 01 Sym...

Страница 3: ...ols that have the switch on invites accidents d Remove any adjusting key or wrench before turning the power tool on A wrench or a key left attached to a rotating part of the power tool may result in p...

Страница 4: ...ons to operate the power tool Power tools are dangerous in the hands of untrained users e Maintain power tools Check for misalignment or binding of moving parts breakage of parts and any other conditi...

Страница 5: ...the rating plate 7 8 Your tool is double insulated for additional protection against a possible electrical insulation failure within the tool 7 9 Always check walls floors and ceilings to avoid hidde...

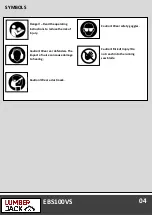
Страница 6: ...structions to reduce the risk of injury Caution Wear safety goggles Caution Wear ear defenders The impact of noise can cause damage to hearing Caution Risk of Injury Do not reach into the running saw...

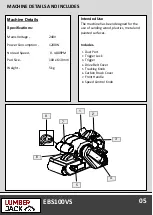
Страница 7: ...ad Speed 0 480RPM Pad Size 100 x 610mm Weight 5kg Intended Use The machine has been designed for the use of sanding wood plastics metal and painted surfaces Includes EBS100VS 1 Dust Port 2 Trigger Loc...

Страница 8: ...3 Secure loose workpieces using a vise or clamps not included to prevent movement while working 4 There must not be objects such as utility lines nearby that will present a hazard while working GENER...

Страница 9: ...rate 2 Eliminate use of extension cord If an extension cord is needed use one with the proper diameter for its length and load Performance decreases over me Carbon brushes worn or damaged Have quali e...

Страница 10: ...uld only be carried out by an qualified technician Keep your tool clean at all times Dirt and dust will cause internal parts to wear quickly and shorten the tool s service life Clean the body of the t...

Страница 11: ...ear at different rates depending on usage 1 2 7 The product has not been used for hire purposes 1 2 8 The product has been purchased by you as the guarantee is not transferable from a private sale 2 C...

Страница 12: ...r any commercial business or resale purposes and we have no liability to you for any loss of profit loss of business business interruption or loss of business opportunity 3 2 This Guarantee does not c...

Страница 13: ...e with the regulations included in the Directives 2006 42 EC EC DECLARATION OF CONFORMITY Certificate for EC type examination delivered by Intertek Testing Services Ltd Shanghai ETL Semko Building No...

Страница 14: ...12 Parts List EBS100VS...

Страница 15: ...13 Parts Diagram EBS100VS...

Страница 16: ......

Отзывы: