Lumagen RadianceXE Скачать руководство пользователя страница 33

Section 6 – Audio Configuration 

RadianceXD/XE 


rev 06/21/11 


27

• 

If Output 2 is enabled for video output 

The “then” Clause 

The  second  parameter  is  the  “then”  clause.  If  the  “If”  conditional  is  true  the  “Then”  clause  is  used, 
otherwise control is passed to the next command line. The options are: 

• 

User Defined 

• 

Pass-through audio EDID from Output 1 

• 

Pass-through audio EDID from Output 2 

• 

Pass-through the common audio modes from Output 1 and Output 2


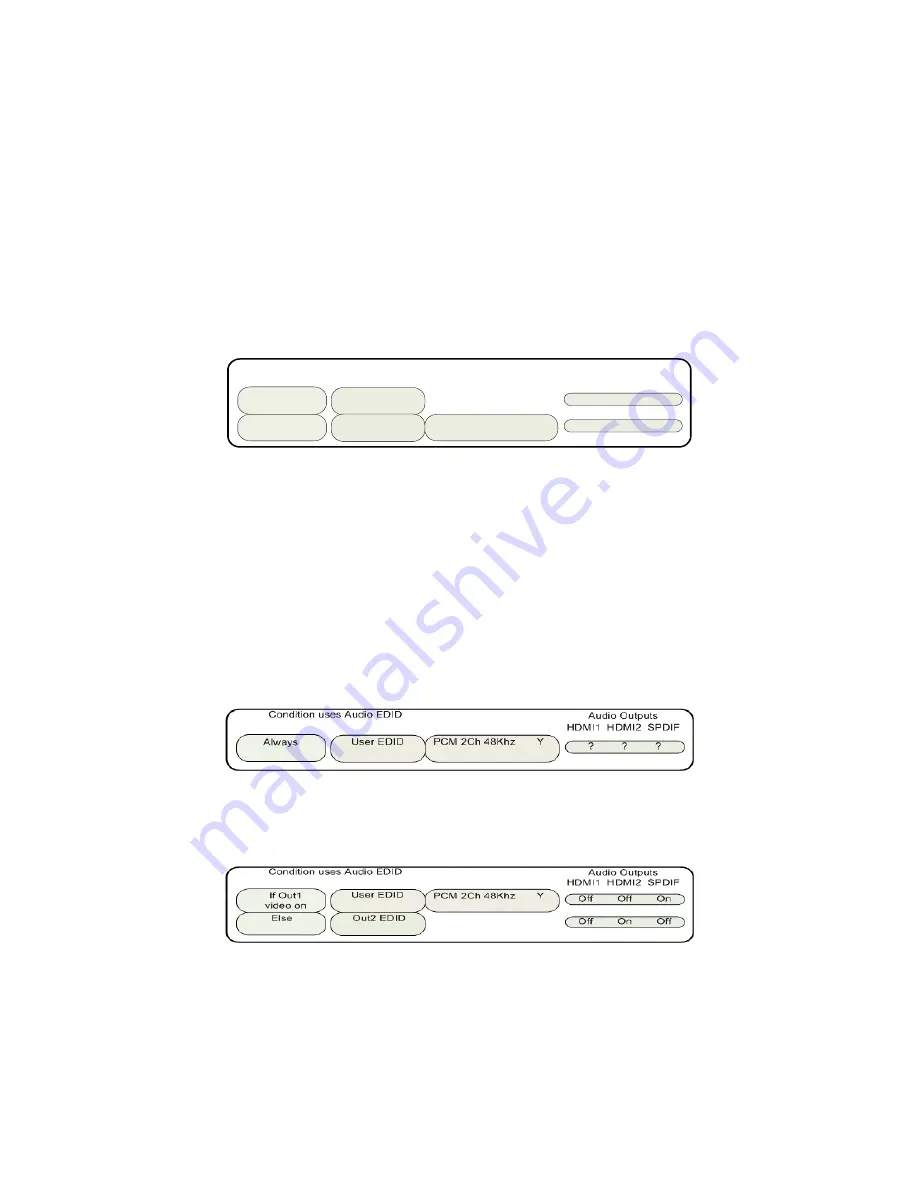
Audio Example 1 (Default Audio Configuration) 

Output  1  drives  a  receiver  that  has  audio  capability.  Output  2  drives  a  display  that  doesn’t  have  audio 
capability. This is the default case, and can be set as shown: 

Else

If Out1

video on

Condition uses Audio EDID

 O n        Off        On

 O n        Off        On

Audio Outputs

HDM I1  HDM I2  SPDIF

 Out1 EDID

 User EDID

PCM  2Ch 48K hz       Y


• 

If output 1 is enabled for video output, and it’s EDID shows that it has audio capability, then pass 
it’s audio EDID back to the HDMI sources. 

• 

If this is not true, then set the EDID to the audio formats selected by the user. 

Because an HDMI device should not output audio to a particular output if it is beyond the capability of the 
device  attached  to  that  output,  each  line  has  a  user  selectable  field  to  independently  enable  each  audio 
output.  These  fields  cover  HDMI  output  1,  HDMI  output  2  and  the  digital  COAX  audio  outputs.  So  the 
default  case  has  HDMI  output  1  and  COAX  audio  turned  on.  You  should  change  the  settings  of  the  User 
EDID to match your system.


Audio Example 2 

A single line case with “User EDID” is shown below. 

When you set the audio EDID to “User EDID,” a “User EDID settings” menu is shown (this is the “PCM 2 Ch 
48KHz   Y” entry below). You can use the “User EDID settings” menu to select which audio modes will be 
advertised by the audio EDID. By default 2-channel PCM and DD 5.1 modes are enabled. Other modes must 
be enabled using the menu commands.


Audio Example 3 

Output  1  drives  a  projector,  which  doesn’t  have  audio  capability  (or  it’s  not  used)  and  instead  the  COAX 
audio  output  is  used.  Output  2  drives  a  second  display,  which  has  audio  capability  and  uses  HDMI  audio. 
When the second output is used, the video configuration is set to enable output2, and disable output 1. This 
type of setup might have the two displays in different rooms with different equipment. This can be set as: 


Audio Example 4 

Output 1 drives a 1080p60 HDMI projector without audio capability, and output 2 drives an HDMI amp. In 
addition,  the  amp’s  HDMI  output  drives  a  720p  (max)  LCD  TV.  When  watching  the  projector  (1080p60), 
Output 2 should have audio only since the TV cannot accept 1080p60. When you watch TV you would select 
720p video output, and turn on the video output on HDMI Output 2. One option is to set MEMA to output 
1080p (and disable output 2 video), and MEMB to output 720p on both outputs. Audio can be set as

Содержание RadianceXE

Страница 1: ...RadianceXETM Video Processor Owner s Manual...

Страница 2: ...in accordance with the instructions may cause harmful interference to radio communications However there is no guarantee that interference will not occur in a particular installation If this equipment...

Страница 3: ...Installation Instructions 8 System Configuration Examples 9 Source Device Connection Examples 10 Section 4 Basic Commands 12 Power 12 Input Selection 12 Configuration Memory Selection 12 Input Aspect...

Страница 4: ...Input Picture Controls 19 Black and White Levels 19 Color Format 20 Color and Hue 20 Y C Delay 20 Input Size Controls 20 Scale Bias 20 Input Sizing 20 Vertical Shift 20 Non linear Stretch 21 Input Mas...

Страница 5: ...e Radiance primary color gamut 30 Calibrate Radiance grayscale and gamma 30 Iterate the gamut and grayscale gamma calibrations 31 Calibrate Radiance output color and hue 31 Iterate gamut grayscale gam...

Страница 6: ...Output Type Auto 38 3D Output Type Specific 3D Type 39 3D EDID Configuration 39 3D Setup Procedures 39 Normal Setup 39 Display Optimization 39 Setup for Non Compliant Displays 39 Setup for Non Compli...

Страница 7: ...EG mosquito and block artifact reduction and 3D temporal noise reduction for both SD and HD sources For these reasons the Radiance processor sets the industry benchmark for switching calibration and v...

Страница 8: ...put MEMA MEMB MEMC and MEMD The input setup and output resolution timing can be set independently for each memory To program an input memory first select the input then select the desired configuratio...

Страница 9: ...log video inputs Audio can be received on the active HDMI input one of four analog stereo inputs or one of eight digital audio inputs There are two HDMI video outputs and two COAX audio outputs Video...

Страница 10: ...s Input 17 and HSync uses Input 18 Each of these inputs can support RGBcvS For this RGBcvS an input is combined with the adjacent composite video input i e Input 7 cvS on Input 15 4 S video Inputs Sup...

Страница 11: ...on input aspect Numeric Entry 1 9 Input 1 to 9 10 Input 10 and greater Picture In Picture PIP OFF Turn PIP off SEL Turn PIP on Ready for PiP input selection SWAP Swap PIP and main view MODE Select PIP...

Страница 12: ...Each half of the image is called a field and displays either all the even lines or all the odd lines So an entire image called a frame takes a thirtieth or twenty fifth of a second to display on the s...

Страница 13: ...Setup is done with the on screen menu User functions e g select input use direct commands Configuration Memories To understand how the Radiance functions it is important to note that setup and calibr...

Страница 14: ...the Radiance power supply into the DC power jack on the back of the Radiance Then connect the power cord to the Radiance power supply and plug it into a wall outlet 5 Turn the other equipment on and u...

Страница 15: ...dio is turned off by default Note some amplifiers do not accept audio for non standard video rates such as 768p or at any rate above 720p 1080i and some amplifiers will not report EDID back to the Rad...

Страница 16: ...t the Radiance s Output 1 to an appropriate AVR input Connect the display s HDMI input to the Radiance s HDMI Output 2 Change the Audio EDID in the main Audio menu to User1 EDID If the AVR output is i...

Страница 17: ...DMI cable is preferred but Input 10 can be used as an analog VGA RGBHV input Use the Y channel for green the PR channel for red and the PB channel for blue Input 17 for VSync and Input 18 for HSync SC...

Страница 18: ...ight input sub memories that are automatically selected based on the input resolution Each configuration memory and sub memory is independent of the other memories To allow the memories to be used for...

Страница 19: ...ideo input is superimposed in a window on top of the main full screen video window The PoP feature reduces the size of the main window and puts a second input in a window beside the main window There...

Страница 20: ...lected using the commands shown below Video Output Setup Menu The Video Output Select Menu is used to select output settings Mode CMS and Style based on the input number input memory and input video m...

Страница 21: ...se different rates The default setting is Off Use Off if your display will not accept these rates The command is MENU Output Custom Modes Custom Timing Rate Match On Off CMS Menu The Color Management...

Страница 22: ...and reduce contouring Dither position sets the bit size of the pixel for dithering Orientation controls the frame to frame randomization and can be fixed of dynamic Masking can be turned on to clear...

Страница 23: ...bal delay setting under the MENU Other I O Setup 3D Glasses menu The command is MENU Output Styles Styles 3D Adjust Misc Output Settings 3D Output EDID Configuration By default the display s 3D capabi...

Страница 24: ...Display Information NOTE Lumagen recommends using default video EDID or user defined video EDID This enables the Radiance to report video EDID back to the sources even when the display is off and it...

Страница 25: ...erent HDMI auto aspect is received the aspect will change to that input aspect ratio The command is MENU Input HDMI Setup Auto Aspect On Off Analog Input Setup Component Input Type For analog inputs 7...

Страница 26: ...source to exactly fit the output resolution If the bias is set to On scaling is enabled unless the input and output resolution match exactly If the scale bias is set to Off scaling is disabled if the...

Страница 27: ...is enabled the image will fill the screen with a 16 9 or 1 85 source for any output aspect ratio up to 2 40 If the output aspect ratio is greater than 2 40 software limits the maximum width to the eq...

Страница 28: ...erlacing for 480p and 576p sources This can provide dramatic improvements to a picture that has been poorly deinterlaced prior to coming into the Radiance Reinterlacing also allows for taking in 480p...

Страница 29: ...de a CMS and a Style memory For HD capable inputs each memory has eight resolution sub memories which are set to default values of 480 576 720p60 1080i50 1080i60 1080p24 1080p60 and Other and automati...

Страница 30: ...ct the PiP window vertical position Size Select the PiP window size Density Select the PiP window transparency Timer Specify if PiP remains enabled until turned off off or automatically turns off afte...

Страница 31: ...ways and USER1 EDID in the Audio menu eliminates the need for the Radiance to read the audio EDID information from the AVR TV See the Output Configuration Commands section and Audio section for more i...

Страница 32: ...6Khz PCM 5 1 192Khz PCM 7 1 44 1Khz PCM 7 1 48Khz PCM 7 1 96Khz PCM 7 1 192Khz DD 5 1Ch DD 7 1Ch DD 5 1Ch DD 7 1Ch DTS 5 1Ch DTS 7 1Ch DD HD 5 1Ch DD HD 7 1Ch DTS HD 5 1Ch DTS HD 7 1Ch Y Y Y N N N N N...

Страница 33: ...OAX audio outputs So the default case has HDMI output 1 and COAX audio turned on You should change the settings of the User EDID to match your system Audio Example 2 A single line case with User EDID...

Страница 34: ...ce Selection Defaults To change the audio source for a particular input first select that video input and then select the desired audio source Any number of video inputs can be linked to the same audi...

Страница 35: ...ture controls to neutral Disable enhancement features on the display Features such as sharpness DRC and certain color mode settings do not live up to their advertising and can actually reduce image qu...

Страница 36: ...elected color temperature in the display should be one where the red green and blue primaries are outside the CIE color triangle for the desired color space If the display 100 White Point cannot be ca...

Страница 37: ...lor hue offsets can still be used to improve color fidelity using colorbar patterns and color filters It should be noted that color filters are not ideal and so whenever possible gamut grayscale gamma...

Страница 38: ...displays Since the black level is most critical in dark scenes this will provide the best setting The command is MENU Input Video Setup Resolution Picture Black OK Set the white level contrast Since...

Страница 39: ...If enabled the OSD shows the selected input input aspect ratio and zoom The command is MENU Other Menu control OSD enable On Off Input Reselect If this is set to On then when the currently active inp...

Страница 40: ...ve the pattern on screen by pressing Ok The command is MENU Other Test Pattern Pattern Reference Adjustable Warm up Trigger Out This command controls the two trigger outputs on the rear panel By defau...

Страница 41: ...you can use a number button on the remote to highlight one of the functions and then press Ok to execute the function 0 4 3 1 LBOX 2 16 9 3 1 85 4 2 35 5 NLS 6 Zoom 7 Zoom 8 MemA 9 MemB n a MemC n a M...

Страница 42: ...bration the video technician can save the resulting Lumagen configuration to a special hidden configuration memory This command restores that configuration in the event that the user inadvertently cha...

Страница 43: ...and is available on all HDMI cables 3D Types The Radiance can receive all the commonly used 3D types The Radiance has options to convert 3D types which are not supported by your 3D display to differe...

Страница 44: ...urrent settings The command is MENU Output Output Setup 3D Ok 3D Output Mode Auto By default the output is set to Auto 2 1 The selection Auto 2 1 means the Radiance automatically reads the EDID for th...

Страница 45: ...lay Display Optimization To get the best quality 3D image on some displays it is necessary to convert some or all of the 3D video modes to a specific 3D output mode Research the display specifications...

Страница 46: ...te The 50 60 HZ 3D modes can have a lot of flicker since each eye sees 25 30 HZ but it is an inexpensive way to view 3D games or video without having to purchase a new 3D display You will need a Radia...

Страница 47: ...NU 0 6 value OK Example For 16 9 enter178 Miscellaneous Commands S W Rev MENU 0 9 0 3 Display software revision and serial number Menu timeout MENU 0 9 0 5 Toggle menu timeout Short default or long sa...

Страница 48: ...ng MPEG mosquito and block artifact reduction Temporal noise reduction for SD HD sources User programmable non linear stretch NLS mode 4 3 to 16 9 or 16 9 1 85 to 2 35 4 3 LBOX 16 9 1 85 2 35 and NLS...

Страница 49: ...Section 11 Specifications RadianceXD XE rev 06 21 11 43 2009 Lumagen Inc 503 574 2211 14025 SW Farmington Road Suite 280 Beaverton OR 97005 2513 U S A www lumagen com...

Отзывы: