background image

64

e100_le100_manual_173100085_EN


07/2021

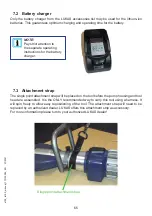
 7.1 Battery

Only LUKAS lithium-ion rechargeable batteries may be used to operate the device. These 

guarantee optimum performance and maximize the operating time of the device.

Charging state 

display

Query button(I)

Technical Data

nom. Voltage

Capacity

Energy

Weight

Unit

V DC

Ah

Wh

kg

lb

Battery

25.2

3.9

98.3

1.2

2.6

NOTE:


To ensure maximum 

operating time and maximum 

uptime, you must make sure 

that the battery is always fully 

charged before connecting it 

to a rescue device.

Release button

7.  Accessories

NOTE:


Indicator lights are the 

same as found on SCBA 

systems (Self-Contained

Breathing Apparatus - 

Symbols G, G, Y, R).

The charge status display is activated either by pressing a switch or activates automatically 

when reaching a certain charge level (see table below).

Constant light


Constant light


Flashing yellow, 

red continuous 

light  

Flashing red 

till battery is 

discharged

Automatic activation

Activated by switch

Capacity

No


No


Yes 

15 seconds activated and 45 

seconds off. After 8 hours the 

activation cycle will terminate 

automatically. 

Yes

After 8 hours the activation cycle 

will terminate automatically.

Содержание 95-10-15

Страница 1: ...BEDIENUNGSANLEITUNG 173100085 07_2021 de Bedienungsanleitung I en Operating instructions es Manual de instrucciones I fr Manuel d utilisation I pt Manual de instruções ...

Страница 2: ......

Страница 3: ...Betriebsanleitung Rettungsgeräte 173100085 DE Multifunktionsgeräte e100 und le100 Original Betriebsanleitung ersetzt 07 2017 Ausgabe 07 2021 e100 le100 TM ...

Страница 4: ...1 Akku für StrongArm e100 le100 14 6 Schneiden Spreizen Türen aufspreizen Heben 15 5 2 Bedienung des Sterngriffs 15 6 1 Sicherheitshinweise 15 6 2 Schneiden 16 6 3 Spreizen 17 6 4 Türen aufspreizen 19 6 5 Heben 21 7 Zubehör 22 7 1 Akku 22 7 2 Akku Ladegerät 23 7 3 Befestigungsgurt 23 8 Abbau des Geräts Stillsetzen nach Betrieb 24 7 4 Zubehörschiene 24 9 Pflege und Wartung 25 9 1 Ölwechsel 25 9 2 P...

Страница 5: ...nalyse 32 12 Technische Daten 33 12 1 StrongArm e100 le100 34 12 2 Geräuschemissionen 35 12 3 Betriebs und Lagertemperaturbereiche 35 12 4 Schwingungen Vibrationen 35 12 5 Anzugsmoment und Schlüsselweite Zentralbolzen 35 13 EG Konformitätserklärung 36 14 Beleuchtung optionale Erweiterungsmöglichkeit 38 15 Entsorgungshinweise 39 Inhalt Seite ...

Страница 6: ...zu der konkreten Gefahr und den möglichen Folgen 1 Gefahrenklassen Piktogramm Schaden für Signalwort Definition Folgen Mensch GEFAHR Unmittelbar drohende Gefahr Tod oder schwerste Verletzungen WARNUNG Möglicherweise gefährliche Situation Möglicherweise Tod oder Schwere Verletzungen VORSICHT Weniger gefährliche Situation Leichte oder geringfügige Verletzungen Sachen ACHTUNG Gefahr von Sach und Umwe...

Страница 7: ...isungen ohne Einschränkungen zu befolgen Wir empfehlen auch dass Sie sich von einem qualifizierten Ausbilder in die Verwendung des Produktes einweisen lassen WARNUNG VORSICHT Auch die Betriebsanleitungen des Zubehörs sind zu beachten Auch wenn Sie bereits eine Einweisung erhalten haben sollten Sie die folgenden Sicherheitshinweise noch einmal lesen WARNUNG VORSICHT Achten Sie darauf dass das verwe...

Страница 8: ... und oder Standsicherheit des Gerätes beeinträchtigt Reparaturen an dem Gerät dürfen nur von einer ausgebildeten Service Fachkraft mit gerätespezifischen Kenntnissen durchgeführt werden Sicherheitseinrichtungen dürfen in keinem Fall außer Kraft gesetzt werden Für Reparaturen dürfen nur original LUKAS Zubehör und Ersatzteile verwendet werden Vor Einschalten Ingangsetzen und während des Betriebes de...

Страница 9: ...draulikflüssigkeiten können die Gesundheit beeinträchtigen wenn sie verschluckt oder deren Dämpfe eingeatmet werden Der direkte Hautkontakt ist aus dem gleichen Grund zu vermeiden Auch ist beim Umgang mit Hydraulikflüssigkeiten darauf zu achten dass diese biologische Systeme negativ beeinflussen können Beim Arbeiten und oder Lagern des Gerätes ist Sorge dafür zu tragen dass die Funktion und die Si...

Страница 10: ...gemeingültigen gesetzlichen und sonstigen verbindlichen nationalen und internationalen Regelungen zur Unfallverhütung zu beachten und anzuweisen WARNUNG VORSICHT ACHTUNG Das Gerät ist ausschließlich zum in der Betriebsanleitung dargestellten Zweck siehe Kapitel Bestimmungsgemäße Verwendung bestimmt Eine andere oder darüber hinausgehende Benutzung gilt als nicht bestimmungsgemäß Für hieraus resulti...

Страница 11: ... ausgeschlossen sein dass durch das Gerät eine Explosion ausgelöst wird durch die Arbeit mit dem Gerät eine Explosion ausgelöst wird z B können durch das Schneiden eines Objekts Funken entstehen Die Verantwortung für die Explosionsvermeidung oder der Ausschluss der Arbeiten mit einem StrongArm e100 le100 liegt beim Bediener des Gerätes bzw dem Verantwortlichen an der Einsatzstelle Bei Arbeiten in ...

Страница 12: ...s Gerätekörpers Als Energiequelle und Antrieb dient ein elektrischer Akkumulator im Lieferumfang Der Akku kann in die vorgesehene Öffnung im Gerätekörper eingesteckt werden Dort wird dieser automatisch verriegelt Durch Verwendung mehrerer Akkus können Sie die Einsatzzeit des StrongArm e100 le100 verlängern Die Akkus können nach dem Einsatz im externen Ladegerät im Lieferumfang wieder aufgeladen we...

Страница 13: ...lakku 4 Entriegelungstaste für Akku 5 Handgriff 360 drehbar 6 Arretierbolzen hochziehen zur Entsicherung 7 Lüftungsschlitze 8 Werkzeugspitzen Kombi Steckspitzen 9 Messerarme 10 Zentralbolzen mit gesicherter Mutter 11a vorderes Kunststoffgehäuse 11b hinteres Kunststoffgehäuse 12 Gerätekörper 13 Handschutz 14 Zubehörschiene 15 Beleuchtungseinheit optionale Erweiterung 6 9 11b 14 ...

Страница 14: ... Steckspitzen Messerarm Schneidkante Messerarm 4 2 3 Kombi Steckspitzen Kombi Spitzen Druckknopf zum Lösen der Wechselspitze Einrasten erfolgt automatisch auf Druck VORSICHT Vorsicht beim Aufstecken und Abziehen der Steckspitzen Es besteht Verletzungsgefahr Tragen Sie Schutzhandschuhe ...

Страница 15: ... Druck 4 2 5 Drehbarer Handgriff Um im Einsatzfall besser Ansetzen zu können ist der Handgriff um 360 drehbar jeweils in 90 Schritten Ziehen Sie dazu den Arretierbolzen nach oben und drehen Sie den Handgriff in die gewünschte Position In der entsprechenden 90 Position rastet der Arretierbolzen automatisch ein Damit ist der Handgriff wieder gesichert VORSICHT Vorsicht beim Aufstecken und Abziehen d...

Страница 16: ... externen Ladegerät vollständig aufgeladen werden Vorgehensweise 1 Ziehen Sie die rote Entriegelungstaste vollständig nach hinten und ziehen Sie gleichzeitig den Akku vorsichtig nach oben aus dem Akkuschacht heraus Wenden Sie dabei keine Gewalt an 2 Jetzt kann der Akku im Ladegerät wieder aufgeladen und ersetzt werden beachten Sie hierzu auch die separate Betriebsanlei tung des Ladegerätes 3 Steck...

Страница 17: ... sind die landesüblichen Sicherheitsrichtlinien zu beachten und einzuhalten In der Bundesrepublik Deutschland sind regelmäßige sicherheitstechnische Prüfungen nach den Vorschriften der Gesetzlichen Unfallversicherung GUV vorgeschrieben WARNUNG VORSICHT ACHTUNG Das StrongArm e100 le100 ist nicht explosionsgeschützt Bei Einsätzen des Geräts in explosionsgefährdeten Bereichen muss ausgeschossen sein ...

Страница 18: ...schützt werden Beim Arbeiten mit dem StrongArm e100 le100 sind zu tragen Schutzkleidung Schutzhelm mit Visier oder Schutzbrille Schutzhandschuhe Sicherheitsschuhe und ggf Gehörschutz tragen Sie spezielle Schutzkleidung bei extrem hohen Temperaturen Stellen Sie unbedingt vor der Betätigung des Geräts sicher dass keine beteiligten und oder unbeteiligten Personen durch die Bewegung des Geräts oder du...

Страница 19: ...den wenn Sie möglichst nahe am Messerdrehpunkt schneiden RICHTIG FALSCH 6 3 Spreizen Benutzen Sie den vorderen Bereich der Spitzen nur zum Vergrößern eines Spaltes Um die Griffigkeit zu erhöhen und um ein Abrutschen bzw Ausbrechen der Spitzen aus dem zu bearbeitenden Teil zu vermeiden sollte frühzeitig nachgesetzt werden Zudem erfolgt die höchste Kraftentwicklung im hinteren Bereich der Messerspit...

Страница 20: ... zum Spreizen geeignet Spitzen greifen sicher Nur mit den Spitzen arbeiten Messerarme nicht beschädigen Bilddarstellung der Spreizerspitzen exemplarisch Stellen sie sicher dass bei Spreiz und Hebearbeiten die Spitzen über Ihre volle Breite kraftschlüssig anliegen s Abb unten Ansonsten besteht die Gefahr dass Teile wegspringen ...

Страница 21: ...r Türen mit Mehrfachsicherung Schließblech Türbänder und bei Bedarf an jedem Verriegelungszapfen 6 4 2 Vorgehensweise Beim Ansetzen muss das Gerät fest und so tief wie möglich mit den Klauen in die Türspalte eingedrückt oder eingeschlagen werden siehe Anwendungsbeispiele WARNUNG VORSICHT ACHTUNG Beim Abrutschen des Gerätes von Metall oder Stein besteht Funkengefahr Im Bereich der aufspringenden od...

Страница 22: ...oder Schutzbrille Schutzhandschuhe Anwendungsbeispiel Bürotür Anwendungsbeispiel Stahltür WARNUNG VORSICHT ACHTUNG Beim Arbeiten können durch die besondere Kraftwirkung Teile herausbrechen abgetrennt werden und dadurch Personen gefährden Es müssen Maßnahmen getroffen werden so dass weder Bediener noch Unbeteiligte gefährdet werden Unbeteiligte müssen einen Sicherheitsabstand einhalten mindestens 5...

Страница 23: ...T ACHTUNG Die anzuhebende Last ist gemäß den gültigen Richtlinien und Vorschriften gegen Abrutschen zu sichern WARNUNG VORSICHT ACHTUNG Vor Abbau der verwendeten Ausrüstung ist sicherzustellen dass sich die bewegte Last in einer stabilen unverückbaren Lage befindet Nur mit dem mittleren Bereich der Spitzen arbeiten Messerarme nicht beschädigen ...

Страница 24: ...ntsicherungs schalter 7 Zubehör HINWEIS Ladezustandsanzeige ähnlich wie bei Atemschutzgeräten Die Ladezustandsanzeige wird entweder durch Drücken des Schalters aktiviert oder beim Erreichen eines bestimmten Ladezustands automatisch aktiviert siehe Tabelle unten Dauerlicht Dauerlicht Gelb blinkend rot Dauerlicht Rot blinkend bis Akku entladen ist Automatische Aktivierung Aktivierung mit Schalter Ka...

Страница 25: ...anleitung des Akku Ladegeräts 7 3 Befestigungsgurt Der Einpunkt Befestigungsgurt wird vor dem Pumpengehäuse und Werkzeugkopf montiert Dieser ist nur empfohlen wenn ein entsprechendes Geschirr dazu verwendet werden soll Der Gurt kann sich frei bewegen um ein leichtes Positionieren des Geräts zu ermöglichen Der Befestigungsgurt muss durch einen autorisierten Händler getauscht werden LUKAS bietet die...

Страница 26: ...zu schließen Dadurch wird das Gesamtgerät hydraulisch und mechanisch entspannt Nach jedem Einsatz sollten Sie das Gerät reinigen und sowohl die metallischen als auch die mechanisch beweglichen Teile einölen Auch die Verriegelungsbolzen der Kombi steckspitzen sollten hin und wieder eingeölt werden Das Einölen soll vor übermäßigem Verschleiß und Korrosion schützen Vermeiden Sie es das Gerät in feuch...

Страница 27: ...ühren Beachten Sie hierzu auch die entsprechend gültigen nationalen und internationalen Vorschriften in Bezug auf die Wartungsintervalle von Rettungsgeräten In der Bundesrepublik Deutschland sind regelmäßige sicherheitstechnische Prüfungen nach den Vorschriften der Gesetzlichen Unfallversicherung GUV vorgeschrieben ACHTUNG Reinigen Sie das Gerät vor der Kontrolle von Verschmutzungen WARNUNG VORSIC...

Страница 28: ... der Werkzeugarme vorhanden und in ordnungsgemäßem Zustand Beleuchtungen von Hauptschalter blaues Gerät Arbeitsbereich optional funktionsfähig Öffnungsweite der Arme an den Spitzen siehe Kapitel Technische Daten Abdeckungen unbeschädigt Werkzeugarme rissfrei Riffelung der Spitzen sauber und kantig ohne Einrisse Spitzen vorhanden Ver bzw Entriegelung einwandfrei Akku Ladegerät Gehäuse unbeschädigt ...

Страница 29: ...wechselt werden Die abnehmbare Filterabdeckung befindet sich außen am hinteren Gerätegehäuse unten und ist mit zwei Schrauben gesichert Vorgehensweise 1 Lösen Sie die zwei Befestigungsschrauben mit einem Torx Schraubendreher TX 15 an der Filterabdeckung und entnehmen Sie die Abdeckung siehe Abbildung unten 2 Nun können Sie das Filterelement entnehmen und gegen ein Neues austauschen 3 Der Zusammenb...

Страница 30: ...ten da Verschmutzungen das Gerät beschädigen können ACHTUNG Da LUKAS Geräte für höchste Leistungen ausgelegt sind dürfen nur Komponenten ausgetauscht werden die in den Ersatzteillisten des entsprechenden Geräts aufgeführt sind Weitere Komponenten der Geräte dürfen nur ausgetauscht werden wenn Sie an einer entsprechenden LUKAS Serviceschulung teilgenommen haben Sie die ausdrückliche Erlaubnis des L...

Страница 31: ...es Geräts bestehen ist zusätzlich eine Funktions und Belastungsprüfung durch einen autorisierten LUKAS Händler oder durch LUKAS direkt durchzuführen 10 3 Reparaturen 10 3 1 Handschutz wechseln WARNUNG VORSICHT Bei Betrieb mit demontiertem Handschutz besteht eine erhöhte Verletzungsgefahr wegen der freiliegenden bewegten Elemente 1 Entfernen Sie den Handgriff wie in 10 3 2 beschrieben 2 Die zwei Be...

Страница 32: ...erteil abnehmen dabei Oberteil festhalten und ebenfalls abnehmen 3 Neuen Handgriff ansetzen und halten dabei Unterteil mit Befestigungsschrauben montieren mittelfeste Gewindesicherung verwenden z B LOXEAL 54 03 oder Loctite 243 10 3 3 Messerarme wechseln 1 Messerarme so schließen dass sich die Spitzen fast berühren und Akku herausnehmen 2 Handschutz abnehmen wie vorangehend beschrieben ...

Страница 33: ...men 6 Messerarme entnehmen und durch Neue ersetzen 7 Der Zusammenbau erfolgt in umgekehrter Reihenfolge Messerarmbolzen Messerarm Sicherungsring Zentralbolzen Sicherungsschraube Sicherungsmutter 10 3 4 Schilder Alle beschädigten und oder unleserlichen Schilder Sicherheitshinweise Typenschild usw müssen erneuert werden Vorgehensweise 1 Beschädigte und oder unleserliche Schilder entfernen 2 Flächen ...

Страница 34: ...erät defekt Behebung des Fehlers durch autorisierten Händler von LUKAS speziell geschultem Personal oder LUKAS direkt Nach dem Loslassen geht der Sterngriff nicht in die Mittelstellung zurück Gehäuse beschädigt oder Sterngriff Betätigung schwergängig Beschädigung der Schenkelfeder für die Rückstellung Behebung des Fehlers durch autorisierten Händler von LUKAS speziell geschultem Personal oder LUKA...

Страница 35: ...ten Sie auf Anfrage bei LUKAS direkt Da alle Werte toleranzbehaftet sind können geringe Unterschiede zwischen den Daten Ihres Gerätes und den Daten der folgenden Tabellen bestehen Auch auf Grund von Ableseungenauigkeiten und oder Toleranzen der eingesetzten Messmittel können die Werte differieren Werden die in den Tabellen angegebenen Werte in die verschiedenen Einheiten rückgerechnet können sich ...

Страница 36: ...FPA kN 24 lbf 5395 Spreizkraft HSF nach NFPA kN 30 lbf 6744 Kraft Spreizen min kN 28 lbf 6295 max Spreizweg mm 212 in 8 3 Masse netto ohne Akku ohne Steckspitzen inkl Öl kg 9 8 lbs 21 6 Masse mit Akku ohne Steckspitzen inkl Öl kg 11 1 lbs 24 4 Masse mit Kombi Spitzen ohne Akku kg 11 2 lbs 24 6 Masse mit Türöffnerspitzen ohne Akku kg 11 8 lbs 26 0 elektr Nennspannung mit Lithium Ionen Akku V DC 25 ...

Страница 37: ...elt 12 5 Anzugsmoment und Schlüsselweite Zentralbolzen Gerät einschließlich Akku Gerätetyp e100 le100 Leerlauf Messabstand 1 m nach EN dB A Volllast Messabstand 1 m nach EN dB A Leerlauf Messabstand 4 m nach NFPA dB A 67 Volllast Messabstand 4 m nach NFPA dB A 70 Betriebstemperatur standard C F 20 55 4 131 Betriebstemperatur Extrembereich für 9 min zyklisch Gerät in Betrieb C F 20 120 4 250 Lagert...

Страница 38: ... oraz wdrażające je krajowe przepisy prawne Con la presente dichiariamo che le apparecchiature designate nella configurazione da noi fornita sono conformi alle disposizioni riportate e alle norme attuative nazionali Número del artículo Hiermit erklären wir dass die bezeichneten Geräte in der von uns gelieferten Ausführung den aufgeführten Bestimmungen und den sie umsetzenden nationalen Rechtsvorsc...

Страница 39: ...рираме че посочените устройства във версията предоставена от нас отговарят на изброените разпоредби и на приложимото национално законодателство Izjavljamo da označene naprave v izvedbah ki jih dajemo v promet izpolnjujejo navedena določila in veljavne nacionalne zakonske predpise Izjavljujemo da su navedeni uređaji u verziji koju dostavljamo u skladu s navedenim propisima i nacionalnim propisima k...

Страница 40: ...s zum Loslassen 3 Kippschalter einmal nach rechts unten drücken Dauerlicht 4 Kippschalter einmal nach rechts unten drücken und wiederholen innerhalb von 0 4 s Blinklicht Stroboskopbetrieb Erneut drücken beendet die Beleuchtung 14 Beleuchtung optionale Erweiterungsmöglichkeit Die Beleuchtungseinheit ist optional und wird nicht durch LUKAS angeboten Die Abbildung zeigt eine typische Befestigung eine...

Страница 41: ...tgerechten Wiederverwertung zugeführt werden Nur für EU Länder Werfen Sie Elektrogeräte nicht in den Hausmüll Gemäß der Europäischen Richtlinie 2002 96 EG über Elektro und Elektronik Altgeräte und ihrer Umsetzung in nationales Recht müssen nicht mehr gebrauchsfähige Elektrogeräte getrennt gesammelt und einer umweltgerechten Wiederverwertung zugeführt werden Bitte beachten Sie dazu auch die Hinweis...

Страница 42: ... Tel 49 0 91 31 698 0 Fax 49 0 91 31 698 394 e mail lukas info idexcorp com www lukas com Made in USA Copyright 2021 LUKAS Hydraulik GmbH e100_le100_manual_173100085_DE indd Änderungen vorbehalten Entsorgen Sie bitte ordnungsgemäß alle Verpackungsmaterialien und abgebauten Teile ...

Страница 43: ...173100085 EN Original instruction manual Edition 07 2021 Instruction manual for rescue equipment Multifunction tools e100 and le100 replaces 07 2021 e100 le100 TM ...

Страница 44: ...le100 14 6 Cutting spreading spread open doors lifting 15 5 2 Operating the star grip 15 6 1 Safety notes 15 6 2 Cutting 16 6 3 Spreading 17 6 4 Spreading open doors 19 6 5 Lifting 21 7 Accessories 22 7 1 Battery 22 7 2 Battery charger 23 7 3 Attachment strap 23 8 Dismantling the equipment deactivation following operation 24 7 4 Accessory rail 24 9 Maintenance and service 25 9 1 Oil change 25 9 2 ...

Страница 45: ... 12 Technical data 33 12 1 StrongArm e100 le100 34 12 2 Noise emission 35 12 3 Operating and storage temperature ranges 35 12 4 Oscillation vibration 35 12 5 Torque specification and wrench size for pivot bolt 35 13 EC Declaration of Conformity 36 14 Lighting unit optional expansion possibility 38 15 Instructions regarding disposal 39 Contents Page ...

Страница 46: ...tograms and signal words to the specific danger and the possible consequences Pictogram Damage injury to Keyword Definition Consequences Persons DANGER Immediate danger Death or severe injury WARNING Potentially dangerous situation Potential death or serious injury CAUTION Less dangerous situation Minor or slight injury Property ATTENTION Risk of damage to property environment Damage to the equipm...

Страница 47: ...tructions they contain before they use the equipment and carefully follow them We further recommend that you have a qualified trainer show you how to use the product CAUTION The operating instructions for accessories must also be taken into account Even if you have already received instructions on how to use the equipment you should still read through the following safety instructions again WARNIN...

Страница 48: ...must always be complete and in a legible condition Any mode of operation which compromises the safety and or stability of the device is forbidden Repairs to the equipment may only be carried out by a trained service technician with specific knowledge of the device Safety devices may never be disabled Only genuine LUKAS accessories and spare parts are to be used for repairs Before switching on star...

Страница 49: ...trimental to health if it is swallowed or its vapor is inhaled Direct contact with the skin must be avoided for the same reason Also when handling hydraulic fluid note that it can negatively affect biological systems When working with or storing the equipment ensure that the function and the safety of the equipment are not impaired by the effects of severe external temperatures and that the equipm...

Страница 50: ...and are to be implemented in addition to the instruction manual WARNING CAUTION PLEASE NOTE The device is intended exclusively for the purpose stated in the operating instructions see chapter Proper Use Any other use is not in accordance with its designated purpose The manufacturer supplier is not liable for any damage resulting from improper use The user bears sole responsibility for such use Pro...

Страница 51: ...xplosive environment the following must be excluded that the device could trigger an explosion that working with the device could trigger an explosion e g sparks may result from cutting an object The responsibility for explosion prevention or for ruling out work with the device is with the operator of the device or with the person responsible at the place of use When working in areas at risk of ex...

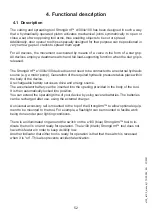
Страница 52: ... required hydraulic pressure takes place within the body of the device A rechargeable battery serves as drive and energy source The accumulator battery can be inserted into the opening provided in the body of the tool It is then automatically locked into position You can extend the operating time of your device by using several batteries The batteries can be recharged after use using the external ...

Страница 53: ...ery 4 Release button for battery 5 Handle rotates 360 6 Locking bolt pull up to unlock 7 Ventilation slots 8 Tool tips combination snap on tips 9 Blade arms 10 Pivot bolt with secured nut 11a Front plastic housing 11b Rear plastic housing 12 Tool body 13 Protective cover 14 Accessory rail 15 Lighting unit optional expansion 2 3 4 5 7 8 10 11a 1 13 12 6 9 11b 14 ...

Страница 54: ...out combi or door opening tips Blade arm Cutting edge Blade arm 4 2 3 Combination tips snap on tips Combination tip Push button to release and automatically lock the tool tip Please note Use caution installing or removing tips Wear protective gloves to avoid injury ...

Страница 55: ...ip 4 2 5 Rotatable handle The handle can be rotated about 360 degrees with four set points every 90 degrees This allows for easy change of position of the tool for the best angle attack To do this pull the locking pin upwards while turning the handle to the desired position Let go of the locking pin and it will automatically engage the next locking position thus securing the handle again Please no...

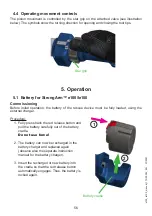
Страница 56: ...initial operation the battery of the rescue device must be fully loaded using the external charger Procedure 1 Fully press back the red release button and pull the battery carefully out of the battery cradle Do not use force 2 The battery can now be recharged in the battery charger and replaced again observe also the separate instruction manual for the battery charger 3 Insert the recharged or new...

Страница 57: ...shored to ensure that there is no risk of sliding or shifting Worldwide safety guidelines pertaining to the specific country must be observed and complied with WARNING CAUTION PLEASE NOTE The StrongArm e100 le100 device is not explosion protected When using the device in potentially explosive environments the following must be excluded that the device could trigger an explosion that working with t...

Страница 58: ...enclosed persons must be protected The following are to be worn when working with the rescue equipment protective clothing safety helmet with visor or protective goggles protective gloves safety shoes and if necessary ear protection wear special protective clothing in case of extremely high temperatures Before operating the device you should ensure that no participants or bystanders are at risk fr...

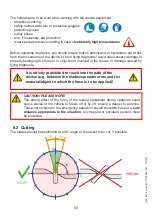
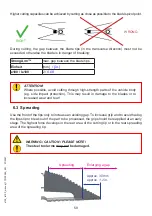
Страница 59: ...ade tips Einheit mm in e100 le100 2 0 08 Higher cutting capacities can be achieved by cutting as close as possible to the blade s pivot point RIGHT WRONG 6 3 Spreading Use the front of the tips only to increase an existing gap To increase grip and to avoid having the tips slip or break out of the part to be processed the grip should be reapplied at an early stage The highest force develops in the ...

Страница 60: ...a gap not suitable for spreading Tips get a safe grip Work with the tips only Do not damage the tool arms Illustration of the spreader tips as an example Every effort should be made to fully engage the width of the tip during a spreading lifting maneuver see picture below Failure to do so could result in debris flying ...

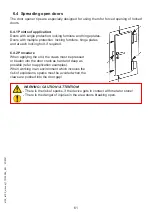
Страница 61: ...inge plates and at each locking bolt if required 6 4 2 Procedure When applying the unit the claws must be pressed or beaten into the door crack as hard and deep as possible refer to application examples When working in an environment which involves the risk of explosions sparks must be avoided when the claws are pushed into the door gap WARNING CAUTION ATTENTION There is the risk of sparks if the ...

Страница 62: ... clothing helmet with visor or goggles protective gloves Application example office door Application example steel door WARNING CAUTION ATTENTION During operation of this rescue device parts of the object worked on with this device may break away and endanger people standing nearby Onlookers must be kept at a safety clearance of at least 5 m 16 ft ...

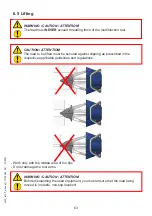
Страница 63: ...CAUTION ATTENTION The load to be lifted must be secured against slipping as prescribed in the respective applicable guidelines and regulations WARNING CAUTION ATTENTION Before dismantling the used equipment you must ensure that the load being moved is in stable non slip location Work only with the middle area of the tips Do not damage the tool arms ...

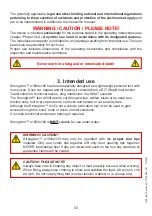
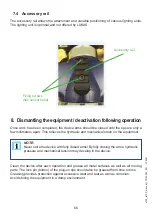
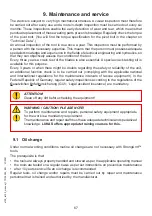
Страница 64: ...rged before connecting it to a rescue device Release button 7 Accessories NOTE Indicator lights are the same as found on SCBA systems Self Contained Breathing Apparatus Symbols G G Y R The charge status display is activated either by pressing a switch or activates automatically when reaching a certain charge level see table below Constant light Constant light Flashing yellow red continuous light F...

Страница 65: ...for the battery charger 7 3 Attachment strap The single point attachment strap will be placed on the tool before the pump housing and tool head are assembled It is the ONLY recommended way to carry this tool using a harness It will spin freely to allow easy repositioning of the tool The attachment strap will need to be replaced by an authorized dealer LUKAS offers this attachment strip as accessor...

Страница 66: ...osed until the tips are only a few millimeters apart This relieves the hydraulic and mechanical strain on the equipment Clean the device after each operation and grease all metal surfaces as well as all moving parts The lock pin button of the plug on tips should also be greased from time to time Greasing provides protection against excessive wear and tear as well as corrosion Avoid storing the equ...

Страница 67: ...ing the safety or reliability of the unit an additional function check is to be carried out complying with the applicable national and international regulations for the maintenance intervals of rescue equipment In the Federal Republic of Germany regular safety inspections according to the regulations of the Gesetzlichen Unfallversicherung GUV Legal accident insurance are mandatory ATTENTION Clean ...

Страница 68: ...nicks or deformations on the cutting surfaces Cutting surfaces fit on top of each other without making contact Bolts and retaining rings of the blade arms are in place and in good condition Illumination of main switch blue device work area optionally fully functional Opening width of arms at the tips see chapter Technical Data Tool arms tips not cracked Pins and retaining rings on the tool tips ar...

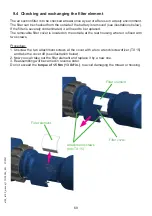
Страница 69: ...l need to be replaced The removable filter cover is located on the outside at the rear housing where it is fixed with two screws Procedure 1 Unscrew the two attachment screws at the cover with a torx wrench screwdriver TX 15 and take the cover off see illustration below 2 Now you can take out the filter element and replace it by a new one 3 Reassembling will be carried in reverse order Do not exce...

Страница 70: ...damage the equipment ATTENTION Because LUKAS devices are designed for highest performance only components specified in the spare parts list for the appropriate equipment may be replaced Other components in the device may only be replaced if You have participated in an appropriate LUKAS service training course You have been explicitly granted permission by LUKAS Customer Service valid LUKAS certifi...

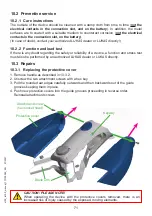
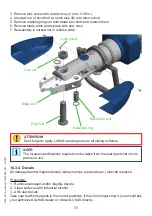
Страница 71: ...es proceeding in reverse order Reinstall attachment screws Attachment screw hex socket head Keyway Protective cover 10 2 1 Care instructions The outside of the device should be cleaned with a damp cloth from time to time not the electrical contacts in the connection slot and on the battery In addition the metal surfaces are to coated with a suitable medium to counteract corrosion not the electrica...

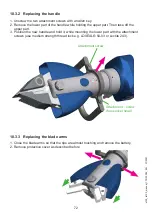
Страница 72: ...he upper part Then take off the upper part 3 Position the new handle and hold it while mounting the lower part with the attachment screws use medium strength thread lock e g LOXEAL 54 03 or Loctite 243 10 3 3 Replacing the blade arms 1 Close the blade arms so that the tips are almost touching and remove the battery 2 Remove protective cover as described before Attachment screw hex socket head ...

Страница 73: ...n both blade arm bolts and remove them 6 Remove blade arms and replace with new ones 7 Reassembly is carried out in reverse order Blade arm bolt Blade arm Retaining ring Pivot bolt Lock screw Lock nut 10 3 4 Decals All damaged and or illegible decals safety notices type plate etc must be replaced Procedure 1 Remove damaged and or illegible decals 2 Clean surfaces with industrial alcohol 3 Affix ne...

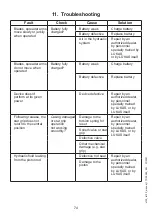
Страница 74: ... battery Device doesn t perform at its given power Device defective Repair by an authorized dealer by personnel specially trained by LUKAS or by LUKAS itself Following release the star grip does not return to the central position Casing damaged or star grip operation not working smoothly Damage to the torsion spring for reset Repair by an authorized dealer by personnel specially trained by LUKAS o...

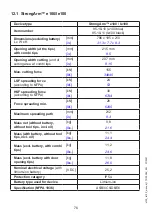
Страница 75: ...orage Further information about your device is available directly from LUKAS Since all values are subject to tolerances minor differences may occur between the data on your equipment and the data in the following tables The values may also differ because of reading inaccuracies and or tolerances in the measuring equipment used If the given values in the tables are re converted into different units...

Страница 76: ...bf 34845 LSF spreading force according to NFPA kN 24 lbf 53 HSF spreading force according to NFPA kN 30 lbf 6744 Force spreading min kN 28 lbf 6295 Maximum spreading path mm 212 in 8 3 Mass net without battery without tool tips incl oil kg 9 8 lbs 21 6 Mass with battery without tool tips incl oil kg 11 1 lbs 24 4 Mass excl battery with combi tips kg 11 2 lbs 24 6 Mass excl battery with door openin...

Страница 77: ... including rechargeable battery Device type e100 le100 Idling measured at a distance of 1 m according to EN dB A Full load measured at a distance of 1 m according to EN dB A Idling measured at a distance of 4 m according to NFPA dB A 67 Full load measured at a distance of 4 m according to NFPA dB A 70 Operating temperature standard C F 20 55 4 131 Operating temperature extreme range for 9 min cycl...

Страница 78: ...je oraz wdrażające je krajowe przepisy prawne Con la presente dichiariamo che le apparecchiature designate nella configurazione da noi fornita sono conformi alle disposizioni riportate e alle norme attuative nazionali Número del artículo Hiermit erklären wir dass die bezeichneten Geräte in der von uns gelieferten Ausführung den aufgeführten Bestimmungen und den sie umsetzenden nationalen Rechtsvor...

Страница 79: ...рираме че посочените устройства във версията предоставена от нас отговарят на изброените разпоредби и на приложимото национално законодателство Izjavljamo da označene naprave v izvedbah ki jih dajemo v promet izpolnjujejo navedena določila in veljavne nacionalne zakonske predpise Izjavljujemo da su navedeni uređaji u verziji koju dostavljamo u skladu s navedenim propisima i nacionalnim propisima k...

Страница 80: ...ong as you hold it down 3 Tap down the right side of the paddle switch constant light Tap again to stop illumination 4 Tap down the right side of the paddle switch and immediately re press within 0 4 s constant strobe mode Tap again to stop illumination 14 Lighting unit optional expansion possibility The lighting unit is optional and not offered by LUKAS The illustration shows a typical installati...

Страница 81: ...ing should always be disposed of in an environmentally compatible way Only for EU countries Do not dispose of electrical equipment with your household waste According to the European Directive 2002 96 EC governing electrical and electronic waste and their application in national legislation old electrical equipment must be separately collected and recycled in an environmentally compatible manner P...

Страница 82: ...aging materials and removed items Subject to change LUKAS Hydraulik GmbH A Unit of IDEX Corporation Weinstrasse 39 D 91058 Erlangen Tel 49 0 91 31 698 0 Fax 49 0 91 31 698 394 E mail lukas info idexcorp com www lukas com Made in USA Copyright 2021 LUKAS Hydraulik GmbH ...

Страница 83: ...anual de instrucciones para herramientas de rescate 173100085 ES Herramientas multifuncionales e100 e le100 Traducción del manual de instrucciones original Edición 07 2021 reemplaza 07 2017 e100 le100 TM ...

Страница 84: ...00 le100 14 6 Cortar separar abrir puertas levantar 15 5 2 Manejo de la empuñadura en estrella 15 6 1 Instrucciones de seguridad 15 6 2 Cortar 16 6 3 Separar 17 6 4 Abrir puertas 19 6 5 Levantar 21 7 Accesorios 22 7 1 Batería 22 7 2 Cargador de baterías 23 7 3 Cinta de sujeción 23 8 Desmontaje del equipo parada después del servicio 24 7 4 Riel de accesorios 24 9 Mantenimiento y cuidado 25 9 1 Camb...

Страница 85: ...s técnicas 33 12 1 StrongArm e100 le100 34 12 2 Emisión de ruidos 35 12 3 Rangos de temperaturas de funcionamiento y de almacenamiento35 12 4 Oscilaciones Vibraciones 35 12 5 Par de apriete y entrecaras perno central 35 13 Declaración de conformidad CE 36 14 Iluminación posibilidad de ampliación opcional 38 15 Indicaciones sobre la eliminación de residuos 39 Contenido Página ...

Страница 86: ...ncia relacionados con peligros concretos y sus posibles consecuencias 1 Clases de peligros Pictograma Daños de tipo Palabra de ad vertencia Definición Consecuencias personales PELIGRO Peligro inminente Muerte o lesiones gravísimas ADVERTENCIA Posible situación de peligro Peligro de muerte o lesiones graves PRECAUCIÓN Peligro menor Lesiones leves o insignificantes Material ATENCIÓN Peligro de da ño...

Страница 87: ...nual de instrucciones y que observen las indicaciones contenidas sin salvedades También recomendamos que le instruya una persona experta en el uso de producto ADVERTENCIA PRECAUCIÓN Hay que tener en cuenta también los manuales de instrucciones de los accesorios Incluso si ya ha obtenido una instrucción debería leer de nuevo las indicaciones de seguridad siguientes ADVERTENCIA PRECAUCIÓN Preste ate...

Страница 88: ...tir cualquier forma de trabajo que pueda menoscabar la seguridad o la estabilidad del equipo La herramienta solo debe ser reparada por personal cualificado del servicio técnico que cuente con conocimientos específicos sobre las herramientas Los dispositivos de seguridad no deberán desconectarse nunca Para las reparaciones solo se deben usar accesorios y piezas de recambio originales LUKAS Antes de...

Страница 89: ...aspirar los vapores que estos producen puede resultar perjudicial para la salud Por el mismo motivo debe evitarse el contacto directo con la piel Al manipular fluidos hidráulicos también hay que tener en cuenta que estos pueden afectar negativamente a los sistemas biológicos Al trabajar con el equipo y o durante su almacenaje se debe tener cuidado para que ni el funcionamiento ni la seguridad del ...

Страница 90: ...s a la prevención de accidentes y a la protección del medio ambiente ADVERTENCIA PRECAUCIÓN ATENCIÓN Elequipoestáconcebidoexclusivamenteparaelfinexpuestoenelmanualdeinstrucciones véase el capítulo Uso previsto Un uso que difiera o exceda del indicado se considerará un uso no previsto El fabricante o proveedor no responde de los daños que se puedan producir por el uso no previsto Los riesgos result...

Страница 91: ...scartar que la herramienta provoque una explosión se provoque una explosión por el trabajo con la herramienta p ej al cortar un objeto se pueden producir chispas La responsabilidad sobre la prevención de explosiones y la omisión de trabajos con una herramienta StrongArm e100 le100 corresponde al usuario de la herramienta o a los responsables del lugar de utilización de la misma Al realizar trabajo...

Страница 92: ...e la herramienta Como fuente de energía y accionamiento se utiliza una batería eléctrica incluida en el volumen de suministro La batería se puede insertar en la cavidad que para tal fin posee el cuerpo de la herramienta Esta queda automáticamente enclavada en esta posición Al utilizar varias baterías puede alargar el tiempo de funcionamiento de su herramienta StrongArm e100 le100 Las baterías se p...

Страница 93: ...queo para la batería 5 Asidero posibilidad de giro 360 6 Perno de bloqueo elevar para desbloquear 7 Ranuras de ventilación 8 Puntas de herramienta puntas enchufables combinadas 9 Brazos de las cuchillas 10 Perno central con tuerca fijada 11a Carcasa delantera de plástico 11b Carcasa trasera de plástico 12 Cuerpo de la herramienta 13 Protección de las manos 14 Riel de accesorios 15 Unidad de ilumin...

Страница 94: ...s cuchillas Filo de corte Brazo de las cuchillas 4 2 3 Puntas enchufables combinadas Puntas combinadas Pulsador para soltar las puntas de sustitución El enclavamiento se lleva a cabo de manera automática con presión PRECAUCIÓN Precaución al encajar y retirar las puntas enchufables Existe peligro de lesión Lleve guantes de protección ...

Страница 95: ...leva a cabo de manera automática con presión 4 2 5 Asidero giratorio Para poder hacer un mejor uso de la herramienta en caso de intervención el asidero puede girarse 360 en pasos de 90 Tire del perno de bloqueo hacia arriba y gire el asidero a la posición deseada En la posición de 90 correspondiente el perno de bloqueo se enclava automáticamente Así vuelve a quedar asegurado el asidero PRECAUCIÓN ...

Страница 96: ...rvicio la batería de la herramienta debe cargarse por completo en el cargador externo Procedimiento 1 Tire completamente hacia atrás del botón rojo de desbloqueo y tire simultáneamente y con cuidado hacia arriba de la batería para extraerla de su alojamiento No utilice para ello la fuerza 2 Ahora se puede cargar de nuevo la batería en el cargador y sustituirse tenga en cuen ta al respecto el manua...

Страница 97: ... deslizamiento A escala mundial se tienen que observar y seguir las normas de seguridad nacionales En la República Federal de Alemania hay normas prescritas para verificaciones regulares referentes a la seguridad según el Seguro Legal de Accidentes GUV ADVERTENCIA PRECAUCIÓN ATENCIÓN La herramienta StrongArm e100 le100 no está protegida frente a explosiones Al emplear la herramienta en entornos po...

Страница 98: ...a o encerrada Al realizar trabajos con la herramienta StrongArm e100 le100 se debe llevar ropa de protección casco protector con visera y gafas de protección guantes de protección guantes de protección y si es preciso protección auditiva lleve ropa de protección especial en caso de temperaturas extremadamente elevadas Antes de accionar la herramienta es imprescindible asegurarse de que ninguna per...

Страница 99: ... lo más cerca posible al punto de giro de la cuchilla CORRECTO INCORRECTO 6 3 Separar Use la zona delantera de las puntas solo para ampliar la hendidura Para aumentar la manejabilidad y evitar que se desprendan o se escapen las puntas de separación sobre las partes en las que se trabaja deben colocarse correctamente con antelación Además los puntos desde los que se puede ejercer la mayor fuerza so...

Страница 100: ...puntas atacan de forma segura Trabaje sólo con las puntas No dañar los brazos de cuchilla La representación de las puntas separadoras es a modo de ejemplo Compruebe que para los trabajos de separación y elevación las puntas se encuentran en contacto con arrastre de fuerza en toda su anchura v fig inferior En caso contrario existe peligro de proyección de partes ...

Страница 101: ...e Chapa de cierre bisagras de puerta y en caso dado en cada cerrojo giratorio 6 4 2 Modo de proceder Para la colocación de la herramienta esta se debe insertar mediante presión o impacto de manera fija y profunda con las garras en la hendidura de la puerta véase ejemplos de aplicación ADVERTENCIA PRECAUCIÓN ATENCIÓN En caso de que la herramienta resbale sobre metal o piedras existe riesgo de forma...

Страница 102: ...uantes de protección Ejemplo de aplicación puerta de oficina Ejemplo de aplicación puerta de acero ADVERTENCIA PRECAUCIÓN ATENCIÓN Durante el trabajo debido al efecto especial de la fuerza de la herramienta se pueden romper y desprender piezas y poner con ello en peligro a otras personas Se deben adoptar medidas de manera que ni el usuario ni los participantes se vean en peligro Los participantes ...

Страница 103: ...La carga que se vaya a levantar se debe asegurar conforme a las normativas y prescripciones vigentes para evitar que pueda deslizarse ADVERTENCIA PRECAUCIÓN ATENCIÓN Antes de desmontar cualquier equipamiento es indispensable fijar y asegurar la carga en una posición estable e inamovible Trabajar solamente con la zona media de las puntas No dañar los brazos de cuchilla ...

Страница 104: ...CACIÓN Indicador de carga similar a los equipos de protec ción respiratoria El indicador del estado de carga se activa presionando el interruptor o se activa automáticamente al alcanzar un determinado estado de carga véase la tabla abajo Luz permanente Luz permanente Amarillo intermitente luz permanente roja Rojo intermitente hasta que la batería está descargada Activación automática Activación co...

Страница 105: ...cífico del cargador de la batería 7 3 Cinta de sujeción La cinta de sujeción de un punto se monta delante de la carcasa de bomba y el cabezal de la herramienta Solo es recomendable cuando se deba utilizar un arnés correspondiente La cinta se puede mover libremente para permitir un fácil posicionamiento de la herramienta La cinta de sujeción debe sustituirse a cargo de un distribuidor autorizado LU...

Страница 106: ...erán cerrarse hasta unos pocos mm de distancia entre las puntas Con ello se relaja hidráulica y mecánicamente toda la herramienta Tras su uso limpie la herramienta y lubrique las piezas metálicas y las piezas de movimiento mecánico De vez en cuando también debe lubricarse el perno de bloqueo de las puntas enchufables combinadas La lubricación debe proteger del excesivo desgaste y corrosión Evite a...

Страница 107: ...ste contexto los reglamentos en vigor correspondientes nacionales e internacionales referentes a los intervalos de mantenimiento de herramientas de rescate En la República Federal de Alemania hay normas prescritas para verificaciones regulares referentes a la seguridad según el Seguro Legal de Accidentes GUV ATENCIÓN Antes de realizar los controles elimine la suciedad del equipo ADVERTENCIA PRECAU...

Страница 108: ...Iluminaciones del interruptor principal herramienta azul zona de trabajo opcional operativas Ancho de la abertura de los brazos separadores en las puntas véase el capítulo Características técnicas Cubiertas sin daños Brazos de herramienta sin fisuras Ranurado de las puntas limpio y angular sin fisuras Puntas disponibles función de bloqueo y desbloqueo operativa Batería cargador Carcasa sin daños S...

Страница 109: ...bajo Si el filtro está muy sucio será necesario cambiarlo La cubierta del filtro extraíble se encuentra en el exterior en la parte posterior de la carcasa de la herramienta abajo y está asegurada con dos tornillos Procedimiento 1 Suelte los dos tornillos de fijación con un destornillador Torx TX 15 en la cubierta del filtro y retire la cubierta véase la figura abajo 2 Ahora puede extraer el cartuc...

Страница 110: ...ENCIÓN Los equipos LUKAS están diseñados para lograr las máximas prestaciones solo se permite sustituir los componentes que se incluyen en la lista de piezas de repuesto del equipo correspondiente Solo se permite sustituir otros componentes del equipo Si ha participado en la correspondiente formación de LUKAS para el servicio si dispone de una autorización expresa del servicio de atención al clien...

Страница 111: ...onalmente una comprobación de funcionamiento y carga a un distribuidor autorizado de LUKAS o directamente a LUKAS 10 3 Reparaciones 10 3 1 Cambio de la protección de las manos ADVERTENCIA PRECAUCIÓN Durante el funcionamiento con la protección de las manos desmontada existe un riesgo de lesiones más elevado debido a los elementos móviles que quedan libres 1 Retire el asidero tal y como viene descri...

Страница 112: ...ta la parte superior y retirarla a su vez 3 Colocar un nuevo asidero y sujetarlo montar la parte inferior con tornillos de fijación utilizar agente fijador de roscas p ej LOXEAL 54 03 o Loctite 243 10 3 3 Cambio de los brazos de cuchilla 1 Cerrar los brazos de cuchilla de manera que las puntas apenas se toquen y extraer la batería 2 Retirar la protección para las manos tal y como viene descrito an...

Страница 113: ...6 Retirar los brazos de cuchilla y sustituirlos por unos nuevos 7 El montaje se efectúa en la secuencia inversa Perno del brazo de las cuchillas Brazo de las cuchillas Anillo de seguridad Perno central Tornillo de seguridad Tuerca de seguridad 10 3 4 Rótulos Se tienen que sustituir todos los rótulos dañados y o ilegibles indicaciones de seguridad placa de características etc Procedimiento 1 Retire...

Страница 114: ...do Solicitar al distribui dor autorizado a personal específica mente formado por LUKAS o directa mente a la empresa LUKAS que repare la avería Después de soltarla la empuñadura en estrella no retorna a la posición central La carcasa está dañada o el ac cionamiento de la empuñadura en estrella fun ciona con dificul tad Daño del resorte de brazos para el retorno Solicitar al distribui dor autorizado...

Страница 115: ...e su herramienta solicítelos directamente a LUKAS Puesto que todos los valores están sujetos a tolerancias pueden existir pequeñas diferencias entre los datos de su herramienta y los datos de las siguientes tablas Otro de los motivos de estas diferencias puede hallarse en los medios utilizados para realizar las mediciones que pueden presentar tolerancias o no contar con precisión de la lectura Si ...

Страница 116: ...de separación LSF según la NFPA kN 24 lbf 5395 Fuerza de separación HSF según la NFPA kN 30 lbf 6744 Fuerza separación mín kN 28 lbf 6295 Recorrido de separación máx mm 212 in 8 3 Masa neto sin batería sin puntas enchufables incl aceite kg 9 8 lbs 21 6 Masa neto con batería sin puntas enchufables incl aceite kg 11 1 lbs 24 4 Masa con puntas combinables sin batería kg 11 2 lbs 24 6 Masa con puntas ...

Страница 117: ...e y entrecaras perno central Herramienta incl batería Tipo de equipo e100 le100 Marcha sin carga distancia de medición 1 m según EN dB A Marcha a plena carga distancia de medición 1 m según EN dB A Marcha sin carga distancia de medición 4 m según NFPA dB A 67 Marcha a plena carga distancia de medición 4 m según NFPA dB A 70 Temperatura de servicio estándar C F 20 55 4 131 Temperatura de servicio r...

Страница 118: ...cje oraz wdrażające je krajowe przepisy prawne Con la presente dichiariamo che le apparecchiature designate nella configurazione da noi fornita sono conformi alle disposizioni riportate e alle norme attuative nazionali Número del artículo Hiermit erklären wir dass die bezeichneten Geräte in der von uns gelieferten Ausführung den aufgeführten Bestimmungen und den sie umsetzenden nationalen Rechtsvo...

Страница 119: ...рираме че посочените устройства във версията предоставена от нас отговарят на изброените разпоредби и на приложимото национално законодателство Izjavljamo da označene naprave v izvedbah ki jih dajemo v promet izpolnjujejo navedena določila in veljavne nacionalne zakonske predpise Izjavljujemo da su navedeni uređaji u verziji koju dostavljamo u skladu s navedenim propisima i nacionalnim propisima k...

Страница 120: ...o de estroboscopio hasta soltarlo 3 Presionar una vez hacia la derecha abajo el interruptor basculante luz permanente 4 Presionar una vez hacia la derecha abajo el interruptor basculante y repítalo en un intervalo de 0 4 s luz parpadeante funcionamiento de estroboscopio Al pulsar de nuevo se apaga la iluminación 14 Iluminación posibilidad de ampliación opcional La unidad de iluminación es opcional...

Страница 121: ...cesorios y los embalajes deberían ser reciclados respetando el medio ambiente Solo para países de la UE No tire aparatos eléctricos a la basura doméstica De acuerdo con la Directiva europea 2002 96 CE sobre aparatos eléctricos y electrónicos usados y su conversión a la legislación nacional los aparatos que ya no funcionen deben ser recogidos por separado y reciclados respetando el medio ambiente P...

Страница 122: ...8 0 Fax 49 0 91 31 698 394 Correo electrónico lukas info idexcorp com www lukas com Made in USA Copyright 2021 LUKAS Hydraulik GmbH e100_le100_manual_173100085_ES indd Reservado el derecho a modificaciones Elimine todos los materiales de embalaje y piezas desmontadas conforme a la normativa vigente ...

Страница 123: ...Manuel d utilisation des appareils de sauvetage 173100085 FR Appareils multifonction e100 et le100 Traduction du manuel d utilisation d origine Édition 07 2021 remplace 07 2017 e100 le100 TM ...

Страница 124: ...sation de la poignée étoile 15 6 Découpe écartement ouverture de portes levage 15 6 1 Consignes de sécurité 15 6 2 Découper 16 6 3 écartement 17 6 4 Ouverture de portes 19 6 5 Levage 21 7 Accessoires 22 7 1 Accumulateur 22 7 2 Chargeur accu 23 7 3 Sangle de fixation 23 7 4 Glissière à accessoires 24 8 Démontage de l appareil Mise hors service après utilisation 24 9 Entretien et maintenance 25 9 1 ...

Страница 125: ...32 12 Caractéristiques techniques 33 12 1 StrongArm e100 le100 34 12 2 Émissions sonores 35 12 3 Plages de température de service et de stockage 35 12 4 Oscillations Vibrations 35 12 5 Couple de serrage du boulon central et ouverture de clé 35 13 Déclaration CE de conformité 36 14 Unité d éclairage en option 37 15 Consignes de mise au rebut 39 Sommaire Page ...

Страница 126: ...ger concret et les conséquences possibles 1 Classes de risques Pictogramme Danger pour Mot clé Définition Conséquences Personnes DANGER Danger immédiat Mort ou blessures très graves AVERTISSEMENT Situation potentiellement dangereuse Éventualité de mort ou blessures graves PRUDENCE Situation moins dangereuse Blessures légères ou bénignes le matériel ATTENTION Risque de dommages des biens et de l en...

Страница 127: ...vice de l appareil et à respecter les instructions sans aucune exception Nous vous recommandons également de suivre une formation à l utilisation du produit dispensée par un formateur qualifié AVERTISSEMENT PRUDENCE Respectez également les instructions de service des accessoires Même si vous avez déjà reçu une formation il est conseillé de relire les consignes de sécurité suivantes AVERTISSEMENT P...

Страница 128: ... sur l appareil doivent rester complets et lisibles Tout mode de travail entravant la sécurité et ou la stabilité de l appareil est à proscrire Les réparations ne doivent être effectuées que par un personnel de maintenance qualifié et possédant les connaissances spécifiques à l appareil Les dispositifs de sécurité ne doivent en aucun cas être désactivés Pour les réparations utilisez exclusivement ...

Страница 129: ...ent être nocifs pour la santé en cas d ingestion ou d inhalation de leurs vapeurs Il faut éviter leur contact avec la peau pour la même raison Lors de la manipulation des liquides hydrauliques noter qu ils peuvent exercer une influence négative sur les systèmes biologiques Lors du travail et ou du stockage de l appareil veillez à ce que le fonctionnement et la sécurité de ce dernier ne soient pas ...

Страница 130: ...naux et internationaux obligatoires en matière de prévention des accidents et donnez les instructions nécessaires à leur mise en application AVERTISSEMENT PRUDENCE ATTENTION L appareil est exclusivement réservé à l usage décrit dans le manuel d utilisation voir chapitre Utilisation conforme Toute autre utilisation ou une utilisation dépassant ce cadre est considérée comme non conforme Le fabricant...

Страница 131: ...ent explosif vous devez impérativement éviter qu une explosion ne soit provoquée par l appareil qu une explosion ne soit provoquée par le travail avec l appareil la découpe d un objet peut par ex générer des étincelles Il est de la responsabilité de l utilisateur du StrongArm e100 le100 ou du responsable de l intervention d éviter toute explosion ou d interdire l utilisation de l appareil Dans le ...

Страница 132: ...s de l appareil Un accumulateur électrique fourni assure l alimentation et l entraînement Il s emboîte dans le compartiment prévu à cet effet dans le corps de l appareil et se verrouille automatiquement En utilisant plusieurs accumulateurs vous pouvez étendre la durée d utilisation de votre StrongArm e100 le100 Ils peuvent être rechargés après utilisation à l aide de chargeurs externes fournis La ...

Страница 133: ... Touche de déverrouillage de l accumulateur 5 Poignée rotative sur 360º 6 Goujon de blocage le soulever pour déverrouiller 7 Fentes d aération 8 Pointes pointes combinées enfichables 9 Bras de lames 10 Boulon central avec écrou de sécurité 11a Boîtier plastique avant 11b Boîtier plastique arrière 12 Corps de l appareil 13 Protection pour les mains 14 Glissière à accessoires 15 Unité d éclairage en...

Страница 134: ...pants Bras de lame 4 2 3 Pointes combinées enfichables Pointes combinées Bouton permettant d extraire la pointe de rechange Encliquetage automatique par pression PRUDENCE Soyez prudent lorsque vous mettez les pointes enfichables en place et lorsque vous les extrayez Vous pouvez vous blesser Portez des gants de protection ...

Страница 135: ...ignée rotative Pour assurer une meilleure prise lors des interventions la poignée tourne sur 360º par plages de 90º Pour la placer dans la position voulue tirez sur le goujon de blocage et faites la tourner Le goujon de blocage s encliquète automatiquement lorsque vous atteignez la plage de 90º correspondante La poignée est alors verrouillée PRUDENCE Soyez prudent lorsque vous mettez les pointes e...

Страница 136: ...eil doit être complètement chargé à l aide du chargeur externe Procédure à suivre 1 Tirez sur le bouton de déverrouillage rouge vers l arrière tout en extrayant prudem ment l accumulateur du compartiment vers le haut Ne forcez pas 2 Vous pouvez maintenant charger l accumu lateur à l aide du chargeur et le remplacer veillez à suivre les instructions spécifiques au chargeur 3 Insérez l accumulateur ...

Страница 137: ...sque dû à un glissement Respectez et appliquez les directives nationales en vigueur En Allemagne les consignes de l assurance accidents légale Gesetzlichen Unfallversicherung GUV prévoient des essais réguliers en matière de sécurité technique AVERTISSEMENT PRUDENCE ATTENTION Le StrongArm e100 le100 n est pas protégé contre les explosions En cas d utilisation de l appareil en environnement explosif...

Страница 138: ... utilisation du StrongArm e100 le100 portez impérativement Des vêtements de protection Un casque avec visière ou des lunettes de protection Des gants de protection Des chaussures de protection Le cas échéant une protection auditive Si la température est très élevée portez des vêtements de protection spéciaux Avant de mettre l appareil en marche assurez vous impérativement qu aucune personne impliq...

Страница 139: ... être atteintes en coupant le plus proche possible du point de rotation des lames CORRECT MAUVAIS 6 3 écartement N utilisez la partie avant des pointes que pour agrandir une fente Pour augmenter l adhérence et éviter tout dérapage ou rupture des pointes de l écarteur sur la partie à traiter procédez à temps à leur réajustement C est dans la partie arrière de la pointe des lames de la pointe d écar...

Страница 140: ...er L agrippement des pointes est fiable Ne travaillez qu avec les pointes Veillez à ne pas endommager les bras des lames Exemple d utilisation des pointes d écartement Durant les travaux d écartement et de levage assurez vous que les pointes sont en contact sur toute leur largeur voir fig ci dessous Dans le cas contraire des pièces risquent de s échapper ...

Страница 141: ... multiples gâche gonds et au besoin chaque loquet de verrouillage 6 4 2 Procédure Pour commencer introduisez fermement les mâchoires de l appareil aussi loin que possible dans la fente de la porte éventuellement en tapant dessus voir exemples d applications AVERTISSEMENT PRUDENCE ATTENTION Risque de formation d étincelles si l appareil dérape sur du métal ou de la pierre Risque de blessure dans la...

Страница 142: ... application sur une porte de bureau Exemple d application sur une porte en acier AVERTISSEMENT PRUDENCE ATTENTION Étant donné la force exercée pendant les interventions des pièces peuvent être brisées séparées et mettre des personnes en danger Vous devez adopter des mesures opportunes afin d éviter que l utilisateur et ou toute autre personne soient en danger Les personnes ne prenant pas part à l...

Страница 143: ...ent max PRUDENCE ATTENTION La charge à soulever doit être sécurisée conformément aux directives et dispositions en vigueur AVERTISSEMENT PRUDENCE ATTENTION Avant de démonter l équipement utilisé assurez vous que la charge déplacée est stable et fixe Ne travaillez qu avec la zone médiane des pointes Veillez à ne pas endommager les bras des lames ...

Страница 144: ...otection respiratoire Pour activer l indicateur de charge il vous suffit d appuyer sur l interrupteur L indicateur s active par ailleurs automatiquement lorsque l appareil atteint un certain niveau de charge voir tableau ci dessous Allumé en continu Allumé en continu Jaune clignotant rouge continu Rouge clignotant jusqu à ce que l accu mulateur soit déchargé Activation automatique Activation avec ...

Страница 145: ...3 Sangle de fixation La sangle de fixation 1 point se monte avant le boîtier de la pompe et la tête de l outil Nous vous conseillons de ne l utiliser qu en association avec un harnais adéquat le cas échéant La sangle peut se déplacer librement pour faciliter le positionnement de l appareil Elle ne doit être remplacée que par un revendeur agréé Il s agit d un accessoire LUKAS Pour de plus amples in...

Страница 146: ... quelques mm d écartement au niveau des pointes Ceci permet de détendre l ensemble de l appareil hydrauliquement et mécaniquement Après chaque utilisation nettoyez l appareil et lubrifiez les pièces métalliques ainsi que les pièces mécaniques mobiles Lubrifiez aussi régulièrement les goujons de verrouillage des pointes combinées enfichables Cela les protège d une usure trop importante et de la cor...

Страница 147: ... les directives nationales et internationales en vigueur concernant les intervalles de maintenance pour les appareils de sauvetage En Allemagne les consignes de l assurance accidents légale Gesetzlichen Unfallversicherung GUV prévoient des essais réguliers en matière de sécurité technique ATTENTION Nettoyez l appareil pour éliminer les impuretés avant le contrôle AVERTISSEMENT PRUDENCE ATTENTION P...

Страница 148: ...Voyants de l interrupteur principal appareil bleu et de la zone de travail en option opérationnels Largeur d ouverture des bras au niveau des pointes voir chapitre Caractéristiques techniques Protections en bon état Absence de fissures sur les bras Striures des pointes propres et nettes sans craquelures Pointes présentes verrouillage et déverrouillages parfaits Accumulateur chargeur Boîtier non en...

Страница 149: ...it être remplacé Le couvercle amovible du filtre se trouve à l extérieur sur la partie basse du boîtier arrière de l appareil il est fixé par deux vis Procédure à suivre 1 Desserrez les deux vis de fixation du couvercle de filtre à l aide d une clé Torx TX 15 et retirez le couvercle voir illustration ci dessous 2 Il est à présent possible de retirer l élément de filtre et de le remplacer par un no...

Страница 150: ...ants car les impuretés peuvent endommager l appareil ATTENTION Les appareils LUKAS étant conçus pour offrir des performances très élevées seuls les composants mentionnés dans les listes de pièces détachées de l appareil concerné peuvent être remplacés Les autres composants des appareils ne peuvent être changés que si vous avez participé à une formation de maintenance LUKAS appropriée vous disposez...

Страница 151: ...s directement à LUKAS ou à un revendeur LUKAS agréé pour qu il fasse des essais de fonctionnement et de charge 10 3 Réparations 10 3 1 Remplacement de la protection pour les mains AVERTISSEMENT PRUDENCE Lorsque la protection pour les mains est démontée le risque de blessure est plus élevé car les éléments en mouvement sont alors dégagés 1 Retirez la poignée comme indiqué dans le paragraphe 10 3 2 ...

Страница 152: ...ent la partie supérieure retirez la à son tour 3 Mettez la nouvelle poignée en place Maintenez la et fixez la partie inférieure avec des vis utilisez un adhésif à résistance moyenne de type LOXEAL 54 03 ou Loctite 243 10 3 3 Remplacement des bras des lames 1 Fermez les bras de lames de façon à ce que les pointes se touchent presque et retirez l accumulateur 2 Retirez la protection pour les mains c...

Страница 153: ...lames et retirez les goujons 6 Retirez les bras des lames et remplacez les 7 Le montage se fait dans l ordre inverse Goujon de lame Bras de lame Circlip Boulon central Vis de sécurité Écrou de blocage 10 3 4 Plaques Tous les panneaux endommagés et ou illisibles consignes de sécurité plaque signalétique etc doivent être remplacés Procédure à suivre 1 Retirer les panneaux endommagés et ou illisibles...

Страница 154: ... indiquée Appareil défectueux Suppression du défaut par un distributeur agréé par le personnel formé par LUKAS ou directement par LUKAS Une fois relâchée la poignée étoile ne retourne pas en position moyenne Boîtier endommagé ou poignée étoile difficile à manipuler Endommagement du ressort à branches pour la remise à l état initial Suppression du défaut par un distributeur agréé par le personnel f...

Страница 155: ...Vous obtiendrez les autres données de votre appareil directement auprès de LUKAS Comme toutes les valeurs comportent des tolérances il peut y avoir de légères différences entre les valeurs de votre appareil et celles des tableaux suivants Les valeurs peuvent diverger également en raison d inexactitudes de lecture et ou de tolérances des instruments de mesure mis en œuvre Il est possible que vous c...

Страница 156: ...N 155 lbf 34845 Force d écartement LSF selon NFPA kN 24 lbf 5395 Force d écartement HSF selon NFPA kN 30 lbf 6744 Force d écartement min kN 28 lbf 6295 Ecartement max mm 212 in 8 3 Poids net sans accu sans pointes enfichables avec huile kg 9 8 lbs 21 6 Poids avec accu sans pointes enfichables avec huile kg 11 1 lbs 24 4 Poids avec pointes combinées sans accu kg 11 2 lbs 24 6 Poids avec pointes ouv...

Страница 157: ... de serrage du boulon central et ouverture de clé Appareil avec accumulateur Type d appareil e100 le100 Marche à vide distance 1 m selon EN dB A Pleine charge distance 1 m selon EN dB A Marche à vide distance 4 m selon NFPA dB A 67 Pleine charge distance 4 m selon NFPA dB A 70 Température de service standard C F 20 55 4 131 Température de service conditions extrêmes pendant 9 min cyclique appareil...

Страница 158: ...cje oraz wdrażające je krajowe przepisy prawne Con la presente dichiariamo che le apparecchiature designate nella configurazione da noi fornita sono conformi alle disposizioni riportate e alle norme attuative nazionali Número del artículo Hiermit erklären wir dass die bezeichneten Geräte in der von uns gelieferten Ausführung den aufgeführten Bestimmungen und den sie umsetzenden nationalen Rechtsvo...

Страница 159: ...рираме че посочените устройства във версията предоставена от нас отговарят на изброените разпоредби и на приложимото национално законодателство Izjavljamo da označene naprave v izvedbah ki jih dajemo v promet izpolnjujejo navedena določila in veljavne nacionalne zakonske predpise Izjavljujemo da su navedeni uređaji u verziji koju dostavljamo u skladu s navedenim propisima i nacionalnim propisima k...

Страница 160: ...re clignote fonctionne en mode stroboscopique jusqu à ce que vous le relâchiez 3 Si vous faites basculer l interrupteur vers la droite et vers le bas lumière en continu 4 Si vous faites basculer l interrupteur vers la droite et vers le bas et réappuyez dessus dans les 0 4 s qui suivent la lumière clignote fonctionne en mode stroboscopique Elle s éteint lorsque vous réappuyez dessus 14 Unité d écla...

Страница 161: ...objet d un recyclage écologique Uniquement pour les pays de l UE Ne jetez pas les appareils électriques à la poubelle Conformément à la Directive Européenne 2002 96 UE relative aux appareils électriques et électroniques usagés et à son application dans le droit national les appareils électriques usagés doivent être collectés séparément et doivent faire l objet d un recyclage écologique Veuillez re...

Страница 162: ... 91 31 698 394 e mail lukas info idexcorp com www lukas com Fabriqué aux États Unis Copyright 2021 LUKAS Hydraulik GmbH e100_le100_manual_173100085_FR indd Sous réserve de modifications Merci d éliminer l ensemble du matériel d emballage et des pièces démontées en conformité avec la réglementation en vigueur ...

Страница 163: ...Manual de operação Equipamentos de resgate 173100085 PT Equipamentos multifuncionais e100 e le100 Manual de operação original Versão 07 2021 substitui 07 2017 e100 le100 TM ...

Страница 164: ... 14 6 Cortar expandir abrir portas elevar 15 5 2 Operação do manípulo em forma de estrela 15 6 1 Indicações de segurança 15 6 2 Cortar 16 6 3 Expandir 17 6 4 Abrir portas 19 6 5 Elevar 21 7 Acessórios 22 7 1 Bateria 22 7 2 Carregador de baterias 23 7 3 Cinto de fixação 23 8 Desmontagem do equipamento parada após a utilização 24 7 4 Trilho para acessórios 24 9 Conservação e manutenção 25 9 1 Troca ...

Страница 165: ...ados técnicos 33 12 1 StrongArm e100 le100 34 12 2 Emissão de ruídos 35 12 3 Faixas de temperatura para operação e armazenamento 35 12 4 Vibrações trepidações 35 12 5 Torque de aperto e tamanho de chave do pino central 35 13 Declaração de conformidade CE 36 14 Iluminação possibilidade de ampliação opcional 38 15 Indicações sobre o descarte 39 Índice Página ...

Страница 166: ...e das palavras de alerta aos determinados perigos e suas possíveis consequências 1 Classes de perigo Pictograma Danos para Palavra sinal Definição Causas Pessoa PERIGO Perigo iminente Morte ou lesões graves AVISO Situação provavelmente perigosa Morte provável ou lesões graves CUIDADO Situação pouco perigosa Lesões ligeiras ou mínimas Materiais ATENÇÃO Perigo de danos materiais e ambientais Danos n...

Страница 167: ...umprir as indicações mencionadas sem limitações Também recomendamos que o usuário deve receber treinamento por um especialista para poder utilizar o equipamento AVISO CUIDADO Os manuais de operação dos acessórios também devem ser respeitados Mesmo quando já tenha recebido treinamento o usuário deve ler de novo as seguintes indicações de segurança AVISO CUIDADO Prestar atenção para que os acessório...

Страница 168: ... prejudique a segurança e ou a estabilidade do equipamento Os reparos nos equipamentos só podem ser realizados por técnicos especializados e com conhecimentos específicos do equipamento Os dispositivos de segurança nunca devem ser colocados fora de funcionamento Para reparos somente podem ser utilizados acessórios e peças de reposição originais da LUKAS Antes de ligar colocar em operação e durante...

Страница 169: ...Este fluido hidráulico pode prejudicar a saúde se for ingerido ou se seus vapores forem inalados Devido às mesmas razões o contato direto com a pele também deve ser evitado Durante o manuseio de fluido hidráulico também é necessário ter atenção para que os sistemas biológicos não sejam negativamente influenciados Durante o trabalho e ou a armazenagem do equipamento é necessário assegurar que a fun...

Страница 170: ...ernacionais vigentes gerais e obrigatórias por lei para a prevenção de acidentes AVISO CUIDADO ATENÇÃO O equipamento destina se exclusivamente para a finalidade mencionada no manual de operação ver capítulo Utilização adequada Qualquer outro tipo de utilização é considerado inadequado O fabricante fornecedor não se responsabiliza pelos danos oriundos dessa utilização inadequada A responsabilidade ...

Страница 171: ...o é necessário garantir que a ferramenta não provoque uma explosão o trabalho com a ferramenta não provoque uma explosão por exemplo devido a faíscas provocadas pelo corte de um objeto A responsabilidade pela prevenção de explosões ou pela suspensão dos trabalhos com um StrongArm e100 le100 é do utilizador da ferramenta ou da pessoa responsável pelo local de intervenção Durante os trabalhos em áre...

Страница 172: ...entro do corpo da ferramenta Como fonte de energia e acionamento é usada uma bateria elétrica no escopo de fornecimento A bateria pode ser encaixada na abertura prevista no corpo do equipamento Ali ela é bloqueada automaticamente Através da utilização de várias baterias pode ser aumentado o tempo de ação do Stron gArm e100 le100 Após a utilização as baterias podem ser recarregadas no carregador ex...

Страница 173: ...tão de liberação para a bateria 5 Manípulo rotacionável 360 6 Pinos de travamento puxar para cima para destravamento 7 Ranhuras de ventilação 8 Pontas de ferramentas pontas de encaixe combinadas 9 Pinças 10 Pino central com porca bloqueada 11a Corpo dianteiro em plástico 11b Corpo traseiro em plástico 12 Corpo da ferramenta 13 Proteção de mãos 14 Trilho para acessórios 15 Unidade de iluminação amp...

Страница 174: ...tura de portas Pinça de corte Aresta de corte Pinça de corte 4 2 3 Pontas de encaixe combinadas Pontas combinadas Botão de pressão para soltar a ponta da ferramenta O encaixe ocorre automaticamente ao pressionar CUIDADO Cuidado ao encaixar ou remover as pontas de encaixe Há risco de lesão Use luvas de proteção ...

Страница 175: ... encaixe ocorre automaticamente ao pressionar 4 2 5 Manipulo rotacionável Para poder aplicar melhor em cada caso o manípulo é rotacionável em 360 sempre em passos de 90 Para isso puxe o pino de travamento para cima e gire o manípulo para a posição desejada Na posição de 90 correspondente o pino de travamento encaixará automaticamente Assim o manípulo estará novamente travado CUIDADO Cuidado ao enc...

Страница 176: ...o a bateria do equipamento tem de ser totalmente carregada no carregador externo Modo de procedimento 1 Puxe o botão de destravamento vermelho totalmente para trás e simultaneamente remova a bateria puxando cuidadosamente para cima para fora do compartimento da bateria Não exercer força excessiva 2 Agora a bateria pode ser recarregada no car regador para isso observe também o manual de operação se...

Страница 177: ...o de perigo por escorregamento É necessário respeitar e cumprir as diretrizes de segurança nacionais e internacionais Na Alemanha é necessário realizar inspeções de segurança técnica regulares de acordo com as prescrições da Gesetzlichen Unfallversicherung GUV AVISO CUIDADO ATENÇÃO O StrongArm e100 le100 não é à prova de explosão Durante a utilização do equipamento em áreas com perigo de explosão ...

Страница 178: ...abalhos com o StrongArm e100 le100 você deve usar vestuário de proteção capacete com viseira ou óculos de proteção luvas de proteção Calçados de segurança e eventualmente proteção auricular use vestuário de proteção especial para temperaturas extremamente altas Antes da operação do equipamento garantir que as pessoas envolvidas e ou não envolvidas não sejam colocadas em perigo devido ao movimento ...

Страница 179: ...res quando o corte é realizado o mais perto possível do ponto de giro das pinças CORRETO ERRADO 6 3 Expandir Utilizar as pontas das pinças só para alargar uma fenda Para aumentar a aderência e para evitar que as pinças escorreguem ou saiam do objeto de trabalho as mesmas devem ser reposicionadas a tempo Além disso a maior força ocorre na área traseira da pinça de corte ou na área de abertura trase...

Страница 180: ...ado para a expansão Pontas prendem com segurança Trabalhar só com as pontas Não danificar as pinças de corte Imagem das pontas de abertura exemplificada Assegurar que as pontas estejam totalmente apoiadas em toda a sua largura durante os trabalhos de expansão e elevação ver imagem abaixo Caso contrário os componentes poderão se soltar ...

Страница 181: ...obradiças Portas com travas múltiplas Chapa de fechamento dobradiças e caso necessário em cada pino de travamento 6 4 2 Modo de procedimento Ao aplicar o equipamento deve ser pressionado firmemente e tão fundo quanto possível com as garras parra dentro dos vãos da porta ver exemplos de aplicação AVISO CUIDADO ATENÇÃO O deslizamento do aparelho sobre metal ou pedra apresenta risco de faíscas Há ris...

Страница 182: ... óculos de proteção Luvas de proteção Exemplo de aplicação porta de escritório Exemplo de aplicação porta de aço AVISO CUIDADO ATENÇÃO Durante os trabalhos podem cair ou serem arrancadas peças devido à aplicação da força causando risco para as pessoas Devem ser tomadas medidas para que não haja perigo para o operador nem para pessoas não envolvidas Pessoas não envolvidas devem manter uma distância...

Страница 183: ...DADO ATENÇÃO A carga a elevar deve ser protegida contra escorregamento de acordo com as diretivas e normas válidas AVISO CUIDADO ATENÇÃO Antes da desmontagem do equipamento utilizado assegurar que a carga deslocada está em uma posição estável e fixa Trabalhar somente com a região intermediária das pontas Não danificar as pinças de corte ...

Страница 184: ...mento 7 Acessórios NOTA Indicação da condição seme lhante à dos equipamentos de proteção respiratória A indicação da condição de carga é ativada ao pressionar o interruptor ou automaticamente ao atingir uma determinada condição de carga vide a tabela abaixo Luz permanente Luz permanente Amarelo piscante luz permanente vermelha Vermelho piscante até a bateria estar descarregada Ativação automática ...

Страница 185: ...r de baterias 7 3 Cinto de fixação O cinto de fixação de um ponto é montado à frente do corpo da bomba e da cabeça de ferramentas Ele somente é recomendado quando usado junto com um conjunto de amarração correspondente O cinto pode se mover livremente para permitir um fácil posicionamento do equipamento O cinto de fixação deve ser substituído por um revendedor autorizado A LUKAS oferece este cinto...

Страница 186: ...ntre as pontas fique uma distância de poucos mm Assim todo o equipamento é aliviado hidraulicamente e mecanicamente Após cada utilização o equipamento deve ser limpo e as peças metálicas e peças mecânicas móveis devem ser lubrificadas As cavilhas de bloqueio das pontas de encaixe combinadas devem ser regularmente lubrificadas com óleo A lubrificação com óleo pretende proteger contra desgaste acent...

Страница 187: ... na segurança ou confiabilidade é adicionalmente necessário realizar uma verificação do funcionamento para isso respeitar também as prescrições nacionais e internacionais em relação aos intervalos de manutenção de equipamentos de resgate Na Alemanha é necessário realizar inspeções de segurança técnica regulares de acordo com as prescrições da Gesetzlichen Unfallversicherung GUV ATENÇÃO Antes do co...

Страница 188: ...s do interruptor principal equipamento azul área de trabalho opcional funcional Abertura dos braços nas pontas ver capítulo Dados técnicos Coberturas não danificadas Braços de ferramenta sem trincas Estrias das pontas limpas e angulares sem fendas Pintas existentes travamento ou destravamento em perfeito estado Bateria carregador Corpo não danificado Superfícies de contato elétricas limpas e sem d...

Страница 189: ...agens embaixo Se o filtro apresentar muita sujeira ele deverá ser substituído A cobertura removível do filtro se encontra no corpo traseiro do equipamento embaixo e está fixa por dois parafusos Modo de procedimento 1 Soltar os dois parafusos de fixação na cobertura do filtro usando uma chave Torx TX 15 e remover a cobertura ver imagem abaixo 2 Agora é possível remover o elemento de filtro e substi...

Страница 190: ...limpos pois a sujeira pode danificar o equipamento ATENÇÃO Visto que os equipamentos da LUKAS foram concebidos para elevadas potências somente podem ser trocados componentes que são indicados nas listas de peças sobressalentes do respetivo equipamento Outros componentes do equipamento somente podem ser trocados se você participou em um treinamento de serviço LUKAS você possui a autorização express...

Страница 191: ... ou confiabilidade do equipamento deve ser realizado adicionalmente um teste funcional e de carga por um revendedor autorizado LUKAS ou diretamente pela LUKAS 10 3 Reparos 10 3 1 Substituição da proteção de mãos AVISO CUIDADO Durante o funcionamento com proteção de mãos desmontada existe um perigo aumentado de ferimentos devido a elementos móveis expostos 1 Remova o manípulo como descrito em 10 3 ...

Страница 192: ...rando a parte superior e também removê la 3 Colocar e segurar o novo manípulo então montar a parte inferior com parafusos de fixação usar trava roscas de média resistência por ex LOXEAL 54 03 ou Loctite 243 10 3 3 Substituição das pinças de corte 1 Fechar as pinças de corte de tal forma que as pontas quase se toquem e remover a bateria 2 Remover a proteção de mãos conforme descrito anteriormente ...

Страница 193: ... corte e remover o pino 6 Remover as pinças de corte e substituir por novas 7 A montagem é realizada na sequência inversa Pino da pinça de corte Pinça de corte Anel de retenção Pino central Parafuso de retenção Porca de retenção 10 3 4 Placas Todas as placas danificadas e ou ilegíveis indicações de segurança chapa de características etc têm de ser trocadas Modo de procedimento 1 Remover as placas ...

Страница 194: ...ta ava riada Eliminação do dano por meio do reven dedor autorizado técnicos com treina mento especial da LUKAS ou direta mente na LUKAS Após a liberação o manípulo em forma de estrela não se desloca para a posição central Corpo danificado ou acionamento do manípulo em forma de estrela emperrado Danos na mola basculante para a reposição Eliminação do dano por meio do reven dedor autorizado técnicos...

Страница 195: ...s informações sobre o seu equipamento contatar diretamente a LUKAS Visto que todos os valores apresentam tolerâncias poderão existir pequenas diferenças entre os dados de seu equipamento e os dados das tabelas seguintes Devido a imprecisões na consulta e ou tolerâncias dos meios de medição utilizados os valores podem divergir Se os valores informados nas tabelas forem recalculados para as diversas...

Страница 196: ...845 Força de abertura LSF conforme NFPA kN 24 lbf 5395 Força de abertura HSF conforme NFPA kN 30 lbf 6744 Força expandir mín kN 28 lbf 6295 Percurso de abertura máx mm 212 in 8 3 Massa líquida sem bateria sem pontas de encaixe incl óleo kg 9 8 lbs 21 6 Massa com bateria sem pontas de encaixe incl óleo kg 11 1 lbs 24 4 Massa com pontas combinadas sem bateria kg 11 2 lbs 24 6 Massa com pontas para a...

Страница 197: ...ramenta e100 le100 Funcionamento sem carga distância de medição 1 m conforme EN dB A Funcionamento com carga máx distância de medição 1 m conforme EN dB A Funcionamento sem carga distância de medição 4 m conforme NFPA dB A 67 Funcionamento com carga máx distância de medição 4 m conforme NFPA dB A 70 Temperatura de operação padrão C F 20 55 4 131 Temperatura de operação faixa extre ma para 9 min cí...

Страница 198: ...cje oraz wdrażające je krajowe przepisy prawne Con la presente dichiariamo che le apparecchiature designate nella configurazione da noi fornita sono conformi alle disposizioni riportate e alle norme attuative nazionali Número del artículo Hiermit erklären wir dass die bezeichneten Geräte in der von uns gelieferten Ausführung den aufgeführten Bestimmungen und den sie umsetzenden nationalen Rechtsvo...

Страница 199: ...рираме че посочените устройства във версията предоставена от нас отговарят на изброените разпоредби и на приложимото национално законодателство Izjavljamo da označene naprave v izvedbah ki jih dajemo v promet izpolnjujejo navedena določila in veljavne nacionalne zakonske predpise Izjavljujemo da su navedeni uređaji u verziji koju dostavljamo u skladu s navedenim propisima i nacionalnim propisima k...

Страница 200: ...ão estroboscópica até soltar 3 Pressionar o interruptor de alavanca uma vez para baixo à direita Luz permanente 4 Pressionar o interruptor de alavanca uma vez para baixo à direita e novamente dentro de 0 4 s Luz piscante operação estroboscópica Pressionar novamente finaliza a iluminação 14 Iluminação possibilidade de ampliação opcional A unidade de iluminação é opcional e não é ofertada pela LUKAS...

Страница 201: ...lhos eletrônicos acessórios e embalagens devem ser reciclados adequadamente Só para países da UE Não descartar aparelhos eletrônicos através do lixo doméstico De acordo com a diretriz europeia 2002 96 CE sobre equipamentos elétricos e eletrônicos e sua conversão para o direito nacional os aparelhos eletrônicos não funcionais têm de ser recolhidos separadamente e reciclados de maneira ecológica Par...

Страница 202: ...n Tel 49 0 91 31 698 0 Fax 49 0 91 31 698 394 e mail lukas info idexcorp com www lukas com Made in USA Copyright 2021 LUKAS Hydraulik GmbH e100_le100_manual_173100085_PT indd Sujeito a modificações Favor destinar adequadamente todo o material de embalagem e as peças desmontadas ...

Страница 203: ......

Страница 204: ...AS Hydraulik GmbH A Unit of IDE X Corporation Weinstraße 39 91058 Erlangen Germany Fon 4 9 9131 69 8 0 Fax 4 9 9131 69 8 39 4 E Mail lukas info idexcorp com LUKAS Rescue www lukas com I www lukas store de ...

Отзывы: