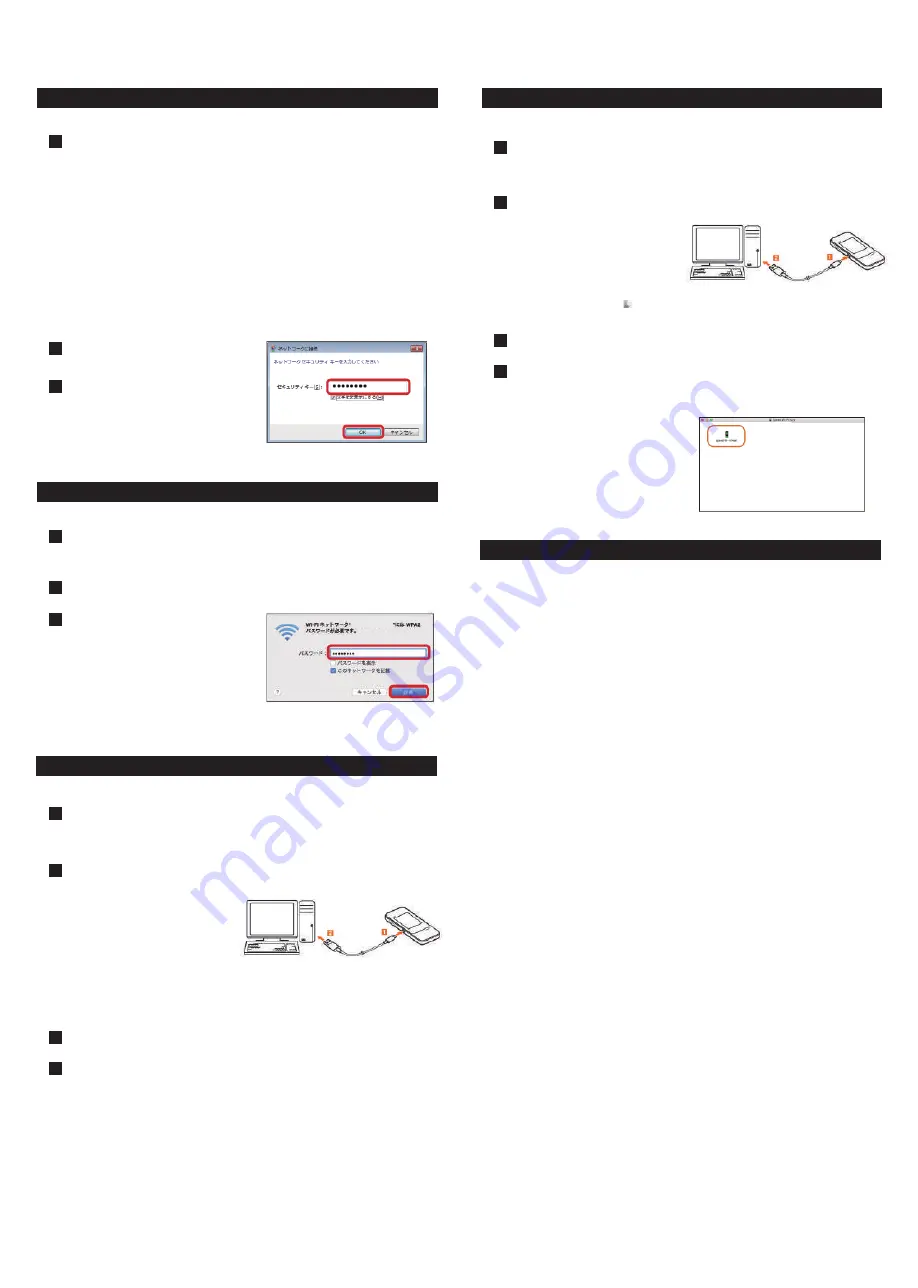
◆ Connecting with WLAN(for Windows)
◆ Connecting with WLAN (for Mac PC)
Turn on wireless LAN function on a wireless LAN device.
1
Turn on wireless LAN (Wi-Fi) function on a wireless LAN (Wi-Fi) device
1
Select SSID of the product from the
displayed network list etc.
2
Select SSID of the product from the pulldown list of network names.
2
Enter the seurity Key (password)
3
Enter the security key (password)
3
*Please check Wi-Fi LAN connecting completed.
■Windows10
“Start”→” setting”→” Network and Internet”→Turn on Wi-Fi
■Windows 8.1
Swipe from the right end of desktop screen (for mouse operation, point at the
upper right of the screen)→” setting”→Select the Wi-Fi icon→Turn on Wi-Fi
■Windows 8
Swipe from the right end of desktop screen (for mouse operation, point at the
upper right of the screen)→” setting”→Change PC settings→” Wireless”→Turn
on a wireless device
■Windows 7
From the start menu, select Controlpanel, then select “Network and Internet”→” Network
and sharing center”→” Connect to a network”
From the Apple menu, “System preferences”→” Network”→” Wi-Fi”→” Turn Wi-Fi on”
W04̲XXXXXXXXXXX
◆ Connecting with USB cable (for Windows)
◆ Connectin with USB cable (for Mac)
*Please make sure that this product is power on before connecting.
*Please make sure that this product is power on before connecting.
Connect the included cable to the external connection terminal of the
product.
1
Connect the other connector of the included cable to the USB port of the
personal computer.
2
Click and install “AutoRun.exe execution.”
3
If “User Account Control” screen appears, select “Yes.”
4
Insert it strate. Firmly insert it all the way.
*If it is not displayed, in Windows 10, Please select “Start” menu→” Explorer”→” CD drive(X:) Speed Wi-Fi
Next”→” AutoRun.exe.” In Windows 8/8.1, Please select “Desktop Mode”→” Explorer” icon on the taskbar→”
Computer(PC)”→” CD drive(X:) Speed Wi-Fi Next”→” AutoRun.exe.” Windows 7 /Vista, Please select
“Computer”→” CD drive(X:) Speed Wi-Fi Next”→” AutoRun.exe.”
*For windows Vista User→” Select “Continue”
*The install will begin. When “Speed Wi-fi Next setting tool”
*For windows Vista User→” Select “Continue”
*The install will begin. When “Speed Wi-fi Next setting tool”
The computer recognizes this product
(Depending on your computer, it may
take time.) Message to confirm the
operation of the CD drive is displayed.
Connect the included cable to the external connection terminal of the
product.
1
Connect the other connector of the included cable to the USB port of the
personal computer.
2
Click and install “AutoRun.exe execitopm”
3
If “User Account Control” screen appears, select “Yes.”
4
*Insert it straight. Firmly insert it all the way.
*If it is not displayed, select ■ and open the Finder→” Device”→” Speed Wi-Fi Next”
◆ Trouble shooting
*Please confirm before inquiry.
*For security key, please read “SSID and password.”
*For security key, please read “SSID and password.”
The computer recognizes this product
(Depending on your computer, it may
take time) “Speed Wi-Fi Next” Icon and
“Speed Wi-Fi Next” screen appear on the
desktop.
【Wi-Fi router is not working, Unable to charge, connect】
Please restart the router.
【Unable to connect Internet Wi-Fi】
Please be sure Wi-Fi router function is turned on.
Please be sure, you entered password correctly.
【Internet connection fails】
If signal reception is poor or fails, move to where signal is strong, then recconect. Also please
restart the router and connecting devices.
*Access point can get busy at certain time. Wait a while and try again.


