background image

8

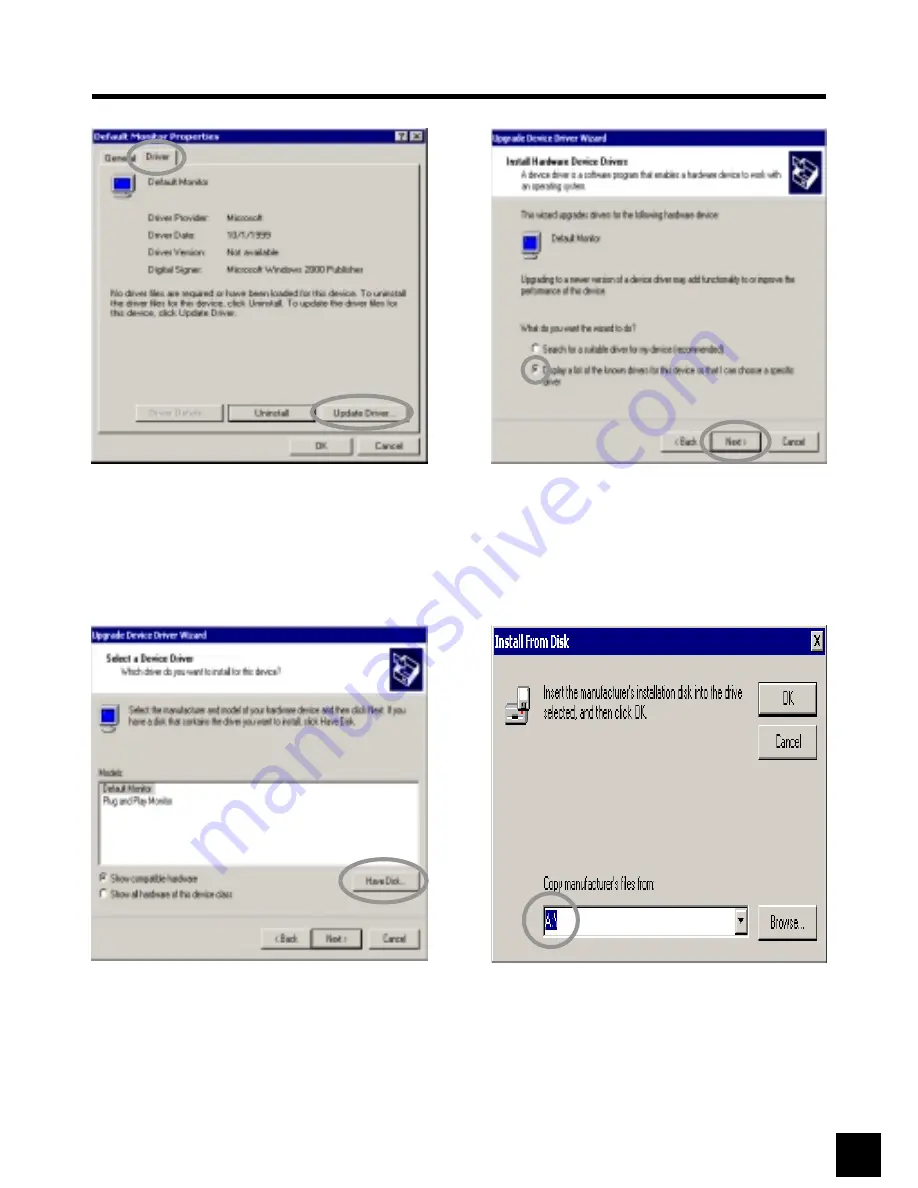
Select 

[Driver]

and then click 

[Update

Driver...]

.

9

[Upgrade Device Driver Wizard] 

will be 

appeared. Choose the 

second list

and

then click 

[Next>]

.

10

Click 

[Have Disk...]

.

11

Select drive 

[A:

]

.

Monitor Installation

(Continued)

Available Mode     

Yes / 

No

PC  

Video  

S-Video  

TV

11

Содержание LCTV-2201A

Страница 1: ...LCTV 2201A TFT LCD Monitor Owner s Guide to Operation...

Страница 2: ...S SUPPLIED ACCESSORIES PREPARATION Remote Control Cable Connection LOCATION OF USERS CONTROL BASIC OPERATION Monitor Installation OSD USAGE Basic OSD usage Basic Setup PC Setup Video Setup 18 20 21 22...

Страница 3: ...gh voltage flows in the product and inserting an object can cause electric shock and or short internal parts For the same reason do not spill water or liquid on the product Do not attempt to service t...

Страница 4: ...e and uneven floor surface can cause the product to fall from the cart The vents and other openings in the cabinet are designed for ventilation Do not cover or block these vents and openings since ins...

Страница 5: ...ith the product Operation Manual x1 Monitor Driver Diskette x1 Remote Control x1 Wall Mount Bracket x1 Screws x4 Wall Mount Latch x1 PC VGA Cable x1 PC Stereo Cable x1 Video Sound Cable x1 S Video Cab...

Страница 6: ...rol If the remote control fails to operate LCD TV Monitor functions replace the batteries in the remote control 2 Insert batteries two Size AAA batteries Supplied with product 3 Close the battery cove...

Страница 7: ...PREPARATION Continued Cable Connection ANALOG RGB PC VIDEO S VIDEO Power input DC 15V VIDEO SOUND PC SOUND Sound out TV Antenna Rear view of main unit 7...

Страница 8: ...source name at another mode Press again Removes displayed channel number Exit Exit the OSD menu or move to previous menu Ch Selects next higher channel Selects next lower channel Vol Increase volume u...

Страница 9: ...urce select Exit or current source 2 Press the Video to select composite video mode 3 Press the S Video to select separate video mode 2 Press the Ch to move the cursor to the desired selected source S...

Страница 10: ...Monitor in the window shown above 6 Set Refresh Frequency at 60Hz 7 Finally click Properties 1 Double click Control Panel icon from My Computer folder 2 Double click Display icon from Control Panel f...

Страница 11: ...click Update Driver 9 Upgrade Device Driver Wizard will be appeared Choose the second list and then click Next 10 Click Have Disk 11 Select drive A Monitor Installation Continued Available Mode Yes N...

Страница 12: ...nitor 15 Click Finish Be sure the screen shows you correct model name 13 Choose SOSA TM800 and then click Next 12 Select the file of NEWCOMMMONITOR inf Monitor Installation Continued Available Mode Ye...

Страница 13: ...r item press the Ch to move the cursor to another desired adjustment items Control Panel C P usage 3 To adjust another item press the Menu then press the Ch to move the cursor to another desired adjus...

Страница 14: ...ase contrast Increase contrast Contrast Cold Medium Hot Bluish Reddish RESET 2 Press the Vol of R C or press the Ch of C P to move the cursor to the Yes or No 1 Press the Sel of R C or Menu of C P to...

Страница 15: ...of PC Setup 5 Canceling Speaker Mute 6 Turning a zoomed picture into its normal shape 100 Frequency Increase horizontal size Take this option just in the case of having horizontally unmatched picture...

Страница 16: ...o They are the same aspect ratio with that of Source Source screen Fill 4 3 Ratio 16 10 Ratio 16 9 Ratio Aspect Ratio Video Type DVD VCR Choose this when the external input device is DVD Choose this w...

Страница 17: ...the cursor to Add or Erase 1 Press Sel of R C or Menu of C P and select Channel Edit 3 Select YES the current channel will be erased 4 select NO move to previous menu 2 Press CH Search of the R C and...

Страница 18: ...de V Position H Position move right the PIP window move left the PIP window move up the PIP window move down the PIP window TV Channel TV Channel change Press the Vol of R C or press the Ch of C P Pre...

Страница 19: ...Move the zoom window up and down while operating the Zoom A A H Pan Move the zoom window sideways while operating the Zoom A A move up the zoom window move down the zoom window move right the zoom win...

Страница 20: ...r Korean 3 Press the Sel of R C or Menu of C P to select the desired language Then press Exit to move to previous menu screen Background Opaque Translucent Duration Time The range of controlling the d...

Страница 21: ...Bad reception can be considered Reference Pages 7 9 7 9 22 Picture is not clear TV Make sure the antenna cable is properly connected Bad reception can be considered Picture is not clear PC Operate th...

Страница 22: ...Typ 60Watt Standard Power Consumption AC100 240V 50 60Hz DC15V Power Voltage B G I D K M Sound Signal Type PAL NTSC Color Signal Type Composite S VIDEO CVBS Input Signal Video TV 22 0 558 8mm Diagonal...

Страница 23: ...rd VESA Standard Industry Standard VESA Standard VESA Standard VESA Standard Standard Type 162 000 75 0 60 1600 x 1200 44 900 35 5 43 60 0 56 5 48 4 46 9 48 1 37 9 35 1 37 5 37 9 31 5 37 9 37 9 37 9 H...

Отзывы: