


Installation Instructions
3 |
P a g e
v 1 . 0 ( 0 7 / 2 0 2 1 )
Installation Directions
•
Remove all packaging material from the product and be careful not to throw away accessories that may be hidden
within the packaging material. If assembly is required, place the luminaire on a smooth non-scratch surface.
FIGURE A
Ensure power to the circuit you are working on has been switched OFF before commencing any electrical work.
FIGURE B
1. Remove the mounting bracket from the luminaire by loosening the screws at the bottom of the luminaire.
2. Use the mounting bracket as a template to mark the screw positions on the wall.
3. Install the mounting bracket onto the wall by using appropriately sized mounting screws and anchors. Ensure the
screws and anchors used are suitable for the mounting surface and the surrounding environment.
NOTE: Take note of the directional label on the mounting bracket.
NOTE: Ensure rubber washers and flat washers are used to install the mounting bracket to maintain the IP44
rating of the luminaire.
4. Connect the mains supply wire to the luminaire. Ensure the wires are secure and no bare wires are exposed.
Mains Supply Wire
Luminaire Wire / Terminal label
Neutral
– Blue or Black
Blue or N
Live
– Brown or Red
Brown or L
NOTE: This luminaire is a Class II product and must be maintained during the wiring and installation.
5. Install the luminaire back onto the mounting bracket and secure by tightening the screws at the bottom of the luminaire.
•
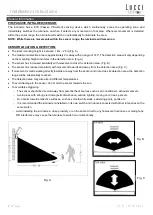
Do not adjust the LED panel up and down more than 60°; as this may damage the knuckle joint or the internal wiring.
•
Do not rotate the LED panel more than 270°; as this may damage the knuckle joint or the internal wiring
FIGURE C
After the luminaire has been fully installed, switch on the luminaire to test and enjoy your new lighting product


