1. Determine the proper height and viewing location for the
monitor taking into consideration the proper ceiling and head
clearance for the monitor being mounted. Also, condider
where the monitor pivot point location will be placed and the
final desired viewing angle for the monitor.
2. Find the location of the center of two wood studs 16"
appart using a stud finder. Using the LC200DS2 Wall Bracket
as a template, mark the location for the six Wood Lag Screws.
3. Using a 1/8" Drill bit, drill the six pilot holes 2-3/4" deep
at the marked locations on the wall.
4. Attach the Wall Bracket to the wall using the provided
Wood Lag Screws or Toggle Bolt Machine Screws. Make
sure all the screws are tight before proceeding with the
remainder of the installation.
Wood Lag Screws are provided for 16" on center wood stud
installations. If you are installing onto metal studs follow
the toggle bolt instructions on page 5 If installing into
concrete, use our WMAAB6, concrete anchor bolt kit.
See http://www.lucasey.com for details and drawings of
all available mount accessories.
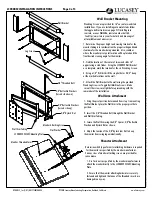
Wall Bracket Mounting
Wall Bracket
Lag Screws
Wall Arm Attachment
1. Using the pivot position determined from step 1 in mounting
the Wall Bracket place the Wall Arm in the proper pivot hole
position.
2. Insert the 3/8" Threaded Bolt through the Wall Bracket
and Wall Arm Tubing.
3. Secure the Wall Arm using the 3/8" Spacer, 3/8" Belleville
Washers and Nyclock Nut as shown.
4. Adjust the tension of the 3/8" Nylock Jam Nut to keep
the monitor from swinging unintentionally.
Wall Arm Tubing
3/8" Nylock Nut
3/8" Threaded Bolt
3/8" Belleville Washers
(Curved side up)
3/8" Belleville Washers
(Curved side down)
Determine which type of monitor attaching hardware is required
for the monitor as specified by the monitor manufacturer.
Various sizes of monitor attaching screws are provided for
convenience.
1. Use fasteners as specified by the monitor manufacturer to
attach the monitordirectly to the LC200DS2 VESA® Mounting
Plate.
2. Ensure that the monitor attaching hardware is securely
fastened and tight and that none of the threaded inserts are
damaged in any way.
LC200DS2 VESA® Mounting Plate
Monitor Threaded Insert
Monitor Attaching Screw
Flat Washer
Monitor Attachment
Pr
o
te
c
te
d
u
n
d
e
r o
n
e
o
r m
o
re
o
f t
h
e
se
U
.S
. P
a
te
n
t n
um
b
e
rs:
3,
291,
432 3,
559,
942 3,
724
,798 D
ES
.270,
689 4,
613,
109
4,
878,
645 4
,852,
842 D
ES
.309,
5624,
973,
023 5,
169,
114
5,
255,
884 5,
310,
152 5,
522
,5
76 5,
621,
61
4 R
e
.35,
677 D
ES
.398,
834 5,
826,
384 5,
941
,492 5,
964,
06
8 6,
060,
661
6,
102,
398 6,
158,
704 6,
454,
11
6B
1 6,
761,
276B
2 6,
806,
425B
1
Page 4 of 5
LC200DS2 INSTALLATION INSTRUCTIONS
LC200DS2_Ins (1/07) DOC#20070003A ©2007 Lucasey Manufacturing Corporation, Oakland, California www.lucasey.com


