


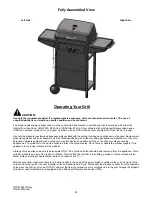


GPC2700JD-Grey
Owner’s Manual
9
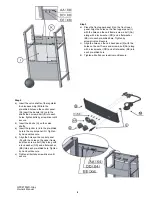
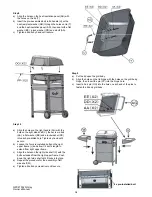
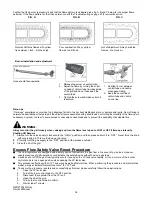
Step 5
d) Align the holes on the heating plate support (X) with
the holes on the grill body (Q), then screw a bolt
(FF) from the outside of grill body into each
pre-drilled hole. Seal with a heating insulation
washer (LL), a flat washer (KK) and a lock washer
(JJ) onto each bolt, then screw a wing nut (MM)
onto each bolt. Tighten by hand until secure.
e) Tighten all bolts by screwdriver until secure.
Step 6
a) Align the holes on body hinge (P) with the
holes on the grill body, then screw a bolt
(II), along with a heat insulation washer
(LL) into the pre-drilled hole, and then seal
with a flat washer (KK), a lock washer(JJ)
and a wing nut (MM). Tighten by hand until
secure.
b) Align the holes on grill body with the holes
on the upper frame, then screw a bolt (AA),
along with a lock washer (DD) and a flat
washer (EE) into each pre-drilled holes.
Tighten by hand until secure.
c) Tighten all bolts by screwdriver until
secure.
Step 7
a) Put the burner (R) inside the grill body. Make certain the
valve nozzle is inserted into the burner venturi tube well.
b) Align the holes on heat insulation panel (AE) with the
holes under the bottom of grill body.
c) Screw a bolt (BB), along with a lock washer (DD) and a
flat washer (GG) through the heat insulation panel, the
bottom of grill body and into the burner. Tighten by hand
until secure.
d) Connect the ignition wire with the igniter.
e) Tighten all bolts by screwdriver until secure.
f)
Hook the grease cup (S) under the grill body.