background image

Digital Video Recorder Quick Start Guide


2.2 HDD Installation 

For DVR that has not been pre-installed HDD, it requires to install HDD for storage. 

Before you start


Ensure power is disconnected.   


Prepare a factory recommended HDD, and cross screwdriver. 

2.2.1 Bracket Installation 

Bracket installation is applicable when it requires to remove the device cover, and install HDD on the internal 
bracket. 
Bracket installation is applicable when it requires to remove the device cover, and install HDD on the internal 
bracket. 

Step 1


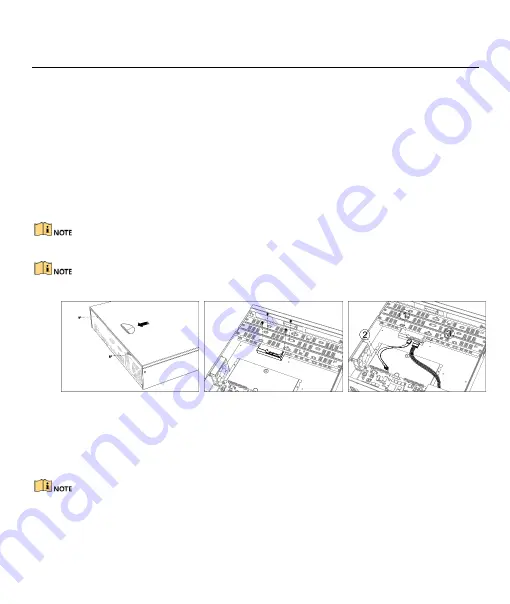
Unfasten screws on the back, and push the cover backwards to remove the cover. Refer to Figure 2-1. 

Step 2


Fix the HDD on the bracket with screws. Refer to Figure 2-2. 


Please uninstall the upper layer bracket first before installing HDD on the lower layer bracket. 

Step 3


Connect the data cable and power cable. Refer to Figure 2-3. 


You can repeat the steps above to install other HDDs. 

Step 4


Reinstall the device cover and fasten screws. 


Figure 2-1


Remove Cover 


Figure 2-2


Fix HDD 


Figure 2-3


Connect Cable 

2.2.2 Front Panel Plug-Pull Installation 

Front panel plug-pull installation is applicable when it requires to open the device front panel with key. 

Step 1


Fix mounting ears to HDD with screws. Refer to Figure 2-4. 

Step 2


Use attached key to unlock the front panel, and press buttons on both sides to open the front panel. 
Refer to Figure 2-5. 

Step 3


Insert the HDD until it is firmly fixed. Refer to Figure 2-6 


You can repeat the steps above to install other HDDs. 

Step 4


Close the front panel and lock it with key. 

Содержание Platinum Advanced LTD8304M-ET

Страница 1: ...Digital Video Recorder Quick Start Guide...

Страница 2: ...Multimedia Interface and the HDMI Logo are trademarks or registered trademarks of HDMI Licensing Administrator Inc in the United States and other countries Legal Disclaimer REGARDING TO THE PRODUCT WI...

Страница 3: ...erence 2 This device must accept any interference received including interference that may cause undesired operation EU Conformity Statement This product and if applicable the supplied accessories too...

Страница 4: ...ips Before connecting and operating your device please be advised of the following tips Ensure unit is installed in a well ventilated dust free environment Unit is designed for indoor use only Keep al...

Страница 5: ...0IC12 0 18P GB MOSO Technology Co Ltd ADS 26FSG 12 12018EPB Shenzhen Honor Electronic Co Ltd European MSA C1500IC12 0 18P DE MOSO Technology Co Ltd ADS 26FSG 12 12018EPG Shenzhen Honor Electronic Co L...

Страница 6: ...ld be within the range of 10 C to 55 C 14 F to 131 F Environmental humidity should be within the range of 10 to 90 Item Description Item Description VIDEO IN BNC interface for Turbo HD and analog vide...

Страница 7: ...s Refer to Figure 2 2 Please uninstall the upper layer bracket first before installing HDD on the lower layer bracket Step 3 Connect the data cable and power cable Refer to Figure 2 3 You can repeat t...

Страница 8: ...Figure 2 9 You can repeat the steps above to install other HDDs Step 4 Reinstall the device cover and fasten screws Figure 2 7 Remove Cover Figure 2 8 Connect Cable Figure 2 9 FixHDD 2 3 RS 485 and C...

Страница 9: ...ctivation You can also activate the device via web browser IP PORTAL or client software Step 1 Enter the same password in Create New Password and Confirm New Password STRONG PASSWORD RECOMMENDED We hi...

Страница 10: ...When you have enabled Export GUID continue to export the GUID file to the USB flash drive for the future password resetting When you have enabled Security Question Configuration continue to set the se...

Страница 11: ...ed the wrong password for 5 times the account will be locked for 60 seconds 3 5 User Logout Shutdown and Reboot You can log out of the system shut down or reboot the device Step 1 Click on the menu ba...

Страница 12: ...signal input 1 Click 2 Check the channel s to enable 5 MP long distance transmission 3 Click OK Figure 3 4 5 MP Long Distance Transmission Settings Step 4 Click Apply to save the settings 3 7 Network...

Страница 13: ...Cloud service will require internet access Please read Service Terms and Privacy Statement before enabling the service if you agree the service terms and privacy statement 4 Click OK to save the setti...

Страница 14: ...r the live view mode You can select a window and double click a camera from the list to play the video from the camera in the selected window Use the toolbar at the playing window bottom to achieve fu...

Страница 15: ...d pictures on HDD can be played back Refer to the user manual for details of each playback mode Step 1 Go to Playback Step 2 Check the channel s in the channel list Step 3 Double click a date on the c...

Страница 16: ...ed activate the device first by setting the password for the admin user account STRONG PASSWORD RECOMMENDED We highly recommend you create a strong password of your own choosing Using a minimum of 8 c...

Отзывы: